
Installation Instructions


Document No. 129-145
Installation Instructions
November 18, 2013
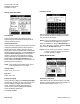
Entering Data
Lightly press or tap in the Lower Limit data entry
box. Enter the lower limit pressure. Lightly press or
tap in the Upper Limit data entry box. Enter the
upper limit pressure. The Room Type box will
change depending on the lower and upper limits. If
both entries are positive, the room will be a Positive
Room. If both are negative, the room will be a
Negative Room. If the lower limit is negative and the
upper limit is positive, the room will be a Neutral
Room.
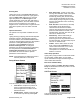
Operator Password
The operator can only enable or disable the room
alarms.
Lightly pressing (or tapping) Yes activates Operator
Password Protection. With Operator Password
Protection enabled, room Enabled/Disabled status
cannot be changed without entering a valid operator
password. Pressing No disables password
protection. Pressing Change will open the
Password Setting Screen. To change the
password, enter the present password, followed by
the new password in the New Password and
Confirm New Password entry boxes, and then
press Save. Be careful to save the operator
password for future reference.
NOTE: If the password is lost, 351 can be used to
reset the password to a new value.
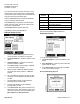
Setup Alarms Screen
From this screen you can access the following:
• Latch Alarm - Requires the pressure to
return to normal and the alarm to be
acknowledged before the alarm can be
silenced and reset.
• Audible Alarm - Enable by selecting Yes,
or use visual only alarm by selecting No.
• Door Alarm Input - Provide a “door open”
warning visual indication. When a door jamb
contact switch is used and this button is
activated by pressing Yes, the door status
“open” condition is indicated by the touch
screen display turning from green to yellow,
and door open indicated on the monitoring
(default) screen.
• Mute Time Out - Set the time (in seconds)
that the alarm can be silenced in the
Latched Alarm mode before the alarm
resumes. This assumes that the room static
pressure is still outside the normal or set
operating limits. The Mute Time Out can be
set from 0 to 9999 seconds.
• Alarm Delay - Set the Alarm Delay (in
seconds) from the time that the room
pressure goes out of the preset limits until
the alarm activates. The alarm delay may be
set from 0 to 9999 seconds.
• Volume - Set the alarm volume or sound
level. Using the Up and Down keys, the
volume can be set at level 1 to 4. Level 4
alarm volume is the loudest and
corresponds to a sound level of 85 dB at a
distance of 4 inches.
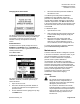
Alarm Setup Operation
Lightly press (or tap) the button to select Yes or No
for Latch Alarm, Audible Alarm, or Door Alarm
Inputs. Selected box background will change from
clear to black when selected.
Mute Time Out/Alarm Delay
Pressing (or tapping) the Mute Time Out or Alarm
Delay box activates the Data Entry screen to set the
time delay duration.
Self Test Screen
This screen identifies the Product Model Part
Number and Software Version.
Siemens Industry, Inc. Page 7 of 11