
Installation Instructions


Document No. 129-145
Installation Instructions
November 18, 2013
Changing Room Alarm Modes
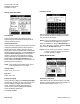
The Room Pressure Monitor can be quickly changed
from Enabled monitor and alarming to Disabled (or
unoccupied). To do this, touch the room mode
indicator at the top of the pressure monitoring
screen.
Enabled/Disabled
Use these buttons to quickly change the room to
ENABLED or DISABLED status. If DISABLED is
used there will be no alarms generated if the room is
outside pressure limits.
Press Save & Exit.
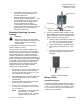
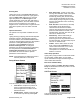
Calibration Screen
The device is designed to operate without routine
calibration. However, it should be periodically re-
zeroed as follows:
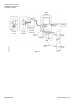
1. Open the device cover.
2. Disconnect the electro-pneumatic Header H1
so that room pressures are not applied to the
pressure sensor.
3. On the Calibration screen, lightly press (or tap)
the ZERO button.
4. Reconnect the electro-pneumatic Header H1
and close the cover.
If a sufficiently accurate pressure calibrator is
available, then span calibration can also be
performed. The calibration unit needs to be more
accurate than the RPM, depending on the facility’s
calibration requirements. The WC and FS columns
in the Product Numbers table on the first page of this
document the water column and full scale accuracy
of each RPM.
To calibrate the span:
1. Open the device cover.
2. Apply a steady full-scale pressure signal to the
+ on the header fitting and press (or tap) the
SPAN button.
3. Reconnect the room pressure tube and
calibration is complete. Calibration must be
within ±5% of original calibration for this to
occur; otherwise, an error message will occur.
To restore the original factory pressure calibration,
press the Restore Factory Calib button.
Maintenance
The Room Pressure Monitor is designed to operate
in an indoor environment, and monitor clean, dry air.
Upon final installation of the Room Pressure
Monitor, no routine maintenance is required. A
periodic check of system calibration is
recommended, as described in the Calibration
Screen section. The unit is not field serviceable and
should be returned if repair is needed (field repair
should not be attempted and may void warranty). Be
sure to include a brief description of the problem
plus any relevant application notes. Contact
Customer Service to receive a return goods
authorization number before shipping.
Cleaning
CAUTION:
Do not blow into the pressure tubing or
fittings with mouth, compressed air, or
canned air. Such actions may permanently
damage the pressure sensor.
Do not clean or wash-down the unit with
industrial cleaners or solvents. The housing
may be wiped down with soap and water or
isopropyl alcohol. The LCD may only be
cleaned with isopropyl alcohol. Do not
immerse unit.
Siemens Industry, Inc. Page 9 of 11