
Installation Instructions


Document No. 129-539
Installation Instructions
November 5, 2008
Information in this publication is based on current specifications. The company reserves the right to make changes in specifications and
models as design improvements are introduced. Other product or company names mentioned herein may be the trademarks of their
respective owners. © 2008 Siemens Industry, Inc.
Siemens Industry, Inc.
Building Technologies Division
1000 Deerfield Parkway
Buffalo Grove, IL 60089
+ 1 847-215-1000
Your feedback is important to us. If you have
comments about this document, please send them
to SBT_technical.editor.us.sbt@siemens.com
Document No. 129-539
Printed in the USA
Page 2 of 2
Drywall Mounting, Continued
4. Insert the two wall anchors in the holes.
5. Using the drywall saw, cut out the rectangle.
6. Mount the backplate on the wall making note
the up arrow "↑" on the plate with the mounting
screws. See Figure 1.
The installation is now complete and ready to accept
the TEC Semi-Flush Mount Room Temperature Sensor.
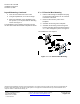
2" × 4" Electrical Box Mounting
1. Pull the cable through the backplate and plug
the terminated cable into the RJ-11 connector
in the back of the PCA.
2. Mount the PCA into the pocket of the
backplate.
3. Assemble the housing to the backplate.
4. Assemble the mounting screws through the
housing and align with the threaded tab of the
2" × 4" box and tighten in place. See Figure 2.
The installation is now complete.
Figure 2. 2" × 4" Electrical Box Mounting.