
Installation Instructions

Installation Instructions
Document No. 550-196
December 15, 2004
Terminal Equipment Controller Enclosure
Item Number 550-196-02, Rev. 010 Page 1 of 5
Product Description
A Terminal Equipment Controller enclosure is a
general-purpose metal cabinet with a removable
cover that houses an electronic output Terminal
Equipment Controller (TEC). It is available in two
versions: one to enclose a short platform TEC, and a
larger multi-purpose model designed to enclose any
of the following:
• Short platform TEC with or without actuator
• Long platform TEC
• TEC Actuator Package
• TEC Plug-in Relay Module (either direct or
remote mounted)
Product Number
540-155 Enclosure for short platform TEC
550-002 Multi-purpose enclosure for short or
long platform TEC and/or other
components listed above
Agency Approvals
• UL listed as an industrial control panel
enclosure per UL 508
• cUL certified as an industrial control panel
enclosure per Canadian standard C22.2
No.14–95
Required Tools
• 1/4-inch hex nut driver
• If supplied screws are not used: electric drill
and appropriate size bit
• Medium flat-blade screwdriver
Prerequisites
The mounting screws provided are designed for
common sheet-metal duct surfaces. Have
appropriate mounting hardware on hand if another
surface is used.
Instructions
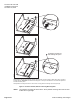
1. Remove enclosure cover.
NOTE: Enclosure 540-155 has cover screws
that should be loosened but not
removed. Enclosure 550-002 has no
cover screws; see Figure 5 for tip on
removing cover.
2. Remove appropriate knockouts.
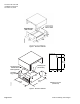
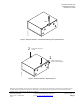
3. Align the enclosure on the mounting surface
and mark the position of the mounting holes
(Figure 1 or Figure 2).
4. Mount the enclosure with the self-tapping
screws provided or drill pilot holes and mount
with other screws.
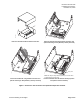
5. Do one of the following:
• If the controller will not be installed at this
time, replace the cover.
• If the controller will be installed now, then
snap it into the mounting rail and replace
enclosure cover. (For enclosure 550-002,
see Figure 4 for how to secure the mounting
rail, and Figure 6 for how to replace the
cover.)
The enclosure is installed.
Expected Installation Time
20 minutes