
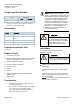
Installation Instructions


Document No. A6V10549963
Installation Instructions
January 13, 2016
Page 6 of 7 Siemens Industry, Inc.
Actuator Replacement
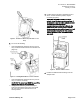
1. Remove the terminal block from the DXR and
disconnect actuator wiring.
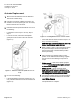
2. Using the hex wrench supplied, loosen the old
actuator’s set screw (see Figure 5 for set screw).
Remove actuator and set aside.
3. Determine the damper shaft diameter. Do one of
the following:
– If it measures 1/2-inch (12 to 14 mm), skip to
step 5.
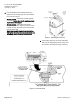
– If it is not 1/2-inch, remove the black plastic
guide piece from the hub of the new actuator
(Figure 11).
Figure 11. Guide Piece Removal (Shaft size not 1/2-
inch).
4. Do one of the following:
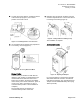
– If the shaft diameter measures 3/8-inch (8 to 10
mm), install the metal insert into the actuator hub
(Figure 13).
Figure 12. Installing Metal Insert for 3/8-inch Shafts.
– If the shaft diameter measures 5/8-inch (15 to 17
mm), no insert is necessary.
CAUTION! The metal insert MUST be used if the
damper shaft diameter equals 3/8-inch.
5. Refer to Steps 3 and 4 of the
Instructions
section
and place the damper shaft and replacement
actuator both in full counterclockwise position
before proceeding.
6. Place actuator over damper shaft in correct
position on the DXR Actuator Package. Tighten
the set screw to the following inch-pounds of
torque:
–
60 inch pounds – solid steel or plastic graphite
composite
(hollow steel shafts require an insert
to prevent shaft damage!)
–
38 inch pounds – hollow aluminum shafts
CAUTION! It is EXTREMELY IMPORTANT to
fully tighten the set screw. Loose set screws are
the leading cause of actuator control failure.
7. Connect the actuator wiring to the terminal block
and plug the terminal block back into the DXR2.
Insert Wiring Diagram
The replacement is complete.