ACVATIX™ Intelligent Valve Commissioning with ABT Go Commissioning Instructions This document describes the workflow for commissioning Intelligent Valve with ABT Go.
Contents WORKFLOW FOR COMMISSIONING INTELLIGENT VALVE WITH ABT GO ...........................................................................3 A: GETTING READY............................................................................................................................................................4 PRECONDITIONS FOR COMMISSIONING INTELLIGENT VALVE ..........................................................................................................
Workflow for Commissioning Intelligent Valve with ABT Go Configuration Configuration Network Node Cloud Configuration Commissioning Hydronic Balancing Must be done last, or the results of the self-test will be lost.
A: Getting ready Preconditions for Commissioning Intelligent Valve Set up mobile device 1. Scan QR code with your mobile device. 2. Install ABT Go application on your device. a Your mobile device is set up and ready to use. Android device Apple device https://play.google.com/store/apps/details?id=com.siem ens.abtgo&hl=en https://itunes.apple.com/app/abtgo/id1293043551?l=en&ls=1&mt=8 Power up Intelligent Valve w Intelligent Valve is installed. w Piping system is flushed.
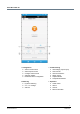
Connecting via Direct Access Point (WLAN) for the first time 1 2 Start ABT Go App [1]. Welcome screen shows your Account [2.1]. Select Menu Siemens Smart Infrastructure [2.2]. 3 4 Select Connection [3]. Switch to Device AP [4.1]. Select Connect [4.2].
5 6 7 8 Is the WLAN LED on the Intelligent Valve Controller Box [5.1] flashing blue? Activate WLAN on your mobile device. Select Intelligent Valve Controller. Where to find the SSIDS of the Intelligent Valve on the device [8]. (E.g. ASE4U10E_0000001116 [7]) Yes ⇒ Press Connect [5.2]. No ⇒ Press WLAN button on the device [5] > 0.5 s. ⇒ Press Connect [5.2].
9 10 11 12 Enter WLAN password. Accept local connection to Intelligent Valve Controller [10]. Device list may be empty. Device appears in list. Password: 12345678 Select Discover [11]. Switch to device by selecting it. Password CANNOT be changed! Return to ABT Go by pressing return button Siemens Smart Infrastructure .
13 14 Enter role [13.1]: First login requires a password change. ● ● Administrator: Full access Specialist: Balancing, control functions, configuration Password rules: Installer: Balancing ● Enter password [13.2]. ● 8 characters ● 1 number ● 1 special character ● 1 capital letter Inital password for all roles: OneBT Remember your password! Resetting the password resets ALL settings.
Main Menu ABT Go Siemens Smart Infrastructure 1 Configuration ● Select control function ● Select setpoint source ● Configure network node ● Software updates ● Read back device configuration 3 Commissioning ● Valve design (2-port/3-port) ● Control mode ● Valve characteristic ● Design values ● Output limitation ● Temperature limitation 2 Balancing ● Hydronic balancing ● Vmax / Vmin settings ● Self-test 4 Operation ● Actual values ● Alarms ● Counter ● Device information 9 A6V11422293_en--_b 2020-07-01
B: Intelligent Valve Configuration ABT Go Configuration Menu NOTICE For Administrator and Specialist only. 1 Configure device from file Load an existing backup to the device. 5 Cloud configuration Manage Cloud settings 2 Read back device configuration Save a backup, including all parameters and configuration settings. 6 Configure network node Manage BACnet and IP settings. 3 Basic configuration Define a setpoint source and the analog signals on terminals X1, X2, X3.
Configuration: Update software Preparation for Update 1. Send yourself the software file FW_EV-100.E_VMS_1.16.2251.FWH1Z. 2. Open the e-mail on your smartphone and double-tap the software file. a The e-mail program will save the file into the correct app folder. – It is possible that the automated saving is blocked by the security settings of the email program on Android phones (this is likely when using Siemens Nine Work).
Updating software 1 2 3 4 Select Configuration [1]. Select Update Software [2]. Select the software version you need from the software list. Startup time approximately 30 s. Duration approximately 8 min. Updating the software will take a few minutes. During this process, the device is out of order, the control function of the Intelligent Valve is stopped and the valve will close.
5 6 7 8 Update process will start. 2. Loading software. 1. Backing up all parameters. 3. Restoring stored parameters to updated device. All settings such as Network Node Configuration, Volume Flow Limitations, etc. remain the same as before. Operation > Info shows the upgraded software version.
Configuration: Control function and I/O configuration Control function selection and I/O configuration overview 1 Select Configuration [1]. 2 3 4 Select Setpoint source [4] to set up Intelligent Valve for one of the four control functions: Select Basic configuration [2] to Startup time approximately 30 s. ● choose between control functions; Duration approximately 3 min. ● configure I/Os with regard to signal type and range.
5 Dynamic control valve Flow temperature control ● ● Relative setpoint terminal [5.1] – ● analog setpoint at X1 – Relative setpoint remote [5.2] – Flow temperature setpoint terminal [5.3] remote setpoint via BACnet IP ● ● Heating circuit outside temp.comp. [5.5] – internal setpoint by heating curve and outside temperature sensor at X1 Differential pressure control ● Setpoint differential pressure remote [5.
Dynamic control valve: Signal selection and I/O configuration 1 2 3 4 Select Signal type selection for X1 [2]. Choose the analog signal used at terminal X1. Activate output X2 by selecting which present parameter should be displayed [4]. Passive sensors are only used for the control function “Flow temperature control”.
5 6 7 8 Select present value represented at X2. Select Signal type selection for X2 [6]. Choose the analog signal used at terminal X2. Select Apply - Restart device [8]. Device will restart after applying configuration changes.
9 10 11 Device is restarting. Device has restarted. ABT Go returns to Configuration menu. Duration approximately 30 s. Confirm with OK [10].
Flow temperature control: Signal selection and I/O configuration 1 “Flow temperature control” needs an external setpoint from a Building Automation Controller either via terminal X1, or via BACnet. Intelligent Valve provides the universal input at terminal X3 for flow temperature measuring and runs the PI control loop. Siemens Smart Infrastructure 2 Select Signal type selection for X1 [2].
3 Choose between: ● 0...10 V ● 2...10 V ● 4...20 mA represented at X1 to determine the setpoint. 4 5 6 Select Signal type selection for X3 [4] – this is the flow temperature sensor. Choose the sensor element used at terminal X3. Select Apply - Restart device [6]. Default is LG-Ni1000, so e.g. a QAD22 or QAE2120..; if a Pt1000 sensor is used, that can be indicated here. The signal is always mapped to 0...
7 8 9 Device is restarting. Device has restarted. ABT Go returns to Configuration menu. Duration approximately 30 s. Confirm with OK [8].
Heating circuit outside temperature-dependent: Signal selection and I/O configuration 1 “Heating circuit outside temperature-dependent” provides flow temperature control, e.g. for a floor heating circuit. Flow temperature setpoint is calculated by a heating curve based on outside temperature and internal scheduler. 22 Siemens Smart Infrastructure 2 Select Signal type selection for X1 [2].
3 4 5 6 Choose the sensor element used at terminal X1, e.g. LG-Ni1000 for QAC22. Select Signal type selection for X3 [4]. Choose the sensor element used at terminal X3, e.g. LG-Ni1000 for QAD22. Select Apply – Restart device [6]. Siemens Smart Infrastructure Device will restart after applying configuration changes.
7 8 9 Device is restarting. Device has restarted. ABT Go returns to Configuration menu. Duration approximately 30 s. Confirm with OK [8].
Differential pressure control: Signal selection and I/O configuration 1 Siemens Smart Infrastructure 2 3 4 Selection for X3 is now pre-selected [2]… …and it cannot be changed. Select Signal type selection for X3 [4] to define the differential pressure sensor connected to X3.
5 6 7 8 Choose either Select Apply – Restart device [6]. Device is restarting. Device has restarted. ● one of the Siemens sensors with predefined measuring range; or Device will restart after applying configuration changes. Duration approximately 30 s. Confirm with OK [8].
9 ABT Go returns to Configuration menu.
Configuration: Network node 1 2 3 Select Configuration [1]. Select Configure network node [2]. Select Device name [3] to change it.
4 5 Select Device instance number [4] to enter BACnet device instance number. Select Ethernet settings to adjust them: Siemens Smart Infrastructure ● [5.1]: Enable (IP) DHCP ● [5.2]: IP address ● [5.3]: IP subnet mask ● [5.
6 Integration into the Cloud requires setting up the DNS information. Select DNS servers [6]. 7 8 Set the DNS information = IP address. Configuring the network node requires a device restart. After configuration, ABT Go returns to device list and discovery is necessary [8]. Startup time approximately 45 s. During the restart, the device will close.
Configuration: Cloud configuration Get connected 1 2 3 4 Select Configuration [1]. Select Cloud configuration [2]. Select Enable connectivity [3] to change it. Expand the pop-up menu by clicking on the arrow [4].
5 6 7 8 Choose Yes [5] to enable cloud connectivity. Scroll down to Command [6] and tap twice to expand the pop-up menu. Select Activate [7] to establish a connection. Tapping Back [8] will cause the device to restart and the cloud connection will be activated.
C: Intelligent Valve Commissioning ABT Go Commissioning Menu 1 Balancing ● Hydronic balancing ● Vmax/Vmin, lim settings ● Self-test ● Forced Vmax 4 Backup mode Defines the device behavior in case of communication losses or setpoint source failure 2 Valve ● Valve design ● Control mode ● Valve characteristic 5 Demonstration mode Allows running the valve without water flow for training purposes 3 Limitation ● Design values ● Output limitation ● Temperature limitation Siemens Smart Infrastructure 33 A6V1
Commissioning: Valve design This step is necessary when operating 3-port valves EXG4U10E.. or EXF4U20E.. It activates the required control parameters for 3-port configurations. 1 2 3 4 Select Commissioning [1]. Select Valve [2]. Select Valve design [3]. Select 3-port [4] when setting up control mode for EXG4U10E.. or EXF4U20E..
5 Return and check whether Valve type [5] has changed from EVG4U10E../EVF4U20E.. to EXG4U10E.. or EXF4U20E..
Commissioning: Dynamic control valve Valve control mode and characteristic 1 2 3 4 Select Commissioning [1]. Select Valve [2]. Select Control mode [3].
5 6 Select Compensation mode [5]. Choose valve characteristic: Siemens Smart Infrastructure 7 ● ● Volume flow linear [6.1] Volume flow exponential [6.2] Equal percentage with ngl 1…4 ● Heat exchanger characteristic [6.3] Compensation of heat exchanger characteristic Select Compensation volume flow coefficient [7].
8 Set exponential coefficient: ● Compensation coefficent 2.2 [8.5] ● Use slider [8.3] for initial rough adjustment. ● Compensation coefficent 3 [8.6] ● Compensation coefficent 3.9 [8.7] ● Use + [8.4] / - [8.1] for final fine adjustment. ● Or enter value manually [8.2]. 38 Siemens Smart Infrastructure 9 10 Select Compensation heat exchanger characteristic [9] Use slider and +/- to set a-value (heat exchanger characteristic).
Design values for temperature and output 1 2 3 4 Select Commissioning [1]. Select Limitation [2]. Select Design primary flow temperature [3] to set design temperature flow. ● Use slider and +/- to set design temperature flow; ● Or enter value manually.
5 6 Select Design primary return temperature [5] to set design temperature return. ● Use slider and +/- to set design temperature return; ● Or enter value manually. 40 Siemens Smart Infrastructure 7 8 Select Relative maximum power [7] to activate output limitation. The limitation is set in relation [%] to the design output. Design output = c * Vmax * (TFlow.design – TRet.design) ● Use slider and +/- to set relative maximum power; ● Or enter value manually.
9 10 Select Maximum power [9] to activate output limitation. The limitation is set as an absolute value [kW]. To activate return temperature limitation, first Design output = c * Vmax * (TFlow.design – TRet.design) activate limitation. Select Enable return temperature limitation ● Use slider and +/- to set absolute [11]. maximum power; ● Siemens Smart Infrastructure 11 12 Select Yes [12] to activate temperature limitation. Or enter value manually.
13 14 Select Return temperature setpoint for heating [13.1]. ● Use slider and +/- to set limitation values; ● Or enter value manually.. When finished, select Return temperature setpoint for cooling [13.2]. 42 Siemens Smart Infrastructure 15 16 Select GainTRtCtr [15] to set control parameters for limitation. ● Use slider and +/- to set parameters; ● Or enter value manually.
17 18 Select TnTRtCtr [17] to set control parameters for limitation. ● Use slider and +/- to set parameters; ● Or enter value manually. ● 120 s = slow reaction ● 30 s = fast reaction Siemens Smart Infrastructure 19 20 Select Enable flow/return temp.diff.limitation [19] to activate ΔT limitation (limitation of difference between flow/return temperature). Select Yes [20] to activate ΔT limitation.
21 22 Select Setpoint flow/return temp.diff.limitation [21]. ● Use slider and +/- to set limitation values; ● Or enter value manually. 44 Siemens Smart Infrastructure 23 24 Select Gain for flow/return temp.difference [23] to set control parameters for limitation. ● Use slider and +/- to set parameters; ● Or enter value manually.
25 26 Select Tn for flow/return temp.difference [25] to set control parameters for limitation. ● Use slider and +/- to set parameters; ● Or enter value manually.
Commissioning: Flow temperature control Valve mounting position and present values 1 2 3 4 Select Commissioning [1]. Select Valve [2]. Select Valve mounting mode [3] – to set whether the flow sensor is mounted in the flow or return. This is the only relevant setting. Choose the mounting position of the flow sensor [4]: The other parameters are for information only and do not influence the flow temperature control loop.
Design values and temperature limitation 1 2 Select Commissioning [1]. Select Limitation [2] to set design temperature Select Design primary flow temperature [3.1] ● (recommended) as well as return temperature and Design primary return temperature [3.2] limitations for the circuit. to set design temperature flow and return. ● Siemens Smart Infrastructure 3 4 Use slider and +/- to set design temperature flow; Or enter value manually.
5 6 7 Select Enable return temperature limitation [5] to activate it. Select Yes [6] to enable temperature limitation. Design temperatures 6 °C [7.1] /12 °C [7.2] show this example is a cooling loop: ● 48 Siemens Smart Infrastructure 8 Select Return temperature setpoint for cooling [7.3]. ● Use slider and +/- to return temperature limitation for cooling; ● Or enter value manually.
9 10 11 12 Gain for return temperature control [9] and Tn for return temperature control may be kept, unless there are very hard requirements to keep the limit. Select Enable flow/return temp.diff.limitation [10] to activate ΔT limitation (limitation of difference between flow/return temperature). Select Yes [11] to activate ΔT limitation. Select Setpoint flow/return temp.diff.limitation [12]. ● If this is the case, it may be necessary to increase Gain and reduce Tn.
13 ● Use slider and +/- to set limitation values; ● Or enter value manually. 50 Siemens Smart Infrastructure 14 15 16 Select Gain for flow/return temp.difference [14] to set control parameters for limitation. ● Use slider and +/- to set parameters; ● Or enter value manually. Select Tn for flow/return temp.difference [16] to set control parameters for limitation.
17 18 ● Use slider and +/- to set parameters; All data are set. ● Or enter value manually. If required, select Backup mode [18] to define behavior in case of missing setpoint.
Commissioning: Heating circuit outside temperature-dependent For relevant settings for heating circuit, see Operation: Heating circuit (outside temperaturedependent) [➙ 73]. Valve mounting position and present values 1 2 3 4 Select Commissioning [1]. Select Valve [2]. Select Valve mounting mode [3] – this is the only relevant setting. Here, set whether the flow sensor is mounted in the flow or return. The other parameters are for information only and do not influence the flow temperature control loop.
Design values and temperature limitation 1 2 Select Commissioning [1]. Select Limitation [2] to set design temperature Select Design primary flow temperature [3.1] ● (recommended) as well as return temperature and Design primary return temperature [3.2] limitations for the circuit. to set design temperature flow and return. ● Siemens Smart Infrastructure 3 4 Use slider and +/- to set design temperature flow; Or enter value manually.
5 6 7 Select Enable return temperature limitation [5] to activate it. Select Yes [6] to enable temperature limitation. Design temperatures 6 °C [7.1] /12 °C [7.2] show this example is a cooling loop: ● 54 Siemens Smart Infrastructure 8 Select Return temperature setpoint for cooling [7.3]. ● Use slider and +/- to set return temperature limitation value for cooling; ● Or enter value manually.
9 10 11 12 Gain for return temperature control [9] and Tn for return temperature control may be kept, unless there are very hard requirements to keep the limit. ● If this is the case, it may be necessary to increase Gain and reduce Tn. Select Enable flow/return temp.diff.limitation [10] to activate ΔT limitation (limitation of difference between flow/return temperature). Select Yes [11] to activate ΔT limitation. Select Setpoint flow/return temp.diff.limitation [12].
13 ● Use slider and +/- to set limitation values; ● Or enter value manually. 56 Siemens Smart Infrastructure 14 15 16 Select Gain for flow/return temp.difference [14] to set control parameters for limitation. ● Use slider and +/- to set parameters; ● Or enter value manually. Select Tn for flow/return temp.difference [16] to set control parameters for limitation.
17 18 ● Use slider and +/- to set parameters; All data are set. ● Or enter value manually. If required, select Backup mode [18] to define behavior in case of missing setpoint.
Commissioning: Differential pressure control Valve control mode and characteristic For Differential pressure control, no settings are needed in section Valve for control mode or characteristic. Limitation for differential pressure setpoint 1 2 3 4 Select Commissioning [1]. Select Limitation [2]. Select Setpoint differential pressure [3] to set the local setpoint for Differential pressure control. ● Use slider and +/- to set differential pressure setpoint; ● Or enter value manually.
5 6 7 New local septoint for Differential pressure control [5] is displayed. Select Valve [6] to set the range values for a Scroll down to Process value 2 for Diff. freely configurable differential pressure sensor. Primary [7]. 8 ● Use slider and +/- to set measuring range to the sensor data; ● Or enter value manually. Limitation of Maximum power and Return temperature limitation is NOT available for Differential pressure control.
Commissioning: Backup Mode Use Backup mode in order to define the device’s behavior if no external setpoint is available. 1 2 3 4 Select Commissioning [1]. Select Backup mode [2]. Select Backup mode [3] to define a specific setpoint during communication loss or cable breakage for each control function. Choose required behavior: ● None = flow temperature setpoint remains as long as power is supplied; after a power fail setpoint = 0 °C.
5 6 7 Select Backup mode for flow temperature control [5] to set the required value. ● Use slider and +/- to set relative maximum With these settings, if no external setpoint is power; available, the device will go to the internal setpoint of 8 °C [7.2] after 900 s [7.1]. Or enter value manually. ● This example is a cooling loop: an internal setpoint of 8 °C is realistic.
Commissioning: Demonstration Mode NOTICE For customer demonstration or exhibitions, the device provides a demonstration mode. It can only be activated if no flow sensor is connected. 1 2 3 Select Commissioning [1]. Select Demonstration mode [2]. Select Enable demonstration mode [3].
4 5 Select Nominal pipe size demonstration mode [4] to set appropriate line size for demonstration. Select Gain for diff.pressure primary demonstration mode [5] to adjust the simulated differential pressure between flow and return in case self test does not show a valid result.
D: Intelligent Valve Balancing Hydronic Balancing performed by Installer 1 2 3 4 Select Balancing [1]. Select [2] to change unit. Choose desired unit. Set Maximum volume flow. Select slider [4.1] to activate it and use it for initial rough adjustment; use +/- for fine adjustment (+/- changes the value of the selected slider). For differential pressure control mode, Minimum Flow is not available. Self-test [4.2] can now be performed.
5 6 Self-test [5] can now be started. Self-test is complete. Conditions: Duration: approximately 3 x runtime. ● Primary pump must be running. ● All consumers must be fully open. ● Secondary pump must be operational.
7 7.1 Task successful 7.2 Task failed 7.3 Task not started 7.4 Task running Example 1: Example 2: Example 3.1: Example 3.1: Vmax was not reached. Vmax was reached. V100 was not reached. Self-test successfully completed. ⇒ Self-test will fail. ⇒ Self-test will probably be completed successfully. ⇒ Not a failure criterion - Self-test will probably Select Create report [7.5] to document the be completed successfully. results.
8 9 10 A Self-test report can be generated. Report is generated as PDF document. Current Self-test report is listed at the bottom of all reports. Switching to document library is possible [9].
Hydronic Balancing: Activate Minimum Volume Flow Limitation 1 2 3 4 Status of Self-test is displayed in the main menu at Balancing [1]. Select Enable Minimum volume flow [2]. Select Yes [3] to activate Minimum volume flow limitation. Select slider [4.1] to activate it and use it for initial rough adjustment; use +/- for fine adjustment (+/- changes the value of the selected slider). Select Force maximum volume flow [4.2] to jump to starting mode. Select Balancing to activate Minimum flow limitation.
5 6 Select Start 'Force maximum volume flow' [5] set the valve to Vmax for 10 min. Select Stop 'Force maximum volume flow' [6] to return to automatic mode.
E: Intelligent Valve Operation ABT Go Operation Menu 1 Info ● Software version ● Model name 2 Diagnostics Counter for energy and flow 3 Alarm Current main fault and status of all faults 4 Heating circuit Settings for control function “Outside temperature-dependent flow temperature controller” 5 Detail datapoints Present values and setpoints: ● Flow ● Output ● Temperatures 70 Siemens Smart Infrastructure A6V11422293_en--_b 2020-07-01
Operation: Display present values 1 Select Operation [1] to view current operational values. Siemens Smart Infrastructure 2 Present values and setpoints are displayed. Select Info [2] to view information about the device.
3 Select Alarm [3] to view the status of faults. 72 Siemens Smart Infrastructure 4 ● Main fault [3.1] = highest priority ● Individual faults – Inactive [3.2] = there is no fault – Active = there is a present fault Select Diagnostics [4] to view counters for energy and flow.
Operation: Heating circuit (outside temperature-dependent) 1 2 3 Select Operation [1]. Select Heating circuit [2]. ● ● Siemens Smart Infrastructure Present values [3.1] ● Settings for heating curve [3.
5 Example: settings for floor heating system in St. Moritz, Switzerland ● Design outside temperature: -18 °C ● Flow temperature setpoint dor design outside temperature: 35 °C ● Outside temperature high: 12 °C ● Flow temperature setpoint for outside temperature high: 22 °C ● Radiator exponent for floor heating: 1.
Setting the scheduler 1 2 3 4 Select Room heating [1]. Select Room operating mode scheduler [2]. Select the day to re-schedule, e.g. Thursday [3]. Example Siemens Smart Infrastructure Standard settings: For floor heating, rooms need to switch to Comfort earlier: 04:00. ● Switch to Comfort at 07:00. Select slider [4] and shift to desired time. ● Switch to Economy at 22:00.
5 6 7 8 Example Example Example Example All residents are out between 08:00 and 16:00 – add scheduled operating mode switch at 08:00 by selecting 08:00 [5]. Choose operating mode by selecting from dropdown menu, e.g. Economy [6]: Remember to switch on again, and take into account time shift for floor heating. Floor heating having a slow cool-down can allow an earlier switch to Economy, e.g. at 20:00.
9 10 To copy a schedule, select Copy [9]. ● Choose the days the schedule should be copied to, e.g. all weekdays [10.1]; ● Select Paste [10.2]. Siemens Smart Infrastructure 11 The newly set schedule is now displayed for all chosen days.
Room temperature settings: Setpoints and optimization 1 2 To set the room temperature level for the operating modes: To set the room heating optimization: ● 3 – Comfort [1.1] – Pre-comfort [1.2] To set the room temperature level for the operating modes: Enable/disable quick setback [1.4] Heating setpoints: Enable the “Einschaltoptimierung” to allow ● maximum comfort – EnOscFnct [1.5]; – Comfort [1.1] And parametrize these functions by defining: – Pre-comfort [1.2] – Economy [1.
Issued by Siemens Switzerland Ltd Smart Infrastructure Global Headquarters Theilerstrasse 1a CH-6300 Zug Tel. +41 58 724 2424 www.siemens.com/buildingtechnologies Siemens Smart Infrastructure Document ID A6V11422293_en--_b Edition 2020-07-01 © Siemens Switzerland Ltd, 2019 Technical specifications and availability subject to change without notice.