Building Operator Engineering Guide A6V11881627_en_k 2021-03-31 Smart Infrastructure
Edition notice Edition notice Technical specifications and availability subject to change without notice. This document may not be reproduced, disseminated to third parties or processed and its contents may not be used or disclosed without express permission. Noncompliance shall result in compensation for damages. All rights, including those resulting from a successful patent application and registration of a utility model or design patent, are reserved.
Cybersecurity disclaimer Cybersecurity disclaimer Siemens provides a portfolio of products, solutions, systems and services that includes security functions that support the secure operation of plants, systems, machines and networks. In the field of Building Technologies, this includes building automation and control, fire safety, security management as well as physical security systems.
Table of Contents Table of Contents ....................................................................................................4 1 Building Operator Engineering Guide.........................................................5 1.1 Overview..........................................................................................................5 1.2 Setting Up Connect Device and Building Operator .........................................8 1.1.1 1.3 1.4 1.5 1.2.1 Engineering Checklist ......
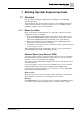
Building Operator Engineering Guide 1 Overview 1 Building Operator Engineering Guide 1.1 Overview This document is intended for Administrators and Engineers in the Building Operator application. The instructions in this document will cover how to connect building automation controls, that reside within a corporate IT network on site, to Building Operator application, using the Connect device gateway. 1.1.
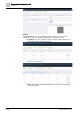
1 Building Operator Engineering Guide Overview Network In the Network tab, you can configure IP settings, firewall, route and proxy settings. There are four sub-tabs to individually complete these tasks: – IP Settings: You can configure local area network (LAN) settings here or add new IP setting in the fields provided. 6 | 69 – Firewall: Here you can add or remove different inbound and outbound rules for Connect devices. – Route: Don’t change anything in the Route tab.
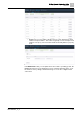
Building Operator Engineering Guide 1 Overview – Proxy: Here you can enable or disable a proxy server and define its IPv4 address and port numbers. This feature is typically used for enterprise-level networks. The proxy server must have DNS functionality built in to properly work. Maintenance In the Maintenance tab, you can update the Connect device operating system, the Building Operator Discovery application version, restart the gateway device, reset the device to factory settings, and download logs.
1 Building Operator Engineering Guide Setting Up Connect Device and Building Operator Device operation Description Restart This action will reboot the device. Connection to the cloud will be lost during reboot process. Factory reset This action will delete all data and reset the gateway to its original settings and state. Device will have to be set up again to be operational. Reset configuration This action will delete all user applications and user data, but the device will remain operational.
Building Operator Engineering Guide 1 Setting Up Connect Device and Building Operator ● ● ● You have unboxed a Connect device and turned it on. You have plugged this device into a private network that has Internet access. You have read the Connect device Quick Install Guide found in the Help tab of the Building Operator Settings. For additional security, always close remote web access connections and log out from Building Operator. Closing your browser does not guarantee your account safety. 1.2.
1 Building Operator Engineering Guide Setting Up Connect Device and Building Operator using Asset Manager. ConnectX300 ☐ Configure Connect Device Firewall After the device is activated and the distributions are installed, you can configure the firewall rules of the Connect device. In Asset Manager, open the remote web access to connect to the Connect X300 UI to configure the firewall rules. ☐ Enabling remote web Proceed to the tunnel access in Connect device page to configure the UI tunnel endpoints e.
1 Building Operator Engineering Guide Setting Up Connect Device and Building Operator ➀ Protective earth The protective earth connection must be connected on the installation side with the building grounding system (PE). Min. diameter: 2.5 mm2 / 14 AWG) ➁ ➂ ➃ ➄ ➅ ➆ ➇ ➈ Pluggable Terminal Block for operating voltage DC 24 V = ON/OFF Switch, OFF when pressing USB 2.0, 3.
1 Building Operator Engineering Guide Setting Up Connect Device and Building Operator 1. In the Connect device landing page, select Accept to verify you’ve acknowledged the end user license agreement. 2. Next, enter the following credentials in the fields provided: – – Username: admin (case-sensitive) Password: admin (case-sensitive) 3. Next, complete the prompt to change the default password. This password is specific to the Connect device you are logged in to.
1 Building Operator Engineering Guide Setting Up Connect Device and Building Operator – case, connect the LAN cable to your building automation network, and your WAN to the Internet. Single network mode: Select this option if your building automation network, and the Internet, use the same physical network connection. In this case, the use the WAN for both the Internet and building automation. CAUTION This selection is not reversible.
1 Building Operator Engineering Guide Setting Up Connect Device and Building Operator 3. (Optional) If you need to configure a proxy setting for an alternative WAN IP address, do so by clicking the Network tab, then Proxy. 4. (Optional) Toggle on the proxy server button. Then type to enter the appropriate values in the spaces provided. 5. In the Operation tab, copy the activation key. Proceed to Asset Manager to complete activating your gateway. Device cloud connection may appear as offline.
Building Operator Engineering Guide 1 Setting Up Connect Device and Building Operator 4. Directly connect your PC to the LAN port via 169.254.169.254 5. Check with the IT administrator if there is a proxy in the network – enable the proxy settings and set a fixed IP address on the WAN port. 1.2.4 Adding Connect devices Before using Building Operator, you need to create a site, add and activate your device, and update your device. In Building Operator ◈ Go to Switch Apps > Asset Manager.
1 Building Operator Engineering Guide Setting Up Connect Device and Building Operator The Address field will automatically suggest addresses. Selecting a suggested address will automatically populate the Time Zone field. If Google API is unavailable, you will need to enter in an address and time zone manually. Adding and activating device After adding a site, in Asset Manager: 1. Go to Sites. 2. Select a site where you want to add your device. 3. Click Add. 4.
Building Operator Engineering Guide 1 Setting Up Connect Device and Building Operator Assigning distributions After adding and activating the device, you will need to assign the distribution to enable Building Operator Discovery. To assign a distribution to the device, follow the steps below. Assigning a distribution set will only need to be done once. The assign distribution pop-up will only appear after adding a device in a site.
1 Building Operator Engineering Guide Setting Up Connect Device and Building Operator 5. Confirm with Update. 6. Navigate to the Services tab and find the status of your application. Update Operating System To update the operating system of the Connect device, follow the steps below. In Asset Manager: 1. Go to Sites. 2. Select the site with the Connect X300 device. 3. Select the device > Updates. 4. Click Update 5. Confirm with Update.
Building Operator Engineering Guide 1 Setting Up Connect Device and Building Operator 1.2.5 Verifying the Registration State and Software Updates (Optional) In Connect device: 1. To check the status of all applications on the Connect device, select the Operation tab in the top navigation bar. 2. Select the caret icon to expand the Applications menu. Ensure all applications have green dots next to their names.
1 Building Operator Engineering Guide Setting Up Connect Device and Building Operator 1. Select the Network tab. Then, select the Firewall header. 2.
1 Building Operator Engineering Guide Adding Data Points Using Building Operator Discovery 1. Under Network, in the Tunnel tab click Edit. 2. Click Add. 3. Enter the Name, Description, and URL. 4. Click Save. 1.3 Adding Data Points Using Building Operator Discovery Building Operator Discovery is an engineering tool embedded on Connect device to configure and provision data points for Building Operator.
1 Building Operator Engineering Guide Adding Data Points Using Building Operator Discovery 1.3.1 Logging in to Building Operator Discovery Remotely You can log in to Building Operator Discovery remotely, or locally. The instructions below outline how to log in remotely. To log in locally, use a local port or network cable. The tunnel will close the session after one hour, even if you are actively working. Gateway software must be version 4.0.
Building Operator Engineering Guide 1 Adding Data Points Using Building Operator Discovery 6. (Recommended) After you first log in to Building Operator Discovery, you may want to create a more secure password. Find and select the username dropdown in the top-right corner, then select Change Password. Complete the fields from the pop-up and select Apply. 7. Once you’ve created a more secure password, find and select Open Project. 8. A new tab will appear.
1 Building Operator Engineering Guide Adding Data Points Using Building Operator Discovery If your remote connection is interrupted during this session, select Disconnect in Building Operator. Re-start the Remote Web Access process again. 1.3.2 Organizing your device view This section will cover how to create a device hierarchy in Building Operator Discovery, and the recommended way to organize your equipment. Prior to organizing your equipment, you will have to add a site in the Equip Tree.
Building Operator Engineering Guide 1 Adding Data Points Using Building Operator Discovery Before you organize the device view, first change the time zone in My Site to the time zone your device resides in. To do so: 1. IMPORTANT! Add or change the country and time zone. This is the time zone you set for points – and their associated historical data – in Building Operator. The field is called “tz.” Once you’ve set the site to the right time zone, you can create a new floor object.
1 Building Operator Engineering Guide Adding Data Points Using Building Operator Discovery 2. Select the Site name. 3. Find and select the (+) icon at the bottom of the navigation tree. Select Add Floor. 4. In the pop-up, type to in the Floor Name field and give your site a unique name. 5. Select Create when finished. 6. Close the property editor to proceed. The floor structure will not appear in Building Operator.
1 Building Operator Engineering Guide Adding Data Points Using Building Operator Discovery 1.3.3 Discovering a BACnet Device After you've added a floor object, you can now discover a device. In doing so, you can add that device to the Building Operator Discovery project and sync it with Building Operator. Complete the instructions below to discover a BACnet device. Discover a BACnet Device 1. Find and expand Connectors in the Navigation tree.
1 Building Operator Engineering Guide Adding Data Points Using Building Operator Discovery 5. (Optional) Select Add. 6. Select Discover beneath the device type. At the bottom of Added Devices (there will be no list results if you haven’t added anything yet), select Discover. 7. Find and select the appropriate device(s) in the list results. 8. Select + Add, and then OK in the confirmation pop-up. 9. (Optional) Before you add a device, select Discovery Settings.
1 Building Operator Engineering Guide Adding Data Points Using Building Operator Discovery 10. If you can’t discover all BACnet devices, increase the timeout setting using the up and down arrows in the field provided. We recommend a 30-second timeout value. 11. (Optional) Select Apply to save changes. 12. Locate the appropriate device, select its name to highlight and select Add. You can also add multiple devices at once.
1 Building Operator Engineering Guide Adding Data Points Using Building Operator Discovery ● ● ● Begin column "A' data with lowercase letters. Add a ping register so that Building Operator Discovery can monitor the controller to make sure it’s active. Manually upload this file to Building Operator Discovery. Configuration Information The following information is required to help configure your .CSV file. ● name (required): Name of the register.
1 Building Operator Engineering Guide Adding Data Points Using Building Operator Discovery Uploading a .CSV File to Building Operator Discovery Once you’ve configured the file, it’s time to upload it to Building Operator Discovery. 1. Select and expand the Modbus drop-down in the Navigation tree. 2. Select Register Maps. 3. Select Upload, below the Modbus Register Maps list. You won’t see any results if you haven’t uploaded a Modbus file yet. 4. Select Choose File.
1 Building Operator Engineering Guide Adding Data Points Using Building Operator Discovery ● Existing Register Map: If you've already configured a modbus connector, this property will let you choose from a list of available registers or to create a new one with ModbusRegMapUri. ● ModbusRegMapUri: Specify the name of the register map to link with this connector. Replace "xxx" with whatever the name of the register map is. ● Uri: To specify the Uri, enter the host, protocol, and port (default 502).
1 Building Operator Engineering Guide Adding Data Points Using Building Operator Discovery Installing the latest nHaystack module Before using a Niagara device with Building Operator Discovery, you will need to install nHaystack jar modules to your device. To install these modules, follow the steps below. In the Niagara workbench: 1. Download the latest nHaystack.jar module(s) for your Niagara device. – – For Niagara AX, download here: https://stackhub.
1 Building Operator Engineering Guide Adding Data Points Using Building Operator Discovery 4. Restart your station. 5.
Building Operator Engineering Guide 1 Adding Data Points Using Building Operator Discovery To test the connection of your device, type /haystack/about into your browser. Adding your Niagara device using a nHaystack connector After installing the nHaystack modules, you can now add your device to Building Operator Discovery. To add a Niagara Framework device via nHaystack connector, follow the steps below. In Building Operator Discovery: 1. Expand Connectors and select Haystack. 2.
1 Building Operator Engineering Guide Adding Data Points Using Building Operator Discovery – – – – Haystack Slot (optional): Only points that have haystack slots will be imported into DB Builder. This is applicable if you are dragging in data through the Site folder under haystack connector. Equip Filter (optional): If haystack slot = YES, then filter equipment can be imported. Point Filter (optional): If haystack slot = YES, then filter points can be imported.
1 Building Operator Engineering Guide Adding Data Points Using Building Operator Discovery 1.3.6 Adding Equipment and Data Points Once you’ve added a floor object, you can then add equipment objects to the hierarchy. These objects are discoverable through object discovery in Building Operator Discovery. The Equipment hierarchy level, although optional, provides flexibility to structure the device level in Building Operator.
1 Building Operator Engineering Guide Adding Data Points Using Building Operator Discovery 4. In the pop-up, type to enter the equipment name. This name will appear in Building Operator as the Device Name. We strongly recommend you label the equipment as the same name as it is on the BACnet network. 5. Select Create. Immediately after an equipment has been added in the Building Operator Discovery, it is also populated in Building Operator. To see this reflected in Building Operator: 1.
Building Operator Engineering Guide 1 Adding Data Points Using Building Operator Discovery Adding Data Points Similar to discovering equipment, you can discover points to add to the equipment you just discovered. To discover points for specific equipment in Building Operator Discovery, complete the following instructions: 1. In the floor object, find and select the right device. Three icons appear once you hover over the device name.
1 Building Operator Engineering Guide Adding Data Points Using Building Operator Discovery 5. Once loaded, find and select (or multiselect) points you want to add to the device. Drag and drop the point(s) on the equipment name in the Equip Tree on your site to add the points or select + Add. 6. Select Apply in the confirmation dialog to add the point. 7. Select Cancel in the Batch Record editor: [Your Panel Name]. This functionality is not fully supported yet. 8.
1 Building Operator Engineering Guide Adding Data Points Using Building Operator Discovery 3. Select Delete [Point or Equipment Name]. 4. Select Delete in the ensuing pop-up to confirm. 5. Go to Building Operator and see that the point was successfully deleted from that device. 1.3.8 Adding Tags to Data Points Now that you have added points to the device, you can configure and tag these points to meet specific criteria.
1 Building Operator Engineering Guide Adding Data Points Using Building Operator Discovery 1. In the Marker Tags section, select the plus icon (+) to expand the tags menu. 2. Enter or scroll to search for the tag(s) you want to attach to this point. 3. Select the check mark icon to save these changes. Select Save to confirm the changes. See the Appendix for a list of applicable Haystack tags. Property Tags Currently, Building Operator will not display these tags.
1 Building Operator Engineering Guide Adding Data Points Using Building Operator Discovery 4. Once you’ve selected the right property tag type, type to enter the tag-name or manually select the tag-name field to find the right tag name. 5. Then, set the appropriate value for the tag using the field provided. 6. Select the check mark to confirm the change, then select Save to save the changes.
1 Building Operator Engineering Guide Adding Data Points Using Building Operator Discovery 5. (Required) Select to select the appropriate tag in the list results. This populated list based on the object you selected in the Available Equip Tree. 6. (Required) Type to enter a filter query in the space provided. The tags you selected above are impacted by the search criteria in the filter field.
Building Operator Engineering Guide 1 Adding Data Points Using Building Operator Discovery 10. (Optional) Edit the filter conditions, including Boolean search criteria (and vs. or), conditions, and tags. Select OK to proceed, and then Confirm in the ensuing window. Here you’ll see how the search filter will display. You can also test its validity by clicking Test.
1 Building Operator Engineering Guide Adding Data Points Using Building Operator Discovery 11. When the two required fields have been filled out, select Apply. Meter Tags Meter tags will allow you to view energy consumption values as bar charts in Building Operator. The meter tag should be applied to points that are connected to accumulator style points.
Building Operator Engineering Guide 1 Adding Data Points Using Building Operator Discovery 3. Select Save to confirm the changes. See the Appendix for a list of applicable Haystack tags. 1.3.9 Determining BACnet Write Priority for Points BACnet priorities are vary for different vendors.
1 Building Operator Engineering Guide Adding Data Points Using Building Operator Discovery 4. Select Save at the bottom of the editor to save your changes. 1.3.10 Restarting Connect Device to Update Data Point Information If you want to update data point information or change it for any reason, you’re able to do so in Building Operator Discovery.
1 Building Operator Engineering Guide Adding Data Points Using Building Operator Discovery 6. Select Restart in the confirmation pop-up. NOTE: You will likely lose and re-gain cloud connectivity during this process. 7. Log back into Building Operator Discovery to confirm the changes reflected after the Connect device restart. 8. Refresh the Site page in Building Operator if the revisions don’t automatically populate. 1.3.
1 Building Operator Engineering Guide Adding Data Points Using Building Operator Discovery 4. Fill in a descriptive name for the record library and click Save. 5. Select an equip in the Equip Tree and then select Gear Icon → Create Batch Records → Download Saved Records. 6. Select your record library from the drop-down box and click OK.
Building Operator Engineering Guide 1 Adding Data Points Using Building Operator Discovery 7. Click Download. 8. The file should now be placed in your browser’s download location. 9. After commissioning a new site, you can then upload a record library. Create an empty equip, select it, and then select Gear Icon → Create Batch Records → Upload Saved Records. 10. Click Choose File and browse to your saved record library, then click Upload. 11.
1 Building Operator Engineering Guide Adding Data Points Using Building Operator Discovery 12. When the Batch Record Editor window pops up, select your record library from the dropdown box in upper left corner. 13. The points have been matched against your record library. Leave the three toggle switches to Replace Existing Names, Marker Tags, His Tags, and click Apply. 14. The points will be brought it with the correct name and tags. You can now clone your equip to other devices of the same type.
Building Operator Engineering Guide 1 Configuring Alarms in Building Operator Discovery 17. To see the new equip refresh the Floor View. 1.4 Configuring Alarms in Building Operator Discovery CAUTION Only use Alarm Config to add, modify or remove alarms. COVs may be needed to ensure alarms are operating. To configure alarms in Building Operator Discovery, please complete the following instructions: 1. Log in to Building Operator Discovery. 2. Select the menu icon in the top-left corner. 3.
1 Building Operator Engineering Guide Configuring Alarms in Building Operator Discovery 4. In Alarm Config, you can set alarm configurations for the points on your device. To do so, first select the appropriate Point Filter above the list results. Choose from Number, Boolean, Enum or String value. 5. Then, select the box next to the appropriate point name(s). A blue check mark will appear to the left of the point name. You can multi-select points and write different values to them at once.
Building Operator Engineering Guide 1 Configuring Alarms in Building Operator Discovery The values you apply in this window will be written to the points selected in the Alarm Config list. 1.4.1 Configuring Number Alarm When configuring a Number alarm with a Delta From Setpoint value, follow the instructions below: 1. Open and launch Alarm Config from the Building Operator Discovery applications menu. 2.
1 Building Operator Engineering Guide Configuring Alarms in Building Operator Discovery 1.4.2 Configuring Boolean Alarm State Text When configuring alarms in Building Operator Discovery, there are a few nuances you should be aware of. First, if you’re configuring a Boolean alarm that has different values than “True” or “False,” you need to know how to determine which of these binary values are true, and which is false. To determine this, please complete the instructions below: 1.
Building Operator Engineering Guide 1 Configuring Alarms in Building Operator Discovery 9. Select OK to proceed. 1.4.3 Configuring multi state Alarm State Text If you’re configuring a multi state alarm that has multiple values, you need to know which of these values to manually add to trigger an alarm. To determine this, please complete the instructions below: 1. Open and launch DB Builder from the Building Operator Discovery applications menu. 2.
1 Building Operator Engineering Guide Configuring Alarms in Building Operator Discovery 5. Enter the multi state value in the Alarm State Text field. Note that spacing is critical in this field. If you enter a multi state field value with incorrect spacing, the alarm will not work. Use a semicolon to separate state text. 6. Select OK. 1.4.4 Verifying Alarms in Building Operator Discovery Once you’ve configured point alarms, you can verify that these changes executed in Building Operator Discovery.
1 Building Operator Engineering Guide Configuring Alarms in Building Operator Discovery 1.4.5 Viewing Alarms in Building Operator Discovery Once you’ve set parameters for your alarm, you can then view the alarm status and associated tags in Building Operator Discovery (pending the alarm has gone off). To do so: 1. Select the menu icon in the top-left corner, and then select Alarms. 2. In the right-hand – Alarms – pane, you’ll see each point that’s listed in an alarm state.
1 Building Operator Engineering Guide Backing Up and Restoring a Building Operator Discovery Database 3. To view the point alarm details, select the (i) information icon directly above the point name. 4. Here you’ll find the point alarm details and associated tags. For example, you can see the timestamp of when that specific point went into alarm (as outlined below). 5. Select Close. 1.4.
Building Operator Engineering Guide 1 Backing Up and Restoring a Building Operator Discovery Database configurations and data to apply on a replacement Connect device (for example: due to device damage). 1.5.1 Creating a Backup To back up a database in Building Operator Discovery: 1. Find and select Folio in the Building Operator Discovery menu. Select Menu. For more information on Folio in Building Operator Discovery, please see the Building Operator Discovery documentation. 2.
1 Building Operator Engineering Guide Backing Up and Restoring a Building Operator Discovery Database 3. From the menu, select Make Snapshot.
Building Operator Engineering Guide 1 Backing Up and Restoring a Building Operator Discovery Database 4. Once the loading bar reaches 100 percent, your database snapshot will display directly below the menu in the Folio pane.
1 Building Operator Engineering Guide Backing Up and Restoring a Building Operator Discovery Database 5. Select the Folio snapshot name you want to pack up to your computer. Three options will appear: – ◈ 1.5.2 Restore: This will upload the same version of the database you created when you made a snapshot. See below for instructions on how to properly restore. – Backup: This will save the database locally to your device in a Zip file. – Delete: This will remove the folio snapshot of the database.
1 Building Operator Engineering Guide System Limits After you’ve executed this procedure, restart the Connect device. To do so: In Connect device: 1. Select the Maintenance tab. 2. Select Restart and wait approximately ten minutes to execute a proper restore in Building Operator Discovery. 1.
1 Building Operator Engineering Guide Resetting Connect X300 nHaystack Building Operator Discovery supports Haystack REST API services to discover, read, and write Niagara framework based control point objects. ● nHaystack Boolean Point ● nHaystack Boolean Writeable ● nHaystack Numeric Point ● nHaystack Numeric Writeable ● nHaystack Enum Point ● nHaystack Enum Writeable 1.7 Resetting Connect X300 1.8 Troubleshooting 1.8.
Building Operator Engineering Guide 1 Troubleshooting Device operation Description When to perform Restart The device will be restarted and reconnected automatically. ● ● ● General service or device issues OS and application update issues Proxy configuration changes Factory reset Siemens customer support function ● A factory reset will delete all data including all ● certificates for cloud communication and set the device to default factory settings.
2 Haystack tags 2 Haystack tags Here is a white list of Haystack tags accessible in Building Operator. You can find a complete list of Haystack tags on their website.
Issued by Siemens Switzerland Ltd Smart Infrastructure Global Headquarters Theilerstrasse 1a CH-6300 Zug +41 58 724 2424 www.siemens.com/buildingtechnologies © Siemens Switzerland Ltd, 2019-2020 Technical specifications and availability subject to change without notice.