Asset Manager for Building Operator User Guide A6V12060067_en_e 2021-03-26 Smart Infrastructure
Edition notice Edition notice Technical specifications and availability subject to change without notice. This document may not be reproduced, disseminated to third parties or processed and its contents may not be used or disclosed without express permission. Noncompliance shall result in compensation for damages. All rights, including those resulting from a successful patent application and registration of a utility model or design patent, are reserved.
Cybersecurity disclaimer Cybersecurity disclaimer Siemens provides a portfolio of products, solutions, systems and services that includes security functions that support the secure operation of plants, systems, machines and networks. In the field of Building Technologies, this includes building automation and control, fire safety, security management as well as physical security systems.
Table of Contents 4 | 27 1 Overview.........................................................................................................5 2 Asset Manager icons ....................................................................................6 3 Managing sites ..............................................................................................7 3.1 Creating sites ..................................................................................................7 3.2 Editing sites .
Overview 1 1 Overview Asset Manager is a service that allows you to manage your company assets. Assets are considered sites (the building and location the device is in) and IoT devices. This service is currently compatible with the following supported devices in Asset Manager: ● Intelligent Valve ● PXC4 and PXC5 ● Connect X300 In particular, this service offers: ● Managing Sites: Manage sites in Asset Manager by adding, editing, and deleting sites.
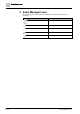
2 Asset Manager icons 2 Asset Manager icons The following icons are used in Asset Manager. See the table below for icon meanings.
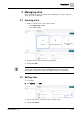
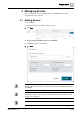
3 Managing sites Creating sites 3 Managing sites This section will cover how to manage sites, including how to create, edit, and delete sites in Asset Manager. 3.1 Creating sites 1. Create a new site via one of the options below: – – Go to Dashboard > Sites. Go to Sites > Add. 2. Fill in the fields on the ensuing form appropriately. 3. Confirm with Add. The Address field will automatically suggest addresses. Selecting a suggested address will automatically populate the Time Zone field.
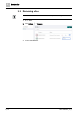
3 Managing sites Removing sites 3.3 Removing sites Devices associated with a site must be removed prior to deleting the site. 1. Go to Sites. 2. Click Options > Remove. 3. Confirm with Remove.
Managing devices 4 Adding devices 4 Managing devices This section will cover how to manage devices, including how to find, add, view/edit, and remove a device. 4.1 Adding devices 1. Go to Sites. 2. Select a site where you want to add your device. 3. Click Add. 4. Enter the device activation key and click Validate 5. Confirm the details of your device. 6. Click Add When defining or changing the custom name of the device, it will only affect the display name in the cloud.
4 Managing devices Finding devices See also Viewing remote web access [➙ 17] Viewing remote web access [➙ 23] 4.2 Finding devices In Asset Manager, you can search for devices by typing (free search) or using the following filters: ● Device name ● Description ● Device type ● Serial Number ● Site name ● Cloud Connection ● Pending updates The search function also allows you to combine search methods and use the free search in addition to adding a filter.
Managing devices 4 Removing devices 4.3 Removing devices Once a device is removed, it can be added again to the same or a different site. Remove a device 1. Go to Sites. 2. Select the site with the device you want to remove. 3. Select the device. 4. Click Remove. 5. In the pop-up, confirm with Remove. Remove multiple devices 1. Go to Sites. 2. Select the site with the device you want to remove. 3. Select multiple devices. 4. Click Actions to open the drop-down menu > Remove. 5.
4 Managing devices Updating multiple devices 4.4 Updating multiple devices 1. Go to Sites. 2. Select the site with the devices you want to update. 3. Select the devices. 4. Click Actions to open the drop-down menu > Update. 5. In the pop-up, confirm with Update. 4.5 Viewing and editing device information 1. Go to Sites. 2. Select the site with the device you want to view. 3. Select the device. 4. Click Edit. 5. After editing, confirm with Save.
5 Working with Intelligent Valves Downloading Intelligent Valve Data 5 Working with Intelligent Valves The Intelligent Valve is a 2 and 3-port pressure-independent control valve (PICV) with volume flow, temperature and power measurement for heating, ventilation, and air conditioning plants. For more information on the Intelligent Valve, please see the Intelligent Valve – Onboarding in Building Operator (A6V11999683).
5 Working with Intelligent Valves Performing a balancing self-test Once the test is finished running, you can download a report as a PDF. 5. Click Report. The file will be downloaded to your browser's download location.
Working with Intelligent Valves 5 Updating firmware 5.3 Updating firmware The Intelligent Valve device will go offline during the firmware update. This may take several minutes. 1. Go to Sites. 2. Select the site with the Intelligent valve device. 3. Select the device. 4. Go to Updates > verify the current installed version and available latest version. 5. Click Update. 6. Confirm with Update.
6 Working with Connect X300 devices Resetting the password 6 Working with Connect X300 devices The Connect device family of devices are physical devices that serve as the connecting point between the cloud and controlled or monitored devices. This can include controllers, sensors, and actuators in the building. These devices integrate BACnet/IP or Modbus/TCP devices and systems as well as FS20 fire panels.
Working with Connect X300 devices 6 Viewing remote web access 6.2 Viewing remote web access Remote web access does not support web interfaces that use Adobe Flash or Microsoft Silverlight. These web interfaces perform certain insecure operations such as sending unencrypted data over the internet. Remote web access can be configured, and other endpoints can be specified on the device user interface.
6 Working with Connect X300 devices Viewing remote web access 6. Go to Network > Tunnel configuration to set up further tunnel endpoints if needed. Desigo PX / Apogee PX tunnel entry: URL must have the following format: http://yourIP/index.
Working with Connect X300 devices 6 Updating operating system 6.3 Updating operating system The device list will indicate if an update is available for your device. 1. Go to Sites. 2. Select the site with the Connect X300 device. 3. Select the device > Updates. 4. Click Update. 5. Confirm with Update. 6.4 Managing applications Installing applications 1. Go to Sites. 2. Select the site with the Connect X300 device 3. Select the device. 4. Go to Applications > go to the application you want to install.
6 Working with Connect X300 devices Assigning and updating distributions Updating applications The application installed on the Connect X300 device is selected. 1. Click Update > confirm with Update. 2. Go to Services to verify the status of your application. 6.5 Assigning and updating distributions Assigning distributions You only need to assign a distribution set once. 1. Go to Sites. 2. Select the site with the Connect X300 device. 3. Select the device. 4. Go to Applications. 5.
Working with Connect X300 devices 6 Assigning and updating distributions 3. Select the device. 4. Go to Applications > Update. 5. Confirm with Update. 6. Go to Services > verify the status of your application.
6 Working with Connect X300 devices Rebooting device 6.6 Rebooting device 1. Go to Sites. 2. Select the site with the Connect X300 device. 3. Select the device. 4. Go to Information > Reboot. 5. Confirm with Reboot. 6.7 Downloading OSS licenses OSS license information is linked to each application version. Before installing an application, the user can check the used OSS license information for included software components and used third party components. 1. Go to Sites. 2.
Working with PXC 4/5 Controllers 7 Viewing remote web access 7 Working with PXC 4/5 Controllers The Desigo PXC4 controller is designed as a compact device with 16 onboard I/Os that can be expanded to a maximum of 40 I/Os with additional TX-I/O modules. The Desigo PXC5 is a programmable controller used for system-level functions like alarm routing, system-wide scheduling and trending, device supervision, stronger integration capabilities, and embedded BACnet routing.
7 Working with PXC 4/5 Controllers Viewing remote web access 24 | 27 A6V12060067_en_e
Troubleshooting 8 Connect X300 8 Troubleshooting 8.1 Connect X300 The Maintenance mode on the Connect X300 device offers multiple device operations that are required in the following cases: ● Moving a device from one site to another ● Change of network mode ● Registration of the device is not possible ● Update process or device activation is failing You have obtained suitable engineering specialist training. You are logged into a Connect X300 device via web interface. 1.
8 Troubleshooting Connect X300 Device operation Description When to perform Restart The device will be restarted and reconnected automatically. ● ● ● General service or device issues OS and application update issues Proxy configuration changes Factory reset Siemens customer support function ● A factory reset will delete all data including all ● certificates for cloud communication and set the device to default factory settings.
Issued by Siemens Switzerland Ltd Smart Infrastructure Global Headquarters Theilerstrasse 1a CH-6300 Zug +41 58 724 2424 www.siemens.com/buildingtechnologies © Siemens Switzerland Ltd, 2020 Technical specifications and availability subject to change without notice.