
Specifications


SD74
21
5.1 DISASSEMBLY
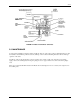
If it is necessary to disassemble the positioner, refer to Parts List No. 12372PL and proceed as follows:
1. Remove the pilot plunger sealing screws, plunger springs and plungers.
2. Remove the six body screws and separate the upper and lower housings.
3. Pull the baffle and grommet from the input diaphragm assembly stem.
4. Remove the two small screws that hold the beam to the output diaphragm assembly. Be careful not to lose the
spacers and washers.
5. Remove the nut that holds the beam on the input diaphragm assembly and remove the beam.
6. Remove the two screws that hold the input diaphragm assembly housing to the bottom housing.
7. Separate the diaphragms of the input diaphragm assembly from the input and upper housings.
8. Remove the input housing and slide the input diaphragm assembly out of the upper housing.
9. Remove the four screws holding the output diaphragm assembly to the upper housing.
CAUTION
There is a blind capillary tube that cannot be seen until the output diaphragm assembly
is removed from the upper housing. This small capillary tube is easily damaged if
undue prying or force is used to separate the output diaphragm assembly from the
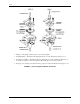
upper housing. See Figure 5-2 and Step 10 for removal instructions.
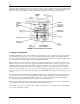
FIGURE 5-2 Upper Housing and Output Diaphragm
10. Insert a screwdriver between the upper housing and the output diaphragm assembly at the locations shown by
the arrows in Figure 5-2. Twist the screwdriver in the direction indicated by the arrows. Twist only enough to
just move the output diaphragm assembly. Do not pry!
11. Once the output diaphragm assembly is loosened from the upper housing, pull it straight out of the upper
housing. A slight wiggling motion may be required.
12. Sometimes the clamping plate will separate from output diaphragm assembly before this assembly is separated
from the upper housing. If it does not, separate the clamping plate after the output diaphragm assembly has
been removed from the upper housing.
13. Clean and inspect all parts for wear or damage and replace if necessary.