CCIC1410 MJPEG / MPEG4 Dual-Streaming Indoor Colour Camera Configuration Manual Building Technologies Fire Safety & Security Products
Liefermöglichkeiten und technische Änderungen vorbehalten. Data and design subject to change without notice. / Supply subject to availability. © 2009 Copyright by Siemens Building Technologies Wir behalten uns alle Rechte an diesem Dokument und an dem in ihm dargestellten Gegenstand vor.
Contents 1 1.1 1.2 1.2.1 1.2.2 1.2.3 1.2.4 1.2.5 1.3 1.4 1.5 Safety .......................................................................................................5 Target readers...........................................................................................5 General safety precautions .......................................................................5 Transport...................................................................................................
8.8 8.8.1 8.8.2 8.8.3 8.8.4 Client settings..........................................................................................38 Stream options ........................................................................................38 MPEG4 media options ............................................................................38 MPEG4 protocol options (transmission modes)......................................38 MP4 saving options (storing destination and file name) .........................
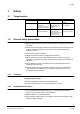
Safety 1 Safety 1.1 Target readers 1.2 Target readers Qualification Activity End user Has working knowledge Performs only the of computers. procedures for proper Instruction by technical operation of the specialists is necessary. product. The product is installed and configured. Service personnel Technical training for electrical installations. Product already in use and requiring servicing.
Safety Radio interference with other devices in the environment z In France, it is not allowed to use the CCIC1410-LAW outside buildings and on the channels 10 – 13. z The unit operates on frequencies that are approved for use in the European Union. When used outside the EU, the national regulations for the use of frequencies must be observed. Damage due to unsuitable mounting location z The environmental conditions recommended by the manufacturer must be observed.
Safety Damage due to improper storage of CD z Always store the CD in its protective case. z Keep the CD in an environment with a relative humidity of 10 – 90 %. z Keep the CD between -5 and +55 °C. z Do not store the CD in dusty places. z Do not keep the CD close to sources of magnetic radiation. z Protect the CD from moisture. z Protect the CD from direct sunlight. 1.3 CMOS characteristics The following conditions may be observed when using a CMOS camera.
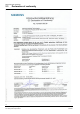
Directives and standards 2 Directives and standards The product complies with the requirements of the following EU directives. The EU declaration of conformity is available from: Siemens Building Technologies Fire & Security Products GmbH & Co.
Directives and standards 2.1 National restrictions The CCIC1410-LAW can be operated in the following European countries: AT, BE, BG, CH, CY, CZ, DK, DE, EE, ES, FI, FR, GB, GR, HU, IE, IS, IT, LV, LI, LT, LU, MT, NL, NO, PL, PT, RO, SE, SK, SI, TR. The unit operates on frequencies that are approved for use in the European Union. When used outside the EU, the national regulations for the use of frequencies must be observed. 2.
Directives and standards 2.3 Declaration of conformity 10 Siemens Building Technologies Fire Safety & Security Products 05.
Technical data 3 Technical data 3.1 Dimensions 3.2 Product specifications Specification CCIC1410-L CCIC1410-LA CCIC1410-LAW Image system Image sensor 1/4" CMOS sensor Pixels 640 (H) x 480 (V) Compression MJPEG / MPEG4 simultaneous dual-streaming Picture format VGA (640 x 480) at max. 30 ips Electronics Synchronisation Internal Minimum illumination 0.4 lx (F2.0) Gamma correction 0.6 White balance control AWB (2500 – 9000 °K) Shutter speed 1/5 – 1/15000 s Audio outputs - G.
Technical data Network Ethernet 1 x 10/100 base-T Ethernet connection for LAN / WAN WLAN - IPv4, TCP/IP, HTTP, UPnP, RTSP/RTP/RTCP, IGMP, SMTP, FTP, TelNet, DHCP, NTP, DNS, DDNS, PPPoE Protocols Access protection Triple user-level access with password protection Event notification Triple user-level access with password protection Triple user-level access with password protection, WEP, WPAPSK, WPA2 Notification via HTTP, SMTP, FTP Event memory Privacy 802.
Ordering data 4 Ordering data Type Item No.
Description of the equipment 6 Description of the equipment SIEMENS CCIC1410 IP cameras are easy-to-use network cameras for security applications in offices and residential areas, specifically designed with a compact exterior. Despite its ultra-compact size, the camera incorporates many advanced features to meet IT security requirements.
Description of the equipment 6.2 Front and rear views of the camera 1 2 3 6.
Description of the equipment 6.4 Connection method The connection method is shown in the illustration below. 6.5 LED status The LED indicates the status of the network camera. LED status Privacy button Description Solid red Solid blue Power is being supplied to the camera. Blinking red Blinking blue The camera is booting up. Solid red Off The camera is trying to obtain an IP address. Blinking green Off An IP address has been successfully assigned to the camera and the camera is working.
Description of the equipment 6.6 Hardware reset There is a reset button on the back cover of the network camera (see chapter 6.2 Front and rear views of the camera, No. 5). It is used to reboot the network camera or to reset the network camera to the factory default configuration. Depending on the functional problem, rebooting may set the network camera back to normal state. If the problem remains after rebooting, restore the network camera settings to the factory default and install the software again.
Installation 7 Installation 7.1 Network setup This section explains how to configure the network camera for Internet connection. 1. If you have external devices such as sensors and alarms, connect them to the general I/O terminal block. 2. Connect the camera to a switch/hub using an Ethernet cable. Use a Category 5 cross cable when the network camera is directly connected to a PC. 3. Connect the supplied power adapter from the network camera to a power outlet.
Installation 7.1.1 Internet connection via a router Before setting up the network camera over the Internet, make sure you have a router, and follow the steps below. 1. Connect your network camera behind a router. The Internet environment is illustrated as below. For information on how to obtain an IP address, see chapter 8.5: Network settings. 2. In this example, the Local Area Network (LAN) IP address of your network camera is 192.168.0.3.
Installation 7.1.2 Internet connection with static IP Choose this connection type if you are required to use a static IP for the network camera and proceed as follows. 7.1.3 1. Set up the network camera in the LAN (see chapter 8.5.2). 2. Go to Configuration > Network > Network Type. 3. Select LAN > Use fixed IP address. 4. Enter the static IP, Subnet mask, Default router, Primary DNS provided by your ISP.
CCIC1410 Installation Wizard 8 CCIC1410 Installation Wizard The initial setup of the CCIC1410 network camera is done with the CCIC1410 Installation Wizard. For the first use of the CCIC1410 Installation Wizard, just follow the steps of the Wizard Tool. The CCIC1410 Installation Wizard is a software that helps you installing your CCIC1410 camera. You first need to set up the Installation Wizard on your PC, then you can start the configuration. 8.1 Set up the CCIC1410 Installation Wizard 1.
CCIC1410 Installation Wizard 5. Select the additional component you want to install. The component Create shortcut on desktop will create a shortcut on the desktop. This will make it more convenient for you to launch Install Wizard 2. 6. Click Next. Î The following window will appear. 7. Select an installation directory for this application software. 8. Click Install.
CCIC1410 Installation Wizard 9. Once the installation is completed, click Close. Î 8.2 The CCIC1410 Installation Wizard is set up. Open the CCIC1410 Installation Wizard 1. Click Start > Programs > Siemens > CCIC1410 Install > CCIC1410 Installation Wizard . Or: 1. Use the shortcut on your desktop to open the CCIC1410 Installation Wizard. Î The user interface of the CCIC1410 Installation Wizard appears. 23 Siemens Building Technologies Fire Safety & Security Products 05.
CCIC1410 Installation Wizard 8.3 User interface of the CCIC1410 Installation Wizard On the left side, several function buttons are situated, e.g. the Manual Setup button, etc. When you click on the arrow button, you will see more advanced functional buttons. 8.3.1 Select a device for the configuration 1. Open the CCIC1410 Installation Wizard, see chapter 8.2. 2. Select a device in the device list by clicking on it.
CCIC1410 Installation Wizard 8.3.2 Refreshing the device list (and linking to the devices) Clicking on the Refresh Devices button will refresh the device list and search for all devices on the LAN again. Refreshing the device list will take several seconds. If you want to link to your device, double-clicking it on your device list will lead you to the browser for operating your device. 8.4 System settings 8.4.1 Open the system settings page 1.
CCIC1410 Installation Wizard Fig. 2 8.4.2 System settings page Change host name 1. Open the system settings page (see chapter 8.4.1). The Hostname is used for the homepage title of the main page and is displayed as the title in the video window of the main page. The maximum string length is 40 characters or 20 characters in double-byte character systems like Chinese or Japanese. 8.4.3 Change administrator password 1. Open the system settings page (see chapter 8.4.1).
CCIC1410 Installation Wizard 8.4.4 Adjust date and time 1. Open the system settings page (see chapter 8.4.1). There are three ways to adjust the system date and time settings: z "Synchronize with computer time": The easiest way is synchronize the device with your computer time. z “Set date and time manually”: Set the date and time manually by entering new values. Note the format in the respective fields while typing.
CCIC1410 Installation Wizard Fig. 4 8.5.2 PPPoE setting page 4. Enter the account information. 5. Click Next and follow the pages of the Installation Wizard. 1. Open the system settings page (see chapter 8.4.1). 2. Click Next. LAN setting Î 3. The following dialog window appears: Click No. Î The Network Settings page appears. 28 Siemens Building Technologies Fire Safety & Security Products 05.
CCIC1410 Installation Wizard Fig. 5 Network Settings page 4. Enter the information for the LAN setting. 5. Click Next and follow the pages of the Installation Wizard. DHCP or fixed IP: z DHCP: Checking the Get IP by DHCP Server automatically checkbox will force the device to renew its IP address whenever it reboots, and the related network configuration is provided by the DHCP server.
CCIC1410 Installation Wizard 8.5.3 Mobile access If you want to access the device by mobile phone, you can enable “Mobile Access”. 1. Open the system settings page, see chapter 8.4.1. 2. Click Next. Î 3. Click No. Î 8.6 The following dialog window appears: The Network Settings page appears. 4. On the Network Settings page, click Next. 5. Click Yes. Î The CCIC1410 Installation Wizard will set the video codec to MPEG-4, and the resolution will be set to 176x144 pixels.
CCIC1410 Installation Wizard Fig. 6 Wireless Settings page z SSID (Service Set Identifier) “SSID” is a name that identifies a wireless network. Access points and wireless clients attempting to connect to a specific WLAN (Wireless Local Area Network) must use the same SSID. The default setting is "default". Note: The maximum length of SSID is 32 single-byte characters.
CCIC1410 Installation Wizard channel must be set to the same channel for each wireless adapter. The default channel setting depends on the regional settings. z Encrypt You can choose the desired encryption type in the pull-down menu. There are three options: None, WEP and WPA-PSK. – None If your wireless environment doesn’t need encryption, please choose “None”. – WEP If your encryption type is WEP, choose the option “WEP” in the Encrypt pulldown menu (Fig. 7).
CCIC1410 Installation Wizard – Key length The administrator can select the key length among 64 or 128 bits. – Key format Hexadecimal or ASCII. “HEX” digits consist of the numbers 0 – 9 and the letters A – F. “ASCII” is a code for representing English letters as numbers from 0 – 127 except “, <, > and space characters that are reserved. “Key”: Enter a key in either hexadecimal or ASCII format.
CCIC1410 Installation Wizard 8.7 Apply settings to selected device After configuring all the settings, the Apply Settings page will show up (Fig. 9). Click Apply to apply the changes to the selected device, or click Back to go back to the previous page and change the setting again. Fig. 9 Apply Settings page When you click Apply, your settings will be updated to the server. When completed, the Access Information page of this server will be displayed.
CCIC1410 Installation Wizard Access information page Fig. 10 Access Information page The Access Information page provides all the information about how to access the server. There are three access types: z Access from Home: If you access the server from home, you can use the domain name (or IP address) and port (if the http port is not 80) to connect the server.
CCIC1410 Installation Wizard In the Access Information page, you can click on Advanced information to obtain further information. Fig.
CCIC1410 Installation Wizard – Add to my favorite can be used to add the access information to the bookmark of your browser. This makes access to the server easier. Fig. 12 Bookmark of your browser after adding the link to your favorites – Export to desktop will generate an html file on your desktop. You can open this file using your browser and see the access information of this server. Fig. 13 HTML file generated on the browser 37 Siemens Building Technologies Fire Safety & Security Products 05.
CCIC1410 Installation Wizard 8.8 Client settings 8.8.1 Stream options 1. Open the CCIC1410 Homepage (see chapter 9.1). 2. Choose the Client Settings menu. The network camera supports MPEG-4 and MJPEG dual streams. 8.8.2 8.8.3 3. Choose the stream to be shown in the client. 4. Click Save. MPEG4 media options 1. Open the CCIC1410 Homepage (see chapter 9.1). 2. Choose the Client Settings menu. 3. Select whether video only, audio only or video and audio will be streamed.
CCIC1410 Installation Wizard UDP unicast: This protocol allows several real-time audio and video streams. However, network packets may be lost due to network burst traffic and images may be damaged. Activate UDP connection when the occasion requires time-sensitive responses and the video quality is less important. Note that each unicast client connecting to the server takes up additional bandwidth and the network camera allows up to ten simultaneous accesses.
CCIC1410 Installation Wizard Add date and time suffix to the file name Select this option to add date and time to the file name suffix. 40 Siemens Building Technologies Fire Safety & Security Products 05.
Configuration with the CCIC1410 Homepage 9 Configuration with the CCIC1410 Homepage The CCIC1410 Homepage helps you viewing your live videos. It is displayed in your web browser. 9.1 Opening the CCIC1410 Homepage Using the CCIC1410 Installation Wizard 1. Open the CCIC1410 Installation Wizard (see chapter 8.2). 2. Double click a device in the device list. Î The user interface of the CCIC1410 Homepage appears. Using your Web Browser 1. Launch your web browser (e.g.
Configuration with the CCIC1410 Homepage 9.2 User interface of the CCIC1410 Homepage There are three menus: z Live Player Web z Configuration z Client Settings 42 Siemens Building Technologies Fire Safety & Security Products 05.
Configuration with the CCIC1410 Homepage 9.3 Tabs of the CCIC1410 Homepage Snapshot Capture and save still images. The captured images will be displayed in a pop-up window. Right-click the image and choose Save Picture As to save it in JPEG (*.jpg) or BMP (*.bmp) format. Language Choose a language for the displayed interface. Configuration Access the configuration page of the network camera.
Configuration with the CCIC1410 Homepage 9.4 The live video window of the CCIC1410 Homepage 9.4.1 Live video window of CCIC1410 Homepage with MPEG4 mode The following window is displayed when the video mode is set to MPEG4: 1 MPEG4 protocol and media options: The transmission protocol and media options for MPEG-4 video streaming. 2 Date: Display of the current date. 3 Time: Display of the current time.
Configuration with the CCIC1410 Homepage Video and audio control buttons: 1 Digital zoom edit: Uncheck Disable digital zoom to enable the zoom operation. The navigation screen indicates which part of the image is being magnified. To control the zoom level, drag the slider bar. To move to a different area you want to magnify, drag the navigation screen. 2 Start / Stop recording: Click this button to record video clips to your computer. Press the Stop recording button to end recording.
Configuration with the CCIC1410 Homepage 9.4.2 Live video window of CCIC1410 Homepage with MJPEG mode The following window is displayed when the video mode is set to MJPEG. 1 MJPEG protocol and media options: The transmission protocol and media options for MJPEG video streaming. 2 Date: Display of the current date. 3 Time: Display of the current time. 4 Video and audio control buttons: Depending on the network camera model and network camera configuration, some buttons may not be available.
Configuration with the CCIC1410 Homepage Video and audio control buttons: 1 Digital zoom edit: Uncheck Disable digital zoom to enable the zoom operation. The navigation screen indicates which part of the image is being magnified. To control the zoom level, drag the slider bar. To move to a different area you want to magnify, drag the navigation screen. 2 Start / Stop recording: Click this button to record video clips to your computer. Press the Stop recording button to end recording.
Configuration with the CCIC1410 Homepage Disable privacy button z Disable privacy button checkbox unmarked Î The video function is on. Î The LED turns to green. Î The privacy button on the front is not functional. Î After rebooting, the video function still is on. The LED still lights green and the privacy button is not functional. z Disable privacy button checkbox marked 9.5.2 Î The privacy button on the front is functional.
1. Configuration with the CCIC1410 Homepage Select the time zone for your network camera first. 2. Mark the checkbox Enable daylight saving time. 3. The starting time and ending time of the DST will be displayed in this option. 4. To manually configure the daylight saving time rules, enter the individual start and end time. Option Description Keep current date and time Select this option to reserve the current date and time of the network camera.
Configuration with the CCIC1410 Homepage 9.5.3 Digital input and digital output 1. Open the CCIC1410 Homepage (see chapter 9.1). 2. Choose the Configuration menu. 3. On the left hand side, choose the menu item System. 4. Define your digital input and digital output settings. 5. Click Save. Option Description Digital input Select "high" or "low" to define normal status of the digital input. The network camera will report the current status.
Configuration with the CCIC1410 Homepage 9.6 Security 9.6.1 Root password The administrator account “root” is permanent and cannot be deleted. NOTE If you want to add more accounts, you must apply a password for the “root” account first. 1. Open the CCIC1410 Homepage (see chapter 9.1). 2. Choose the Configuration menu. 3. On the left hand side, choose the menu item Security. 4. Type in the password identically in both text boxes. 5. Click Save. Î 9.6.
Configuration with the CCIC1410 Homepage 9.6.3 Manage users Here you can change user’s access rights or delete user accounts. 1. Open the CCIC1410 Homepage (see chapter 9.1). 2. Choose the Configuration menu. 3. On the left hand side, choose the menu item Security. 4. Pull down the User name list to find an account. 5. Make the necessary changes. 6. Click Save or Delete for your changes to take effect. 52 Siemens Building Technologies Fire Safety & Security Products 05.
Configuration with the CCIC1410 Homepage 9.7 Network connection settings 9.7.1 Network type 1. Open the CCIC1410 Homepage (see chapter 9.1). 2. Choose the Configuration menu. 3. On the left hand side, choose the menu item Network. 4. Define the settings. 5. Click Save. LAN Select this option when the network camera is deployed in a local area network (LAN) and is intended to be accessed by local computers.
Configuration with the CCIC1410 Homepage Enable UPnP port forwarding PPPoE To access the network camera from the Internet, select this option to allow the network camera to open ports on the router automatically so that video streams can be sent out from a LAN. To utilize this feature, make sure that your router supports UPnP™ and it is activated.
Configuration with the CCIC1410 Homepage 9.7.2 HTTP 1. Open the CCIC1410 Homepage (see chapter 9.1). 2. Choose the Configuration menu. 3. On the left hand side, choose the menu item Network. 4. Define the settings. 5. Click Save. Authentication Depending on your network security requirements, the network camera provides two types of security settings for an HTTP transaction: basic and digest.
Configuration with the CCIC1410 Homepage 9.7.3 FTP The FTP server allows the network camera to utilize the SIEMENS CCIC1410 Installation Wizard to upgrade the firmware. The FTP port is set to 21 by default. It can however be assigned any other port number between 1025 and 65535. 1. Open the CCIC1410 Homepage (see chapter 9.1). 2. Choose the Configuration menu. 3. On the left hand side, choose the menu item Network. 4. Define the settings. 5. Click Save.
Configuration with the CCIC1410 Homepage 9.7.4 RTSP streaming 1. Open the CCIC1410 Homepage (see chapter 9.1). 2. Choose the Configuration menu. 3. On the left hand side, choose the menu item Network. 4. Define the settings. 5. Click Save.
Configuration with the CCIC1410 Homepage The accessibility of the RTSP streaming for the three authentication modes is listed in the following table: O indicates that the authentication mode is supported by the RTSP player. X indicates that the authentication mode is NOT supported by the RTSP player. Access name for stream 1 / Access name for stream 2: The access name is used to select the streaming source.
Configuration with the CCIC1410 Homepage Multicast settings for stream 1 / Multicast settings for stream 2: Select Always multicast to enable multicast for stream 1 or stream 2. Unicast video transmission delivers a stream through point-to-point transmission; multicast, on the other hand, sends a stream to the multicast group address and allows multiple clients to acquire the stream by requesting a copy from the Multicast group address. The five ports can be changed between 1025 and 65535.
Configuration with the CCIC1410 Homepage Wireless mode: Click on the pull-down menu to select from the following options: z Infrastructure: The network camera is connected to the WLAN via an Access Point (default setting). z Ad-Hoc: The network camera is connected directly to a host equipped with a wireless adapter in a peer-to-peer environment. Channel: While in infrastructure mode, the channel is selected automatically to match the channel setting for the selected Access Point.
Configuration with the CCIC1410 Homepage z Security: WEP (Wired equivalent Privacy): It allows communication only with other devices with identical WEP settings. – Authentication mode: Î Open "Open" is the default setting and means that the key will be communicated across the network. Î Shared: "Shared" allows communication only with other devices with identical WEP settings. – Key length: The administrator can select the key length among 64 or 128 bits. 64 bits is the default setting.
Configuration with the CCIC1410 Homepage z WPA-PSK: WPA (Wi-Fi Protected Access) pre-shared key. More secure than WEP; the Wi-Fi Alliance developed WPA (Wi-Fi Protected Access) in 2003 to address WEP’s weaknesses. Improvements include TKIP, which changes the encryption key for each data transmission. – Algorithm Choose one of the following algorithms for WPA-PSK and WPA2-PSK modes. Î TKIP (Temporal Key Integrity Protocol): A security protocol used in the IEEE 802.11 wireless networks.
Configuration with the CCIC1410 Homepage NOTE Invalid settings may cause the system to fail to respond. Change the configuration only if necessary and consult with your network supervisor or experienced users for correct settings. Once the system has lost contact, refer to chapter 9.16 Maintenance for reboot and restore procedures. 9.9 DDNS settings 1. Open the CCIC1410 Homepage (see chapter 9.1). 2. Choose the Configuration menu. 3. On the left hand side, choose the menu item DDNS. 4.
Configuration with the CCIC1410 Homepage Allowed List and Denied List: There are two lists for permission control: the Allowed List and the Denied List. Only those clients whose IP addresses are in the Allowed List and not in the Denied List can access the network camera. Enter the starting IP address and ending IP address in the text boxes in the Allowed List or the Denied List section. A total of ten lists can be configured for both sections.
Configuration with the CCIC1410 Homepage 9.11 Audio and video settings 9.11.1 Video settings 1. Open the CCIC1410 Homepage (see chapter 9.1). 2. Choose the Configuration menu. 3. On the left hand side, choose the menu item Audio and video. 4. Define the settings. 5. Click Save. Video title: Enter a name that will be displayed in the title bar of the live video. Colour: Select to display colourful or black/white video streams.
Configuration with the CCIC1410 Homepage Power line frequency: Select the appropriate power line frequency for your location to eliminate image flickering. Note that after the power line frequency is changed, it is required to disconnect and reconnect the power cord of the network camera in order for the new setting to take effect. Video orientation: "Flip" vertically reflects the display of the live video. "Mirror" horizontally reflects the display of the live video.
Configuration with the CCIC1410 Homepage – Saturation: Adjust the image saturation level, which ranges from -5 to +5. The default value is set to 0. – Contrast: Adjust the image contrast level, which ranges from -5 to +5. The default value is set to 0. – Sharpness: Adjust the image sharpness level, which ranges from -3 to +3. The default value is set to +3. – White balance: Adjust the value for best colour temperature.
Configuration with the CCIC1410 Homepage NOTE Up to 5 privacy mask windows can be set in the same screen. If you want to delete a window, click on the ‘x’ in the upper right-hand corner of the window to close the window. Video quality settings for stream 1 / stream 2: You can set up two separate streams for the network camera for different viewing devices. For example, set the network camera to a smaller image size and a lower bit rate for remote viewing on mobile phones.
Configuration with the CCIC1410 Homepage – Video quality: A complex scene generally produces larger file sizes, meaning that higher bandwidth will be needed for data transmission. Therefore, if Constant bit rate is selected, the bandwidth utilization is fixed at the selected level, resulting in variable video quality performances. The bit rates are selectable at the following rates: 20 Kbps, 30 Kbps, 40 Kbps, 50 Kbps, 64 Kbps, 128 Kbps, 256 Kbps, 512 Kbps, 768 Kbps, 1 Mbps, 1.
Configuration with the CCIC1410 Homepage Resolution Video quality Streaming protocol Image rate / ips Bit rate / Mb/s 640x480 good JPEG 15 3.7 176x144 excellent JPEG 30 1.52 176x144 excellent JPEG 15 0.76 320x240 excellent JPEG 30 3.7 320x240 excellent JPEG 15 1.85 640x480 excellent JPEG 30 10.2 640x480 excellent JPEG 15 6.3 176x144 medium MPEG-4 30 0.07 176x144 medium MPEG-4 15 0.05 320x240 medium MPEG-4 30 0.16 320x240 medium MPEG-4 15 0.
Configuration with the CCIC1410 Homepage 9.11.2 Audio settings 1. Open the CCIC1410 Homepage (see chapter 9.1). 2. Choose the Configuration menu. 3. On the left hand side, choose the menu item Audio and video. 4. Define the settings. 5. Click Save. Mute: Select this option to disable audio transmission from the network camera to all clients.
Configuration with the CCIC1410 Homepage 9.12 Motion detection settings NOTE A total of three motion detection windows can be configured. 1. Open the CCIC1410 Homepage (see chapter 9.1). 2. Choose the Configuration menu. 3. On the left hand side, choose the menu item Motion Detection. 4. Click New to add a new motion detection window. 5. In the Window name text box, enter a descriptive name for the motion detection window. – To move and resize the window, drag-drop the window.
Configuration with the CCIC1410 Homepage Enable motion detection 1. Mark the checkbox Enable motion detection to enable this function. The Percentage Indicator will rise or fall depending on the image variation. When motions are detected by the network camera and the percentage exceeds the defined threshold, a red bar rises. Meanwhile, the motion detection window will be displayed with a red frame around it.
Configuration with the CCIC1410 Homepage 9.13 Application settings This section explains how to configure the network camera to react in response to particular situations. A typical application is that when a motion is detected, the network camera sends buffered images to a FTP server or via e-mail as notifications. 1. Open the CCIC1410 Homepage (see chapter 9.1). 2. Choose the Configuration menu. 3. On the left hand side, choose the menu item Application. 4. Choose the desired settings. 5.
Configuration with the CCIC1410 Homepage Event settings In the Event settings section, click Add to open the event setting page. In this page, you can arrange the three elements – Trigger, Schedule and Action – to configure an event. A total of three event settings can be configured. z Event name: Enter a descriptive name for the event. – Enable this event: Select this option to enable this event. – Priority: Select the relative importance of this event (High, Normal, and Low).
Configuration with the CCIC1410 Homepage z Trigger: Also referred to as the cause or stimulus, defines when to trigger the event. The trigger source can be configured to use the network camera’s built-in motion detection mechanism or external digital input devices. There are four choices of trigger sources: – Video motion detection: Select this option to allow the network camera to use the built-in motion detection mechanism as a trigger source.
Configuration with the CCIC1410 Homepage Media Settings In the Media Settings section, click Add to open the media setting page. In this page, you can specify what kind of media is to be sent when a trigger is activated. A total of five media settings can be configured. z Media name: Enter a descriptive name for the media. Media Type: There are three choices of media types available: z Snapshot z Video clip z System log 77 Siemens Building Technologies Fire Safety & Security Products 05.
Configuration with the CCIC1410 Homepage z Media Type: – Snapshot: Select to send snapshots when a trigger is activated. Î Source: Select whether to use snapshots from stream 1 or stream 2. Î Send pre-event images: The network camera has a buffer area; it temporarily holds data up to a certain limit. Specify how many images are to be captured before a trigger is activated. Up to seven images can be generated.
Configuration with the CCIC1410 Homepage NOTE The maximum duration depends on the selected encoder for the source (MPEG-4 / MJPEG), the selected quality settings, and the maximum file size. Apart from the max. duration setting, please check the actual duration based on the source settings. – System log: Select to send a system log when a trigger is activated. When completed, click Save for your settings to take effect and then click Close to exit this page.
Configuration with the CCIC1410 Homepage z Server name: Enter a descriptive name for the server. There are four server types available: – Email – FTP – HTTP – Alarm Sever z Server Type: – E-mail: Select to send the media via email when a trigger is activated. Î Sender email address: Enter the email address of the sender. Î Recipient email address: Enter the email address of the recipient. Î Server address: Enter the domain name or IP address of the email server.
Configuration with the CCIC1410 Homepage Select to send the media to an FTP server when a trigger is activated. Î Server address: Enter the domain name or IP address of the FTP server. Î Server port: By default, the FTP port server is set to 21. Also, it can be assigned another port number between 1025 and 65535. Î User name: Enter the login name of the FTP account. Î Password: Enter the password of the FTP account. Î Remote folder name: Enter a folder in which to save the media file.
Configuration with the CCIC1410 Homepage log-recording tool to receive system log messages from the network camera. For example "Kiwi Syslog Daemon". 9.14.2 1. Open the CCIC1410 Homepage (see chapter 9.1). 2. Choose the Configuration menu. 3. On the left hand side, choose the menu item System log. 4. Choose the desired settings. 5. Click Save. Current log This column displays the entries in the system log in chronological order.
1. Configuration with the CCIC1410 Homepage Open the CCIC1410 Homepage (see chapter 9.1). 2. Choose the Configuration menu. 3. On the left hand side, choose the menu item View parameters. Î 9.16 The parameter list appears. Maintenance This chapter explains how to reset the network camera to the factory default. 9.16.1 Reboot This feature allows you to restart the network camera. It takes about 1 – 2 minutes to complete the process. When completed, the live video will be displayed in your browser.
Configuration with the CCIC1410 Homepage 1. Open the CCIC1410 Homepage (see chapter 9.1). 2. Choose the Configuration menu. 3. On the left hand side, choose the menu item Maintenance. 4. In the Restore section, mark/unmark the checkboxes for Network Type and Daylight saving time. Î Network Type: Select this option to retain the Network Type settings. Please refer to chapter 9.7.1: Network type. Î Daylight saving time: Select this option to retain the daylight saving time settings (see chapter 9.
Configuration with the CCIC1410 Homepage In the example below, the DST begins each year at 2:00 a.m. on the last Sunday in March and ends at 3:00 a.m. on the last Sunday in October. 85 Siemens Building Technologies Fire Safety & Security Products 05.
Configuration with the CCIC1410 Homepage Upload Daylight Saving Time Configuration File 1. In the Upload section, click Browse… and specify the XML file. If the incorrect date and time is assigned, you will see a warning message when uploading the file to the network camera. 2. Click Upload to enable the DST, see chapter 9.5.2: Time zone of system (system time). Î A warning message is displayed when attempting to upload an incorrect file format.
Accessing the video streams 10 Accessing the video streams This chapter explains how to access the video streams through web browsers, RTSP players, 3GPP-compatible mobile devices. For accessing the video streams via SIEMENS digital recorders SISTORE MX HVR/NVS, please refer to the respective manuals. 10.1 Via the CCIC1410 Installation Wizard 1. Open the CCIC1410 Installation Wizard (see chapter 8.2). 2. Double click a device in the device list. Î 3. Choose the menu item Live Player Web. Î 10.
Accessing the video streams Î The live video will be displayed on your player. For more information on how to configure the RTSP access name, please refer to RTSP Streaming setting. 10.3.2 Viewing MJPEG streaming media Configure http setup according to the requirements of the viewing/recording device: To access motion jpeg stream 1 using the cgi-command, type: http://:<80>/ cgi-bin/ See also chapter 9.7.2. 88 Siemens Building Technologies Fire Safety & Security Products 05.
Accessing the video streams 10.4 Using 3GPP-compatible mobile devices To view the streaming media through 3GPP-compatible mobile devices, make sure the network camera can be accessed from the Internet. To utilize this feature, please check the following settings on your network camera: 1. As most players on 3GPP mobile phones do not support RTSP authentication, make sure the authentication of RTSP streaming is disabled. For more information, see chapter 9.7.4: RTSP streaming. 2.
Upgrade firmware 11 Upgrade firmware This feature allows you to upgrade the firmware on your network camera. It takes about five minutes to complete the process. WARNING Do not power off the network camera during the upgrade process and ensure that the PC running the upgrade software (Installation Wizard / Web Browser) is running stable. Otherwise the camera will be rendered defective (out-ofwarranty).
Upgrade firmware 3. Î In the Selected devices information section, you will see tabs with IP addresses if more than one device was selected. Î Firmware version: The version number of the selected firmware. Use the Select firmware button to select the file that you want to upload to the selected device(s). 91 Siemens Building Technologies Fire Safety & Security Products 05.
Upgrade firmware Î 4. When you have selected a file, the CCIC1410 Installation Wizard will check whether the file you selected is correct. If it is the correct version, then the package information will display the information about the file and enable the Start upgrade button. If it is not the correct version, a warning message will appear. Click the Start upgrade button to upgrade the firmware of the selected device(s). A pop-up dialog window indicating the progress of the upgrading process appears.
Upgrade firmware Fig. 14 5. Upgrade done Click OK to finish the upgrade. Î The upgrade is done. 93 Siemens Building Technologies Fire Safety & Security Products 05.
Index 12 Index A N Access information page 35 Administrator’s password 26 Network camera name of ~ 47 Network setting See LAN setting C CMOS characteristics 7 D Data encryption 32 WEP 32 WPA-PSK 33 Date and time set up ~ 27 Daylight saving time 48 DHCP 29 DTS Siehe Daylight saving time H Host name 26, Siehe network camera Change ~ 26 HTTP 39 I P PPPoE password 27 PPPoE setting 27 PPPoE setting page 28 PPPoE username 27 Q Quicktime 35 R Root password 51 change ~ 26 S Safety precautions 5 SSID 3
Issued by Siemens Building Technologies Fire & Security Products GmbH & Co. oHG D-76181 Karlsruhe www.buildingtechnologies.siemens.com Document no. A6V10236594 Edition 04.05.2009 © 2009 Copyright by Siemens Building Technologies Data and design subject to change without notice. Supply subject to availability.