Built-in oven CM676G0.
en Table of contents no i t cur t sen I 8 Intended use . . . . . . . . . . . . . . . . . . . . . . . . . . . . . 4 ( Important safety information . . . . . . . . . . . . . . . 5 General information . . . . . . . . . . . . . . . . . . . . . . . . . . . 5 Microwave . . . . . . . . . . . . . . . . . . . . . . . . . . . . . . . . . . 5 Cleaning function . . . . . . . . . . . . . . . . . . . . . . . . . . . . . 6 ] Causes of damage . . . . . . . . . . . . . . . . . . . . . . . . 7 General information . . . .
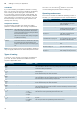
en Intended use Save energy with Eco heating types Acrylamide in foodstuffs . . . . . . . . . . Slow cook . . . . . . . . . . . . . . . . . . . . Drying. . . . . . . . . . . . . . . . . . . . . . . . Preserving . . . . . . . . . . . . . . . . . . . . Prove dough. . . . . . . . . . . . . . . . . . . Defrosting. . . . . . . . . . . . . . . . . . . . . Heating food in a microwave . . . . . . Keeping warm . . . . . . . . . . . . . . . . . Test dishes. . . . . . . . . . . . . . . . . . . . . . . . . . . . . .
Important safety information (Important safety information General information no i t amro f n i y t e f as t na t ropmI : Warning – Risk of fire! Combustible items stored in the cooking compartment may catch fire. Never store combustible items in the cooking compartment. Never open the appliance door if there is smoke inside. Switch off the appliance and unplug it from the mains or switch off the circuit breaker in the fuse box. Risk fire! is created when the appliance ■ A of draught door is opened.
en Important safety information Risk Food of fire! may catch fire. Never heat food in heat-retaining packages. Do not leave food heating unattended in containers made of plastic, paper or other combustible materials. Do not select a microwave power or time setting that is higher than necessary. Follow the information provided in this instruction manual. Never use the microwave to dry food. Never defrost or heat food with a low water content, e.g. bread, at too high a microwave power or for too long.
Causes of damage : Warning – Risk of serious damage to health! The appliance will become very hot during the cleaning function. The non-stick coating on baking trays and tins is destroyed and noxious gases are released. Never clean non-stick baking trays and baking tins using the cleaning function. Only clean enamelled accessories using the cleaning function. : Warning – Risk of burns! The cooking compartment becomes extremely hot during the cleaning function. Never open the appliance door.
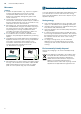
en Environmental protection Microwave Caution! ■ Creation of sparks: Metal – e.g. a spoon in a glass – must be kept at least 2 cm from the cooking compartment walls and the inside of the door. Sparks can irreparably damage the glass on the inside of the door. ■ Combining accessories: Do not combine the wire rack with the universal pan. Sparks may be created if they are inserted directly on top of one another. Only insert them into their own shelf level.
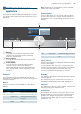
Getting to know your appliance *Getting to know your appliance Note: Depending on the appliance model, individual details and colours may differ. In this chapter, we will explain the displays and controls. You will also find out about the various functions of your appliance. In the control panel, you can use the various buttons and the rotary selector to set the required function of the appliance. The current settings are shown on the display.
en Getting to know your appliance Countdown If you have started your appliance without a cooking time, you can see how long the operation has already been running for at the top right in the status bar. If you had set a cooking time and it was deleted, the countdown applies the time that has already elapsed and continues to count down from this time. You can therefore always check how long the operation has already been running.
Accessories en ; . Pizza setting 30-275 °C Slow cooking 70-120 °C $ R ˆ , Bottom heating 30-250 °C Keeping warm 60-100 °C For preparing pizza and dishes which require a lot of heat from underneath. The bottom heating element and the ring heating element in the back panel heat up. For gentle and slow cooking of seared, tender pieces of meat in ovenware without a lid. The heat is emitted evenly from the top and bottom at low temperatures. For cooking in a bain marie and for the final baking stage.
Accessories en Note: The accessories may deform when they become hot. This does not affect their function. Once they have cooled down again, they regain their original shape. Microwave Only the wire rack provided is suitable when using the microwave only. If you use the universal pan or the baking tray, this may create sparks, which may damage the cooking compartment.
Before using for the first time Universal pan For moist cakes, pastries, frozen meals and large roasts. It can be used to catch dripping fat when you are grilling directly on the wire rack. Baking tray For tray bakes and small baked products. Wire insert For meat, poultry and fish. For inserting into the universal pan to catch dripping fat and meat juices. Profi pan For preparing large quantities. Lid for the Profi pan The lid turns the Profi pan into a Profi roasting dish.
en Operating the appliance Apply the settings indicated. Starting or interrupting operation Settings Type of heating Top/bottom heating % Temperature Cooking time 240 °C 1 hour To start operation or to interrupt an operation which has started running, press the Start/Stop button. The cooling fan may continue to run after an operation is interrupted. Press the On/Off button to delete all settings. If you open the cooking compartment door during operation, operation is interrupted.
Time-setting options 4. Use the start/stop button to start. en OTime-setting options PLQ V Your appliance has different time-setting options. sno i t po gn i t es -emi T 7RS ERWWRP KHDWLQJ & Time-setting option Timer Q The set type of heating and the temperature are shown in the display. + Cooking time Rapid heat up * End time You can use the c button to heat up the cooking compartment particularly quickly.
en Time-setting options Cooking time 1. Touch the "End If you set the cooking time for your meal, the operation stops automatically once this time has elapsed. The oven stops heating. Prerequisite: A type of heating and a temperature have been set. For example: Setting for 4D hot air, 180 °C, cooking time 45 minutes. 1. Press the 0 button. The time-setting options menu opens. ꑘ 7LPHU 2. Set the cooking time using the rotary selector. ꑖ PLQ V ꑖ PLQ V ꑘ 7LPHU ꑗ 2.
Childproof lock AChildproof lock Your appliance is equipped with a childproof lock so that children cannot switch it on accidentally or change any settings. kco l f o rpd l i hC Activating and deactivating You can activate and deactivate the childproof lock when the appliance is switched on or off. In each case, press the / button for approx. 4 seconds. A confirmation note appears in the display and the / symbol appears in the status bar.
en Microwave 6. Press the menu button. "Save" or "Discard" appears on the display. Power cut Following a long power cut, the settings for initial use are shown in the display. Reset the language, time and date. ^Microwave You can use the microwave to cook, heat up or defrost food quickly. The microwave can be used on its own, or in combination with a type of heating.
Sabbath mode You can change the values at any time. To do so, touch the appropriate field and use the rotary selector to change the values. The cooking time has elapsed A signal sounds. The microwave operation has finished. x 0 min 00 s appears in the display end "Finished" appears in the status bar. You can cancel the audible signal before it has finished by pressing the 0 button. If you want to set a microwave output setting again, touch the appropriate field and enter a cooking time.
en Cleaning agent DCleaning agent With good care and cleaning, your appliance will retain its appearance and remain fully functioning for a long time to come. We will explain here how you should correctly care for and clean your appliance. Door panels t nega gn i nae l C Door handle Suitable cleaning agents To ensure that the different surfaces are not damaged by using the wrong cleaning agent, observe the information in the table.
Cleaning function ■ Enamel is baked on at very high temperatures.This can cause some slight colour variation. This is normal and does not affect operation. The edges of thin trays cannot be completely enamelled. As a result, these edges can be rough. This does not impair the anti-corrosion protection. Keeping the appliance clean Always keep the appliance clean and remove dirt immediately so that stubborn deposits of dirt do not build up.
en Rails Once the cleaning has finished An audible signal sounds. The oven stops heating. “Finished” appears in the status bar. Use the 0 button to switch off the audible signal. “Appliance cooling down” appears in the status bar. Cancelling the cleaning operation Use the "On/off" button to switch off the oven. The cooking compartment door cannot be opened until the H symbol goes out in the status bar. Adjusting the cleaning setting Once cleaning starts, the cleaning setting can no longer be changed.
Rails Inserting the holders If the holders fall out when you remove the rails, these must be re-inserted. en 3. Then fold it forwards and insert it (fig. #). 4. And push it downwards (fig. $). 1. The holders at the front differ from those at the rear (fig. !). 2. Use the hook to mount the front holder at the top into the round hole ‚, set it at a slight incline, attach it at the bottom, and straighten it ƒ (fig. "). 1 2 D 5. Completely reinsert the pull-outs. E 3.
Appliance door en qAppliance door With good care and cleaning, your appliance will retain its appearance and remain fully functional for a long time to come. This will tell you how to clean the appliance door. Removing and fitting the door panels To facilitate cleaning, you can remove the glass panels from the appliance door. r o d e c na i l p A Removing the door cover The stainless-steel inlay in the door cover may become discoloured. To carry out thorough cleaning, you can remove the cover.
Appliance door : Warning – Risk of serious damage to health! If the screws are loosened, the safety of the appliance can no longer be guaranteed. Microwave energy may escape. Never loosen the screws. Do not unscrew the four black screws (fig. &). ■ Risk of injury! ■ 5. Press the front panel down until it clicks audibly into place (fig. %). 6. Open the appliance door again slightly and remove the tea towel. 7. Screw both screws back in on the left and right. 8.
en Trouble shooting 3Trouble shooting information. ~ "Tested for you in our cooking studio" on page 29 If a fault occurs, there is often a simple explanation. Before calling the after-sales service, please refer to the fault table and attempt to correct the fault yourself.
Customer service 4Customer service Our after-sales service is there for you if your appliance needs to be repaired. We will always find an appropriate solution, also in order to avoid after-sales personnel having to make unnecessary visits. ec i v res remo t suC E number and FD number When calling us, please give the full product number (E no.) and the production number (FD no.) so that we can provide you with the correct advice.
Dishes en Selecting a dish Applying settings for dishes The dishes are arranged in a uniform structure: You will be guided through the entire setting process for your chosen food. Always touch the "Next" field. ■ ■ ■ Category Food Dish 1. Press the menu button. The operating modes menu opens. The following table lists the categories with the corresponding food. One or more dishes are listed beside each food.
Tested for you in our cooking studio en JTested for you in our cooking studio settings tables will be reduced. The cake will not brown as much underneath. Baking in combination with a microwave is only possible on one level. Here, you can find a selection of dishes and the ideal settings for them. We will show you which type of heating and temperature are best suited to your dish. You will get information on suitable cooking accessories and the height at which they should be placed in the oven.
en Tested for you in our cooking studio Note: Baking times can not be reduced by using higher temperatures. Cakes or small baked items would only be cooked on the outside, and would not be fully baked in the middle. The setting values apply to dishes placed into a cold cooking compartment. By doing so, you can make energy savings of up to 20 per cent. If you preheat the oven, you can reduce the indicated baking times by several minutes.
Tested for you in our cooking studio en Dish Accessories/cookware Shelf posi- Type of tion heating Temperature in °C Yeast cake with moist topping, 2 levels Plaited loaf, savarin Universal pan + baking tray 3+1 : 150-160 MW power in Cooking watts time in mins.
en Tested for you in our cooking studio The cake is too light on top, and too dark underneath. The cake is too dark on top, and too light underneath. Cakes baked in a tray or tin are too brown at the back. The whole cake is too dark. The cake is unevenly browned. You were baking on several levels. The items on the top baking tray are darker than those on the lower baking tray. The cake looks good, but is not cooked properly in the middle.
Tested for you in our cooking studio The setting values apply to dishes placed into a cold cooking compartment. By doing so, you can make energy savings of up to 20 per cent. If you preheat the oven, you can reduce the indicated baking times by several minutes. Preheating is necessary for selected dishes, and this is indicated in the table. Some food turns out better if it is baked in several stages. These dishes are indicated in the table.
en Tested for you in our cooking studio Pizza, quiche and savoury cakes Your appliance offers you a range of heating types for preparing pizza, quiche and savoury cakes. You can find the ideal settings for many dishes in the settings tables. Also refer to the notes in the section on allowing dough to rise. Only use original accessories supplied with your appliance. These have been tailored to the cooking compartment and the operating modes of your appliance.
Tested for you in our cooking studio Types of heating used: ■ : 4D hot air ■ % Top/bottom heating ■ ■ ■ en ; Pizza setting & Intensive heat , coolStart function Dish Accessories Shelf posi- Type of tion heating Temperature in °C MW power in Cooking watts time in mins.
en Tested for you in our cooking studio baking tins/dishes next to one another in the cooking compartment. more even browning. You can increase the temperature next time if necessary. Accessories Ensure that you always use suitable accessories and that they are placed in the oven the right way around. Wire rack Slide the wire rack in with the imprint "Microwave" facing the appliance door, and the outer rail facing downwards.
Tested for you in our cooking studio Poultry Your appliance offers you a range of heating types for preparing poultry. You can find the ideal settings for certain dishes in the settings tables. Roasting on the wire rack Roasting on the wire rack is particularly well suited for larger poultry or for multiple pieces at the same time. Slide the wire rack in at the indicated shelf position with the imprint "Microwave" facing the appliance door and the outer rail facing downwards.
en Tested for you in our cooking studio Remove unused accessories from the cooking compartment. This will achieve the best possible cooking results and energy savings of up to 20 per cent. Tips ■ For duck or goose, pierce the skin on the underside of the wings. This allows the fat to run out. ■ If using duck breast, score the skin. Do not turn duck breasts. ■ When you turn poultry, ensure that the breast side or the skin side is underneath at first.
Tested for you in our cooking studio Meat Your appliance offers you many heating types for preparing meat. You can find the ideal settings for many dishes in the settings tables. Roasting and braising Baste lean meat with fat as required or cover it with strips of bacon. Score the rind crosswise. If you turn the joint when cooking, ensure that the rind is underneath at first. When the joint is ready, turn off the oven and allow it to rest for another 10 minutes in the cooking compartment.
en Tested for you in our cooking studio Use tongs to turn the pieces of food you are grilling. If you pierce the meat with a fork, the juices will run out and it will become dry. Do not add salt until after the meat has been grilled. Salt draws water from the meat. of meat, you should definitely use a lower temperature. If roasting several joints, use the weight of the heaviest piece as a basis for determining the cooking time. The individual pieces should be approximately equal in size.
Tested for you in our cooking studio en Dish Accessories/cookware Shelf posi- Type of tion heating Temperature in °C/ grill setting Sirloin, medium, 1.5 kg Cookware, uncovered 1 240-260 Steak, 3 cm thick, medium Wire rack 2 3 - 15-20 Burger, 3-4 cm thick**** Wire rack 2 % ( ( MW power in Cooking watts time in mins. 180 30-40 3 - 20-30 Veal Joint of veal, 1.5 kg Cookware, uncovered 1 160-170 - 100-120 Joint of veal, 1.
en Tested for you in our cooking studio Fish Your appliance offers you a range of heating types for preparing fish. You can find the ideal settings for many dishes in the settings tables. The whole fish does not have to be turned. Place the whole fish into the cooking compartment in swimming position with the dorsal fin facing upwards. Placing half a potato or a small oven-proof container in the stomach cavity of the fish will provide stability.
Tested for you in our cooking studio Types of heating used: ■ 4 Circulated air grilling ■ ( Grill, large area Dish ■ ■ ■ Accessories/cookware en ; Pizza setting , coolStart function Ý Microwave Shelf posi- Type of tion heating Temperature in °C/ grill setting MW power in Cooking watts time in mins. Fish Fish, grilled, whole 300 g, e.g. trout Cookware, uncovered 1 170-190 - 20-30 Fish, grilled, whole 300 g, e.g. trout Wire rack 2 2 90 15-20 Fish, braised, whole 300 g, e.g.
en Tested for you in our cooking studio Stir or turn the food two to three times during this time. After heating up the food, leave it to rest for two to three minutes to compensate for the temperature difference. The food transfers heat to the cookware. It can become very hot when only using a microwave for cooking. far as the limit stop with the bevelled edge facing the appliance door. Greaseproof paper Only use greaseproof paper that is suitable for the selected temperature.
Tested for you in our cooking studio Dish Accessories/cookware Shelf posi- Type of tion heating Temperature in °C/grill setting Chips** Baking tray 1 Chips, 2 levels (turn during cooking) Universal pan + baking tray Rice Long-grain rice, 250 g + 500 ml water en - 3+1 , : MW power in Cooking watts time in mins.
en Tested for you in our cooking studio : Warning – Risk of burns! Microwave popcorn Use flat, heat-resistant glass cookware, e.g. the lid of an ovenproof dish. Do not use porcelain or heavily curved plates. Place the popcorn bag onto the cookware with the labelled side facing downwards. Use the settings indicated in the table. The time may need to be adjusted, depending on the product and quantity in question. Airtight packaging may burst when food is heated.
Tested for you in our cooking studio Types of heating used: ■ ‘ Hotair Eco ■ en + Top/bottom heating Eco Dish Accessories/cookware Shelf posi- Type of tion heating Temperature in °C Cooking time in mins.
en Tested for you in our cooking studio Acrylamide in foodstuffs Acrylamide is mainly produced in grain and potato products prepared at high temperatures, such as potato crisps, chips, sliced bread, bread rolls, bread or fine baked goods (biscuits, gingerbread, spiced biscuit). Tips for keeping acrylamide to a minimum General ■ Keep cooking times as short as possible. ■ Cook food until it is golden brown, but not too dark. ■ Large, thick pieces of food contain less acrylamide.
Tested for you in our cooking studio en Dish Cookware Shelf posi- Type of tion heating Searing time Temperain mins. ture in °C Pork medallions, 4 cm thick Cookware, uncovered 1 . 5-7 85* Cooking time in mins. 90-120 Cookware, uncovered 1 . 8-10 85* 240-300 Cookware, uncovered 1 4-6 85* 120-180 Sirloin, 5-6 cm thick Cookware, uncovered 1 6-8 85* 210-270 Beef medallions/rump steak, 4 cm thick Cookware, uncovered 1 . . . 5-7 85* 60-120 Veal Joint of veal, 4-5 cm thick, 1.
en Tested for you in our cooking studio Type of heating used: ■ : 4D hot air Dish Accessories Shelf posi- Type of tion heating Temperature in °C Pomes (apple rings, 3 mm thick, 200 g per wire rack) Stone fruit (plums) Wire rack 2 : 80 Cooking time in hours 4-7 Wire rack 2 80 8-10 Root vegetables (carrots), grated, blanched Wire rack 2 80 4-7 Sliced mushrooms Wire rack 2 60 6-8 Herbs, washed 1-2 wire racks - : : : : 60 2-6 Preserving You can preserve fruit and vegetables us
Tested for you in our cooking studio Type of heating used: ■ en : 4D hot air Dish Cookware Shelf posi- Type of tion heating Temperature in °C Cooking time in mins. Preserving Vegetables, e.g. carrots 1-litre preserving jars 1 : Vegetables, e.g. cucumbers 1-litre preserving jars 1 : Stone fruit, e.g. cherries, damsons 1-litre preserving jars 1 : Pomes, e.g.
en Tested for you in our cooking studio Leave the defrosted food to rest for another 10 to 30 minutes in the appliance whilst it is switched off, so that the temperature balances out. Tip: If you have quantities other than those indicated in the settings table, this basic rule will help: double the quantity equates to roughly double the cooking time. Type of heating used: ■ Ý Microwave Dish Accessories/cookware Shelf posi- Type of tion heating MW power in Cooking watts time in mins.
Tested for you in our cooking studio Dish Accessories/cookware Shelf posi- Type of tion heating Vegetables, 600 g Cookware, uncovered 1 Ý Miscellaneous Defrosting butter, 125 g Cookware, uncovered 1 Ý en MW power in Cooking watts time in mins. 180 10 90 8-13 90 7-9 * Turn halfway through cooking time Heating food in a microwave Using the microwave, you can heat food, or defrost and heat it in a single step. Take ready-to-eat meals out of the packaging.
en Tested for you in our cooking studio Dish Cookware Shelf posi- Type of tion heating MW power in Cooking watts time in mins. Vegetables, chilled 250 g Cookware, covered 1 Ý 600 3-8 Vegetables, frozen loose, 250 g Cookware, covered 1 600 8-12 Creamed spinach, frozen block, 450 g Cookware, covered 1 Ý Ý 600 11-16 Dishes, chilled Plated meal, 1 portion Cookware, covered 1 600 4-8 Soup, stew, 400 ml Cookware, covered 1 600 5-7 Side dishes, e.g.
Tested for you in our cooking studio Types of heating used: ■ : 4D hot air ■ ■ en % Top/bottom heating ; Pizza setting Dish Accessories/cookware Shelf posi- Type of tion heating Temperature in °C Cooking time in mins.
en Tested for you in our cooking studio Dish Accessories/cookware Shelf posi- Type of tion heating Temperature in °C MW power in Cooking watts time in mins.
6
6
%6+ +DXVJHUlWH *PE+ &DUO :HU\ 6WU 0QFKHQ *(50$1< VLHPHQV KRPH FRP .