>HQ@ ,QVWUXFWLRQV IRU LQVWDOODWLRQ DQG XVH (+ %$ +RE
EH...BA...
Ú Table of contents e[nuoIrs]acitlfde INSTALLATION INSTRUCTIONS ...............................................4 Assembly ................................................................................4 Important notes ..............................................................................6 Preparation of assembly kitchen units, figures 1/2/3/4 ........6 Installing the appliance, figures 5/6...........................................6 Uninstalling the appliance ....................................
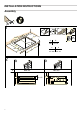
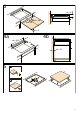
INSTALLATION INSTRUCTIONS Assembly [ 5 % ' & ( $ PLQ % PLQ PLQ $ & ' PLQ PLQ PLQ PLQ PLQ & D ( PLQ 4 E PLQ PLQ PLQ
PLQ PLQ PLQ PLQ D E PLQ PLQ PLQ 5
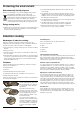
Preparation of assembly kitchen units, figures 1/2/3/4 Built-in kitchen units: Minimum temperature resistance of 90°C. Gap: Remove any shavings after performing cutting work. 9 1a Assembly over drawer, figure 2a / 9 9 Cut surfaces: Seal with heat resistant material. 1 Metal objects stored inside the drawer could become very hot due to the air recirculating from the hob ventilation system. If this occurs, an intermediate support is recommended.
INSTRUCTION MANUAL Produktinfo Additional information on products, accessories, replacement parts and services can be found at www.siemens-home.com and in the online shop www.siemens-eshop.com : Safety precautions Please read this manual carefully. Please keep the instruction and installation manual as well as the appliance certificate in a safe place for later use or for subsequent owners. Check the appliance after removing it from the packaging.
Risk of electric shock! ■ Incorrect repairs are dangerous. Repairs may only be carried out and damaged power cables replaced by one of our trained after-sales technicians. If the appliance is defective, unplug the appliance from the mains or switch off the circuit breaker in the fuse box. Contact the after-sales service. ■ Do not use any high-pressure cleaners or steam cleaners, which can result in an electric shock. ■ A defective appliance may cause electric shock. Never switch on a defective appliance.
Protecting the environment Environmentally-friendly disposal Dispose of packaging in an environmentally-friendly manner. This appliance is labelled in accordance with European Directive 2012/19/EU concerning used electrical and electronic appliances (waste electrical and electronic equipment - WEEE). The guideline determines the framework for the return and recycling of used appliances as applicable throughout the EU. Energy-saving advice ■ ■ ■ ■ ■ ■ Always use the correct lid for each pan.
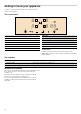
Getting to know your appliance On page 2, you will find information on the dimensions and power of the hotplates. The control panel Indicators Control panels # Main switch ‹ Functionality ¸ Selecting the hotplate ‚- Š Power levels A/@ Selecting settings › Powerboost function › Powerboost function •/œ Residual heat 0 Time program function ‹‹ Time program function ‚ Childproof lock Control panels Pressing a symbol activates its corresponding function.
Programming the hob This section will show you how to program the hotplates. The table contains power levels and cooking times for several dishes. 2. Within the next 10 seconds press the + or - symbol. The basic setting appears: + symbol = power level 9 - symbol = power level 4 Turning the hob on and off The hob is turned on and off using the main switch. To turn on: Press the # symbol. A beep sounds. The indicator located next to the main switch and the ‹ indicators of the hotplates light up.
Power level Slow cooking, simmering Potato dumplings* 4.-5. Fish* 4-5 White sauces (e.g., bechamel) 1-2 Whipped sauces (e.g., Bearnaise, Hollandaise) 3-4 Boiling, steaming, sautéing Rice (with a double amount of water) 2-3 Rice pudding 1.-2. Potatoes 4-5 Pasta* 6-7 Soups 3.-4. Vegetables 2.-3. Greens, frozen foods 3.-4. Cooked in a pressure cooker 4.-5. Stewing Meat roll 4-5 Stew 4-5 Goulash 3.-4.
Powerboost function The Powerboost function can be used to heat large amounts of water more quickly than the power level Š. All the hotplates have this function. To activate The hob must be switched on, but no hotplate should be working. 1. Select a hotplate. Note: If any hotplate is switched on when the Powerboost function is working, › and Š will flash on the hotplate display; the power level Š will then be set. The Powerboost function will be deactivated. To deactivate 1. Select a hotplate. 2.
Automatic time limitation If the hotplate remains in use for a long time and no changes are made in the settings, the automatic time limitation function is triggered. The hotplate stops heating. The ”, ‰ symbol and the residual heat indicator œ/• flash alternately in the display. The indicator goes out when any symbol is pressed. The hotplate can now be reset. When the automatic time function is used, it is governed by the selected power level (from 1 to 10 hours).
Accessing the basic settings The hob should be turned off. 1. Turn on the hob. 3. Press the ‚ symbol several times until the required function appears. 4. Then select the required setting using the + and - symbols. 2. Within the next 10 seconds, press the ‚ symbol for 4 seconds. 5. Press the symbol ‚ again for more than 4 seconds. The settings will have been correctly saved. In the display, the settings ™ and ‚ light up alternately with ‹ as the default setting.
Indicator Malfunction Solution “§ + number / š + number / ¡ + number Electronic system malfunction. Unplug the hob from the mains. Wait about 30 seconds before plugging it in again.* ”‹ / ”Š There is an internal operating error. Unplug the hob from the mains. Wait about 30 seconds before plugging it in again.* ”ƒ The electronic system has overheated and the corresponding hotplate has been switched off. Wait until the electronic system has cooled down sufficiently.
Tested dishes This table has been prepared for assessment institutions to provide controls for our appliances. The data in the table refers to our Schulte-Ufer cookware accessories (4 piece cookware set for the HZ 390042 induction hob) with the following measurements: ■ Saucepan Ø 16 cm, 1.2 l for hotplates of Ø 14.5 cm ■ Pot Ø 16 cm, 1.7 l for hotplates of Ø 14.5 cm ■ Pot Ø 22 cm, 4.
Preheating Tested dishes Cooking Hotplate Power level Time (Min:S) Cover Power level Cover Ø 18 cm 9 1:30 No 7 No Ø 18 cm 9 1:30 No 7 No Ø 18 cm 9 Until the temperature of the oil reaches 180 °C No 9 No Pan-frying pork sirloin Cookware: Frying pan Sirloin initial temperature: 7 °C 2 pieces of sirloin (total weight approx. 200 g, 1 cm thick) Frying crêpes** Cookware: Frying pan 55 ml of crêpe batter Frying frozen potato chips Cookware: Pot Ingredients: 1.
Siemens-Electrogeräte GmbH Carl-Wery-Straße 34 81739 München Germany *9000884167* 9000884167 02 940516