TE 803.. / TE 806.. siemens-home.
de ���������������������������������������������������������������������������������������������������������������������������������� 2 en �������������������������������������������������������������������������������������������������������������������������������� 28 fr �������������������������������������������������������������������������������������������������������������������������������� 53 it ������������������������������������������������������������������������������������������������
B ËÍ ÂÃÀ Á Å Æ 5a Espresso 5 5b 5c 27 * 28 * 2 3 4 6 4 7 8 16 17 15 12 18 5 11 25 10 19 9 1 23 26 *
C 14 13 24 D E 23a 10a 10c 10b 23b 10d 23c
F 20b 19 22 2. 20 1. 20a 1. 2.
de Sehr geehrte Kaffeeliebhaberin, sehr geehrter Kaffeeliebhaber, herzlichen Glückwunsch zum Kauf dieses Kaffeevollautomaten aus dem Hause Siemens. Diese Gebrauchsanleitung beschreibt verschiedene Gerätevarianten, die sich im Detail unterscheiden. Bitte auch die beiliegende Kurzanleitung beachten. Sie kann in einem speziellen Aufbewahrungsfach 22 bis zum nächsten Gebrauch verstaut werden.
de Sicherheitshinweise Die Gebrauchsanleitung bitte sorgfältig durchlesen, danach handeln und aufbewahren! Bei Weitergabe des Geräts diese Anleitung beilegen. Dieses Gerät ist für die Verarbeitung haushaltsüblicher Mengen im Haushalt oder in haushaltsähnlichen, nicht-gewerblichen Anwendungen bestimmt. Haushaltsähnliche Anwendungen umfassen z. B.
de Gerät oder Netzkabel niemals in Wasser tauchen. Nur benutzen, wenn Zuleitung und Gerät keine Beschädigungen aufweisen. Im Fehlerfall sofort den Netzstecker ziehen oder die Netzspannung ausschalten. Das Gerät enthält Permanentmagnete, die elektronische Implantate wie z. B. Herzschrittmacher oder Insulinpumpen beeinflussen können. Träger von elektronischen Implantaten bitte einen Mindestabstand von 10 cm zur Gerätefront einhalten. A Erstickungsgefahr! Kinder nicht mit Verpackungsmaterial spielen lassen.
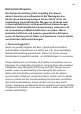
de Lieferumfang (Bild A auf den Ausklappseiten) 1 2 3 4 Kaffeevollautomat Gebrauchsanleitung Kurzanleitung Milchschäumer 5 Wasserhärtestreifen 6 Pulverlöffel 7 Milchbehälter, isoliert * Auf einen Blick (Bilder B, C, D, E und F auf den Ausklappseiten) 1 Netzschalter O / I 2 Taste á (Personalisierung) 3 Taste à (Service-Programme) 4 Wähltasten < > 5 Display a) Statuszeile b) Auswahlzeile c) Navigationszeile 6 Drehknopf für Einstellungen Display 7 Taste j (Info-Menü) 8 Taste start (
de Vor dem ersten Gebrauch Allgemeines Nur reines, kaltes Wasser ohne Kohlensäure und ausschließlich geröstete Bohnen (vorzugsweise Espresso- oder VollautomatenBohnenmischungen) in die entsprechenden Behälter füllen. Keine glasierten, karamellisierten oder mit sonstigen zuckerhaltigen Zusätzen behandelte Kaffeebohnen ver wenden, sie verstopfen die Brüheinheit. Bei diesem Gerät ist die Wasserhärte ein stellbar. Ab Werk ist die Wasserhärte 4 eingestellt.
de ●● Das Gerät ist betriebsbereit, wenn im Display 5 die Symbole für die Getränke auswahl und Taste 8 start leuchten. ËË Í ÂÃÀ Á Å Æ Espresso Info: Der Kaffeevollautomat ist ab Werk mit den Standardeinstellungen für optimalen Betrieb programmiert. Das Gerät schaltet nach einer ausgewählten Zeit automatisch ab (siehe Kapitel „Menüeinstellungen – Auto Off in“). Bedienelemente Netzschalter O / I Mit dem Netzschalter 1 O / I wird das Gerät ein- oder ausgeschaltet.
de Display Das Display 5 zeigt durch Symbole Auswahlmöglichkeiten, Kaffeestärke und Füllmenge sowie durch Texte Einstellungen, laufende Vorgänge und Meldungen an. Mit Drehknopf 6 und Wähltasten 4 können hier Einstellungen vorgenommen werden. Die gewählte Einstellung wird durch einen Rahmen markiert. ËË Í ÂÃÀ Á Å Æ Espresso 5a 5b 5c Beispiel: In der Statuszeile 5a wird der Name der Getränkeart sowie bei Kaffeegetränken die Einstellung der Stärke 55 und Menge � angezeigt.
de Mahlgrad einstellen Mit dem Drehwähler 17 für Mahlgradein stellung kann die gewünschte Feinheit des Kaffeepulvers eingestellt werden. Tassenwärmung (je nach Modell) ¡¡ Achtung! Den Mahlgrad nur bei laufendem Mahlwerk verstellen! Das Gerät kann sonst beschädigt werden. Nicht in das Mahlwerk greifen. Der Kaffeevollautomat verfügt über eine Tassenwärmung 27 die mit der Taste 28 manuell ein oder ausgeschaltet werden kann. Ist die Tassenwärmung 27 an, leuchtet die Taste 28.
de Displayeinstellungen Durch Drücken der Wähltasten 4 < und > können in den Menüebenen folgende Auswahlmenüs aufgerufen werden: Getränkeauswahl ËÍ ÂÃÀ Á Å Æ Espresso Kaffeestärke (nur für Kaffeegetränke) ËÍ Espresso 5 55 555 Füllmenge Espresso Î Ð ËÍ Ò Persönliche Füllmenge einstellen ËÍ Espresso Î ± 0 ml 10 Mit dem Drehknopf 6 können innerhalb der Menüs folgende Parameter eingestellt werden: Einstellungen – Getränkeauswahl: Â Ã À Á Å Æ È É Ê 2 x Espresso 2 x Café Crème Espresso Café
de Einstellungen – Füllmenge Î Ð Ò klein mittel groß Einstellungen – Persönliche Füllmenge Durch Drehen des Drehknopfs 6 kann die vorgegebene Füllmenge Î, Ð oder Ò individuell an die vorhandene Tassengröße angepasst werden. Die Füllmenge ist passend zum ausgewählten Getränk einstellbar. Im Display rechts oben zeigt ein Pfeil im Symbol Ò, ob die Füllmenge erhöht oder verringert wurde. Bei Einstellung z. B. Café Crème Á wird die Anpassung der Kaffeeflüssigkeit in ml und bei einem Kaffee-Milchgetränk z. B.
de Zum Löschen des Benutzers mit der Wähltaste Name löschen start auswählen und Taste 8 start drücken. Temperaturen speichern ●● Mit der Wähltaste Kaffee Temp. oder Heissw. Temp. auswählen. ●● Mit dem Drehknopf 6 die gewünschte Einstellung auswählen. ●● Taste 2 á drücken. Die Einstellungen sind gespeichert. Benutzerprofil aufrufen ●● Taste 2 á kurz drücken.
de Menüeinstellungen ●● Taste 7 j mindestens 3 Sekunden gedrückt halten. Es erscheinen nun die verschiedenen Einstellmöglichkeiten. Einstellungen Kaffee Temp. Heissw. Temp Profil verlassen <85°C Mit den Wähltasten 4 < und > können die verschiedenen Einstellmöglichkeiten aus gewählt werden. Hinweis: Die vorgenommenen Änderungen werden automatisch gespeichert. Eine zusätzliche Bestätigung ist nicht erforderlich. Wenn ca. 2 Minuten keine Eingabe erfolgt ist, schließt sich das Menü automatisch.
de Wasserfilter Bevor ein neuer Wasserfilter verwendet werden kann, muss dieser gespült werden. ●● Dazu Wasserfilter mit Hilfe des Pulverlöffels 14 in den Wassertank 11 fest eindrücken. Wassertank bis zur Markierung „max“ mit Wasser füllen. ●● Durch Drehen des Drehknopfs 6 start wählen und Taste 8 start drücken. 1 L Behälter unter Schäumer, Ansaugrohr in Behälter geben start ●● Einen Behälter mit 1 l Fassungsvermögen unter den Milchschäumer 10 stellen.
de Zubereitung mit Kaffeebohnen Dieser Kaffeevollautomat mahlt für jeden Brühvorgang frischen Kaffee. Vorzugsweise Espresso- oder Vollautomaten-Bohnen mischungen verwenden. Für eine optimale Qualität die Bohnen kühl und verschlossen aufbewahren oder tiefgefrieren. Die Kaffee bohnen können auch tiefgefroren gemahlen werden. Wichtig: Täglich frisches, kaltes Wasser in den Wassertank 11 füllen. Es sollte immer ausreichend Wasser für den Betrieb des Gerätes im Wassertank 11 sein.
de Zubereitung mit gemahlenem Kaffee Dieser Vollautomat kann auch mit gemahlenem Kaffee (kein löslicher Kaffee) betrieben werden. Hinweis: Bei der Zubereitung mit gemahlenem Kaffee ist die aromaDouble ShotFunktion nicht verfügbar. Getränkezubereitung ohne Milch Das Gerät muss betriebsbereit sein. ●● Vorgewärmte Tasse(n) unter den Kaffeeauslauf 9 stellen. ●● Mit dem Drehknopf 6, Espresso À oder Café Crème Á auswählen. ●● Die Pulverschublade 18 öffnen.
de Milchschaum und warme Milch zubereiten ¡¡ Verbrennungsgefahr! Der Milchschäumer 10 wird sehr heiß. Nach Benutzung zuerst abkühlen lassen und erst dann berühren. Das Gerät muss betriebsbereit sein. ●● Das Ansaugrohr 10d des Milchschäumers 10 in den Milchbehälter 26 einführen. ●● Die vorgewärmte Tasse oder Glas unter den Auslauf des Milchschäumers 10 stellen. ●● Mit dem Drehknopf 6 Milchs chaum È oder Warme Milch É auswählen. ●● Die Taste 8 start drücken.
de Pflege und tägliche Reinigung ¡¡ Stromschlaggefahr! Vor der Reinigung den Netzstecker ziehen. Das Gerät niemals in Wasser tauchen. Keinen Dampfreiniger benutzen. ●● Das Gehäuse mit einem weichen, feuchten Tuch abwischen. ●● Keine alkohol- oder spiritushaltigen Reinigungsmittel verwenden. ●● Keine scheuernden Tücher oder Reinigungsmittel verwenden.
de Milchsystem reinigen Wichtig: Milchsystem 10 unbedingt nach jeder Benutzung reinigen! Das Milchsystem 10 kann automatisch vorgereinigt (siehe Kapitel „Service-Programme“) oder manuell gereinigt werden. ●● Die einzelnen Teile wieder zusammensetzen. Dann den Milchschäumer bis zum Anschlag nach hinten in das Gerät einsetzen. Milchsystem 10 zum Reinigen zerlegen: ●● Milchsystem 10 gerade nach vorne aus dem Gerät herausziehen.
de ●● Die Abdeckung 20b der Brüheinheit abnehmen und die Brüheineit 20 unter fließendem Wasser gründlich reinigen. ●● Das Sieb der Brüheinheit unter dem Wasserstrahl gründlich reinigen. Wichtig: Ohne Spülmittel reinigen und nicht in den Geschirrspüler geben. ●● Den Geräteinnenraum mit einem feuchten Tuch gründlich reinigen, eventuell vorhandene Kaffeereste entfernen. ●● Brüheinheit 20 und Geräte-Innenraum trocknen lassen.
de Milchsystem reinigen Dauer: ca. 1 Minute Reinigung und Service Kurzspülen start Milchsystem calc‘nClean Das Milchsystem 10 kann automatisch vorgereinigt werden. ●● Taste 3 à drücken. Kurzspülen Milchsystem start ●● Taste 8 start drücken. Glas unter Schäumer stellen, Ansaugrohr in das Glas geben start ●● Ein leeres Glas unter das Milchsystem 10 stellen und das Ende des Ansaugrohrs 10d in das Glas geben. ●● Taste 8 start drücken. Das Milchsystem reinigt sich nun automatisch.
de 0,5 L Wasser + Entkalker zugeben start ●● Lauwarmes Wasser in den leeren Wasser tank 11 bis zur Markierung „0,5l“ einfüllen und 1 Siemens Entkalkungstablette TZ80002 darin auflösen. Bei Verwendung von TZ60002 unbedingt 2 Tabletten auflösen. ●● Taste 8 start drücken, das Entkalkungsprogramm läuft jetzt ca. 20 Minuten. Das Ansaugrohr 10d des Milchschäumers gründlich reinigen. Reinigen Dauer: ca. 8 Minuten.
de Tropfschale leeren Tropfschale einsetzen ●● Tropfschale 23 leeren und wieder einsetzen. Das Gerät ist fertig gereinigt und wieder betriebsbereit. calc‘nClean Dauer: ca. 36 Minuten. calc‘nClean kombiniert die Einzelfunktionen Entkalken und Reinigen. Liegt die Fälligkeit der beiden Programme nah beieinander, schlägt der Kaffeevollautomat automatisch dieses Serviceprogramm vor.
de ●● Die Taste 8 start drücken, das Entkalkungs programm läuft jetzt noch ca. 1 Minute und anschließend das Reinigungsprogramm ca. 7 Minuten und spült das Gerät. Entkalkungsprogramm läuft Reinigungsprogramm läuft Tropfschale leeren Tropfschale einsetzen ●● Tropfschale 23 leeren und wieder einsetzen. Wenn ein Filter verwendet wird, diesen jetzt wieder einsetzen. Das Gerät ist fertig entkalkt, gereinigt und wieder betriebsbereit.
de Zubehör Garantiebedingungen Folgendes Zubehör ist über den Handel und Kundendienst erhältlich. Für dieses Gerät gelten die von unserer jeweils zuständigen Landesvertretung herausgegebenen Garantiebedingungen des Landes, in dem das Gerät gekauft wurde. Sie können die Garantiebedingungen jederzeit über Ihren Fachhändler, bei dem Sie das Gerät gekauft haben, oder direkt bei unserer Landesvertretung anfordern.
de Einfache Probleme selbst beheben Problem Displayanzeige Bohnenbehälter f üllen trotz gefülltem Bohnen behälter 15 oder Mahlwerk mahlt keine Kaffeebohnen. Kein Heißwasserbezug möglich. Ursache Bohnen fallen nicht ins Mahlwerk (zu ölige Bohnen). Der Milchschäumer 10 oder die Aufnahme des Milchschäumers ist verschmutzt. Zu wenig oder kein Milch Der Milchschäumer 10 schaum oder der Milchoder die Aufnahme des schäumer 10 saugt keine Milchschäumers ist Milch an. verschmutzt. Ungeeignete Milch.
de Problem Der Kaffee ist zu „bitter“. Der Kaffee schmeckt „verbrannt“. Displayanzeige Störung Bitte Hotline anrufen Ursache Der Mahlgrad ist zu fein eingestellt oder das Kaffee pulver ist zu fein. Ungeeignete Kaffeesorte. Zu hohe Brühtemperatur Abhilfe Mahlgrad gröber stellen oder gröberes Kaffeepulver verwenden. Kaffeesorte wechseln. Temperatur reduzieren, siehe Kapitel „Menüeinstellungen – Kaffee Temp.
en Dear Coffee Connoisseur, Contents Congratulations on purchasing this fully automatic espresso machine from Siemens.
en Safety instructions Please read and follow the operating instructions carefully and keep them for later reference. Enclose these instructions when you give this appliance to someone else. This appliance is designed for the preparation of normal household quantities in the home, or in household-like, non-commercial environments.
en The appliance contains permanent magnets that may influence electronic implants such as pacemakers or insulin pumps. Persons with electronic implants should keep a minimum of 10 cm away from the front of the appliance. ¡ Risk of suffocation! Do not allow children to play with packaging material. Store small parts safely as they can be easily swallowed. ¡ Risk of injury! Do not reach into the grinding unit. A misuse of the appliance can potentially lead to injury.
en Included in delivery (Figure A on the fold-out pages) 1 Fully automatic espresso machine 2 Instruction manual 3 Quick reference guide 4 Milk frother 5 Water hardness testing strip 6 Measuring spoon 7 Milk container, insulated * At a glance (Figures B, C, D, E and F on the fold-out pages) 1 Power on/off switch O / I 2 Customising button á 3 Service programmes button à 4 Selection buttons < > 5 Display a) Status line b) Selection line c) Navigation line 6 Rotary knob for display
en Before using for the first time General Fill the appropriate container using only pure, cold, uncarbonated water and only roasted beans (preferably espresso or coffee bean blends for fully automatic coffee machines). Do not use coffee beans that have been glazed, caramelised or treated with other additives containing sugar, since they will block the brewing unit. The water hardness setting can be adjusted on this appliance. The factory setting for the water hardness is 4.
en ●● The appliance is ready for use when the symbols for the drink selection and the start button 8 light up in the display 5. ËË Í ÂÃÀ Á Å Æ Espresso Info: The factory settings of the fully automatic espresso machine are programmed for optimal performance. The appliance switches off automatically after a specific time (see “Menu settings – Auto Off after”).
en Display The display 5 uses symbols to indicate the selection options, coffee strength and per-cup quantity, and uses text to indicate settings, ongoing processes and messages. The rotary knob 6 and selection buttons 4 can be used to change settings. The selected setting is highlighted by a frame. ËË Í ÂÃÀ Á Å Æ Espresso 5a 5b 5c Example: The status line 5a shows the name of the type of drink, along with the strength setting 55 and per-cup quantity Î.
en Adjusting the grinding unit The rotary selector 17 adjusts the grind settings from coarse to fine. ¡¡ Warning! Adjust the grinding unit only while it is running! Otherwise the appliance may be damaged. Do not reach into the grinding unit. ●● While the grinding unit is running, adjust the rotary selector 17 from fine (a: Turn anticlockwise) to coarse (b: Turn clockwise). a b Cup warming function (depending on the model) ¡¡ Warning! The cup warmer 27 gets very hot.
en Display settings Press the selection buttons < and > 4 to select the following selection menus in the menu levels: Drink selection ËÍ ÂÃÀ Á Å Æ Espresso Coffee strength (only for coffee drinks) ËÍ Espresso 5 55 555 Per-cup quantity Espresso Î Ð ËÍ Ò Select your personal per-cup quantity ËÍ Espresso Î ± 0 ml 36 Turn the rotary knob 6 to adjust the following parameters within the menus: Settings – Drink selection: Â Ã À Á Å Æ È É Ê 2 x Espresso 2 x Coffee Espresso Coffee Macchiato Ca
en Settings – Per-cup quantity Î Ð Ò small medium large Settings – Personal per-cup quantity The preset per-cup quantity Î, Ð or Ò can be individually adjusted to the size of the cup in use by turning the rotary knob 6. The per-cup quantity can be adjusted according to the drink selected. An arrow in the Ò symbol in the top right-hand corner of the display indicates whether the per-cup quantity was increased or decreased.
en There are 6 characters available for the user name. To delete entries made, select the symbol â and press the start button 8. Note: Press the selection button > to save your entry. Press the selection button < to cut the process short. Info: The entry can be overwritten at any time. To delete the user, use the selection button Delete name start and press the start button 8. Saving temperatures ●● Use the selection button to select C offee temp. or Hot water temp.
en Menu settings Auto off after ●● Hold down the j button 7 for at least 3 seconds. The different setting options are now displayed. Settings Coffee temp. Hot water temp. Exit profile <85°C The different setting options can be selected with the selection buttons < and > 4. ●● Turn the rotary knob 6 to enter the time span after which the appliance should automatically switch off following the last drink preparation. A time between 5 minutes and 8 hours can be set. Cup warm.
en Water filter A new water filter must be rinsed before it can be used. ●● To do this, press the water filter firmly into the water tank 11 with the aid of the measuring spoon 14. Fill the water tank with water up to the “max” mark. ●● Turn the rotary knob 6 to select start and press the start button 8. Place 1 l container Place suction pipe in container start ●● Place a container with a capacity of 1 litre under the milk frother 10. ●● Place the end of the suction pipe 10d in the container.
en Preparation using coffee beans This fully automatic espresso machine grinds beans freshly for each brew. If possible, use only beans for fully automatic coffee and espresso machines. For optimal quality, deep-freeze the beans or store in a cool place in sealed containers. Coffee beans can be ground while frozen. Important: Fill the water tank 11 with cold, fresh water every day. The water tank 11 should always contain sufficient water for operating the appliance.
en Preparation using ground coffee ●● Open the powder compartment 18. ●● Pour in no more than 2 level measuring spoons 14 of ground coffee. This fully automatic espresso machine can also be operated using ground coffee (not instant coffee powder). ¡¡ Warning! Do not use whole beans or instant coffee. Note: The aromaDouble Shot function cannot be used when coffee is prepared using ground coffee. Drink preparation without milk The appliance must be ready for use.
en Info: When preparing warm milk, you may hear a whistling sound. This is caused by the milk frother for technical reasons. Maintenance and daily cleaning Tip: For optimal milk froth quality, use cold milk with a fat content of at least 1.5 % if possible. ¡¡ Danger of electric shock! Unplug the appliance before cleaning it. Never submerse the appliance in water. Do not use a steam cleaner.
en ●● Remove powder compartment 18 and rinse under running water. ●● Wipe out the inside of the tray holders. Important: Drip tray 23 and coffee grounds container 23c should be emptied and cleaned daily to prevent mould from developing. Dismantling the milk system 10 for cleaning: ●● Pull the milk system 10 forward out of the appliance. ●● Turn the upper part 10a in an anticlockwise direction and remove from the lower part 10b.
en Cleaning the brewing unit (Fig. F) (refer also to the quick reference guide) In addition to the automatic cleaning programme, the brewing unit 20 should be removed regularly for cleaning. ●● Switch the appliance off completely at the power on/off switch 1 O / I ; no buttons are lit. ●● Take hold of the door to the brewing unit 19 at the bottom and open it. ●● Slide the red lock 20a on the brewing unit 20 completely to the left. ●● Press the eject lever 21 down fully. The brewing unit is released.
en Before starting the respective service programme (descaling, cleaning or calc‘nClean), remove the brewing unit, clean as instructed and replace. Specially developed and suitable descaling and cleaning tablets are available from retailers or customer service (see “Accessories”). Cleaning the milk system Duration: approx. 1 minute Cleaning and service Short rinse start milk system calc‘nClean Descaling Duration: approx. 30 minutes.
en Add 0.5 l water and descaler start ●● Pour lukewarm water into the empty water tank 11 up to the “0.5 l” mark and then dissolve 1 Siemens descaling tablet TZ80002 in it. When using TZ60002, 2 tablets must be dissolved. ●● Press the start button 8. The descaling programme will now run for about 20 minutes. Descaling Not enough descaling fluid. Refill fluid start Info: If there is not enough descaling solution in the water tank 11, the corresponding prompt is displayed.
en Empty drip tray Replace drip tray ●● Empty the drip tray 23 and reinsert it. The appliance is ready for use again. calc‘nClean Duration: approx. 36 minutes. calc‘nClean combines the separate functions of descaling and cleaning. If both programmes are due to be run soon, the espresso machine automatically suggests this service programme. Cleaning and service Short rinse milk system start calc‘nClean The start button 8 flashes while the different calc‘nClean processes are running.
en Clean and refill water tank start ●● Rinse the water tank 11 and refill it with fresh water up to the “max” mark. ●● Press the start button 8. The descaling programme now runs for about 1 minute more, followed by the cleaning programme for about 7 minutes, and rinses the appliance. Descaling Cleaning Empty drip tray Replace drip tray ●● Empty the drip tray 23 and reinsert it. Replace the filter if one is being used. The appliance has completed descaling and cleaning and is ready for use again.
en Accessories Disposal The following accessories are available from retailers or from customer service: Accessories Cleaning tablets Descaling tablets Water filter Care set Milk container with “Fresh Lock” lid Ordering number Retail / Customer service TZ60001 00310575 TZ80002 00576693 TZ70003 00575491 TZ80004 00576330 TZ80009N 00576166 J Dispose of packaging in an environmentally-friendly manner.
en Simple troubleshooting Problem Display shows Refill bean container although the bean container 15 is full, or the grinding unit does not grind the beans. No tea water dispensed. Cause Beans are not falling into the grinding unit (beans too oily). Solution Gently tap the bean container 15. Change the type of coffee if necessary. When the bean container 15 is empty, wipe it with a dry cloth. The milk frother 10 or its holder is soiled.
en Problem The coffee tastes “burnt”. Display shows Error Please contact hotline The water filter does not stay in position in the water tank. Display shows Check water tank Cause Brewing temperature too high The grinding setting is too fine or the pre-ground coffee is too fine. Unsuitable type of coffee. The appliance has a fault. Solution Reduce the temperature, see “Menu settings – Coffee temp.” Adjust the grinding unit to a coarser setting or use coarser pre-ground coffee.
fr Chère amatrice de café, cher amateur de café, Nous vous félicitons pour l’achat de cette machine à expresso automatique Siemens. Ce mode d’emploi décrit les différents modèles d’appareils qui se distinguent par des détails. Veuillez également tenir compte du Mémento joint. Un logement 22 a été prévu spécialement pour le conserver à portée de main dans la machine.
fr Consignes de sécurité Lire attentivement ce mode d’emploi, s’y conformer lors de l’utilisation et le conserver ! Veuillez joindre ce mode d’emploi si vous passez l’appareil à quelqu’un d’autre. Cet appareil est conçu pour la préparation de quantités usuelles, dans le cadre d’un foyer ou d’un usage non commercial de type domestique. Citons p. ex.
fr Ne jamais plonger l’appareil ou le cordon électrique dans l’eau. N’utiliser la machine que lorsque le cordon électrique et l’appareil ne présentent aucun dommage. En cas de défaut, débrancher immédiatement la fiche secteur ou couper la tension du réseau. L‘appareil contient des aimants permanents qui peuvent exercer une influence sur les implants électroniques tels que les stimulateurs cardiaques ou les pompes à insuline.
fr Contenu de l’emballage (Figure A sur les pages dépliantes) 1 Machine à expresso automatique 2 Mode d’emploi 3 Mémento 4 Mousseur de lait 5 Bandelette pour déterminer la dureté de l’eau 6 Cuillère-dose 7 Réservoir de lait, isolé * Présentation (Figures B, C, D, E et F sur les pages dépliantes) 1 Interrupteur électrique O / I 2 Touche á (personnalisation) 3 Touche à (programmes de maintenance) 4 Touches de sélection < > 5 Écran a) Ligne d’état b) Ligne de sélection c) Ligne de n
fr Avant la première utilisation Généralité Utiliser exclusivement de l’eau pure, froide, sans gaz carbonique et exclusivement du café en grains torréfié (de préférence pour expresso ou percolateur) et remplir les conteneurs correspondants. Ne pas employer des grains de café avec glaçage, des grains caramélisés ou enrobés d’une substance sucrée quelconque ; ils obturent l’unité de percolation. Il est possible, sur cette machine, de régler la dureté de l’eau.
fr ●● La machine est prête à fonctionner lorsque les symboles de sélection de boisson et la touche 8 start sont allumés à l’écran 5. ËË Í ÂÃÀ Á Å Æ Espresso Info : La machine à expresso automatique est programmée en usine de façon à fonctionner de manière optimale. La machine s’arrête automatiquement après une durée définie (voir au chapitre « Réglages menu – AR auto dans »).
fr Touches de sélection < et > L’activation des touches de sélection 4 < et > permet de naviguer à l’écran (Ligne de navigation 5c) vers le bas et vers le haut. Écran À l’aide des symboles Boissons au café, Arôme et Quantité ainsi que des textes de réglage, l’écran 5 affiche en permanence les opérations en cours et les messages. Le bouton rotatif 6 et les touches de sélection 4 servent à effectuer les réglages. Le réglage sélectionné est identifié par un cadre.
fr Régler la finesse de la mouture Le sélecteur 17 de réglage de la mouture du café permet de régler la finesse de mouture souhaitée du café. ¡¡ Attention ! Modifier le réglage de la mouture uniquement lorsque le broyeur fonctionne. Sinon, la machine peut être endommagée. Ne pas glisser les doigts à l’intérieur du broyeur.
fr Réglages de l’écran Une pression sur les touches de sélection 4 < et > permet d’afficher les menus de sélection suivants dans les niveaux de menu : Sélection de la boisson ËÍ ÂÃÀ Á Å Æ Espresso Arôme du café (uniquement pour les boissons au café) ËÍ Espresso 5 55 555 Quantité Espresso Î Ð ËÍ Ò Régler individuellement la quantité ËÍ Espresso Î ± 0 ml À l’aide du bouton rotatif 6, il est possible de régler les paramètres suivants sans le menu : Réglages – Sélection de la boisson : Â Ã À
fr Réglages – Quantité Î Ð Ò petit moyen grand Réglages – Quantité individuelle À l’aide du bouton rotatif 6, il est possible d’adapter individuellement la quantité à préparer prédéfinie Î, Ð ou Ò à la taille de la tasse. La quantité peut être réglée en fonction de la boisson sélectionnée. Sur l’écran, à droite, une flèche dans l’icône Ò indique si la quantité à préparer a été augmentée ou diminuée. Pour le réglage Café Á p. ex., la quantité de café est indiquée en ml, et pour le réglage Cappuccino Æ p.
fr ●● Tourner le bouton rotatif 6 pour sélectionner une lettre ou un chiffre. ●● Confirmer avec la touche 8 start. 6 champs sont disponibles pour le nom de l’utilisateur. Sélectionner le symbole â et appuyer sur la touche 8 start pour supprimer les entrées. Le menu de sélection de la boisson apparaît : Remarque : Appuyer sur la touche de sélection > pour mémoriser. Appuyer sur la touche de sélection < permet d’interrompre l’opération. ●● Régler la boisson, l’arôme du café, etc.
fr Réglages menu AR auto dans ●● Maintenir appuyée la touche 7 j pendant au moins 3 secondes. Les différentes possibilités de réglage s’affichent. Réglages Temp. du café Temp. eau chaude Quitter profil <85°C Les touches de sélection 4 < et > permettent de sélectionner les différentes possibilités de réglage. Remarque : Les modifications effectuées sont automatiquement enregistrées. Aucune confirmation supplémentaire n’est nécessaire.
fr Filtre eau Avant d’utiliser un nouveau filtre à eau, il doit tout d’abord être rincé. ●● Pour cela, enfoncer fermement le filtre à eau dans le réservoir d’eau 11 à l’aide de la cuillère dose 14. Remplir d’eau le réservoir jusqu’au repère « max ». ●● Tourner le bouton rotatif 6 pour sélectionner start et appuyer sur la touche 8 start. Placer récipient 1l sous mousseur lait et tuyau dans récipient start ●● Placer un récipient d’une capacité de 1 l sous le mousseur de lait 10.
fr Préparation avec du café en grains Cette machine à expresso automatique mout du café frais pour chaque préparation. Utiliser de préférence un mélange de café en grains pour expresso ou percolateur. Pour assurer aux grains une qualité optimale, les conserver au frais dans un récipient fermé ou les congeler. Il est possible de moudre les grains de café congelés. Important : Remplir tous les jours le réservoir d’eau 11 avec de l’eau fraîche et froide.
fr Les réglages peuvent être modifiés (voir au chapitre « Réglages de l’écran ») ou vous pouvez effectuer des réglages personnalisés ou afficher ceux-ci (voir au chapitre « Personnalisation »). ●● Appuyer sur la touche 8 start. Tout d’abord, le lait est pompé dans la tasse ou le verre. Ensuite, la machine effectue la percolation du café qui s’écoule dans la tasse ou le verre.
fr Remarque : Pour préparer une autre tasse à partir de café moulu / lait, répéter l’opération. Si vous ne versez pas de café dans un délai de 90 s, la chambre de percolation se vide automatiquement afin d’empêcher un débordement. La machine effectue un rinçage. Préparer de la mousse de lait et du lait chaud ¡¡ Risque de brûlure ! Le mousseur de lait 10 devient brûlant ! Après utilisation, bien laisser refroidir avant de le toucher. La machine doit être prête à fonctionner.
fr Entretien et nettoyage quotidiens ¡¡ Risque de chocs électriques ! Avant tout nettoyage, débrancher la fiche secteur. Ne jamais plonger l’appareil dans l’eau. Ne pas utiliser de nettoyeur à vapeur. ●● Essuyer l’habillage de la machine avec un chiffon doux et humide. ●● Ne pas utiliser de produit nettoyant contenant de l’alcool ou de l’alcool à bruler. ●● Ne pas utiliser de chiffons abrasifs ou de produit nettoyant.
fr Nettoyage du système lait Important : Il est impératif de nettoyer le système lait 10 après chaque utilisation ! ●● Assembler toutes les pièces. Remettre ensuite le mousseur de lait en place dans l’appareil en l’enfonçant jusqu’en butée. Le système lait 10 peut être pré-nettoyé automatiquement (voir au chapitre « Programmes de maintenance ») ou nettoyé manuellement. Démonter le système lait 10 pour le nettoyer : ●● Extraire le système lait 10 de la machine en le tirant vers l’avant.
fr ●● Retirer le couvercle de protection 20b de l’unité de percolation et nettoyer soigneusement l’unité de percolation 20 sous l’eau courante. ●● Nettoyer soigneusement le tamis de l’unité de percolation sous le jet d’eau. Important : Ne pas ajouter de produit vaisselle, ne pas laver en machine. ●● Essuyer l’intérieur de la machine avec un chiffon humide et retirer tous les résidus de café. ●● Laisser sécher l’unité de percolation 20 et l’intérieur de la machine.
fr Nettoyage du système lait Durée : env. 1 minute Nettoyage et service Rinçage court start système lait calc‘nClean Un pré-nettoyage automatique du système lait 10 peut être effectué. ●● Appuyer sur la touche 3 à. Rinçage court système lait start ●● Appuyer sur la touche 8 start. Glisser verre sous mousseur, placer embout dans le verre start ●● Placer un verre vide sous le système lait 10 et introduire l’embout du tube d’aspiration 10d dans le verre. ●● Appuyer sur la touche 8 start.
fr Remplir 0,5 l eau + détartrant start ●● Verser de l’eau tiède dans le réservoir d’eau 11 jusqu’au repère « 0,5 l » et y dissoudre 1 pastille de détartrage Siemens TZ80002. En cas d’utilisation de TZ60002, dissoudre impérativement 2 pastilles. ●● Appuyer sur la touche 8 start, le programme de détartrage se déroule maintenant pendant 20 minutes environ. Nettoyer soigneusement le tube d’aspiration 10d du mousseur de lait. Nettoyage Durée : env. 8 minutes.
fr Vider le bac collecteur Placer le bac collecteur ●● Vider le bac collecteur 23 et le remettre en place. La machine est maintenant nettoyée et de nouveau prête à fonctionner. calc‘nClean Durée : env. 36 minutes. calc‘nClean combine les fonctions individuelles Détartrage et Nettoyage. Si le moment de réaliser chacun des deux programmes est proche, la machine propose automatiquement ce programme de maintenance.
fr ●● Appuyer sur la touche 8 start, le programme de détartrage se déroule pendant 1 minute environ, puis le programme de nettoyage rince la machine pendant 7 minutes environ. Détartrage en cours Nettoyage en cours Vider le bac collecteur Placer le bac collecteur ●● Vider le bac collecteur 23 et le remettre en place. Si un filtre est utilisé, le replacer maintenant. La machine est nettoyée et détartrée et de nouveau prête à fonctionner.
fr Accessoires Les accessoires suivants sont disponibles dans le commerce ou auprès du Service Clientèle : Accessoires Pastilles de nettoyage Pastilles de détartrage Filtre eau Kit d’entretien Réservoir de lait avec couvercle « Fresh Lock » N° commande Commerce / Service Clientèle TZ60001 00310575 TZ80002 00576693 TZ70003 00575491 TZ80004 00576330 TZ80009N 00576166 Mise au rebut J Eliminez l’emballage en respectant l’environnement.
fr Éliminer soi-même les problèmes simples Problème Affichage à l’écran Remplir le bac à café bien que le bac à café 15 soit rempli, ou bien le broyeur ne parvient pas à moudre. Impossible de produire de l’eau chaude. Cause Les grains ne tombent pas dans le broyeur (grains trop gras). Remède Frapper légèrement le bac à café 15. Changer éventuellement de café. Une fois que le bac à café 15 est vide, l’essuyer avec un chiffon sec. Le mousseur de lait 10 ou le support du mousseur de lait est obturé.
fr Problème Le café a un goût de « brûlé ». Affichage à l’écran Défaillance Appeler Service Clientèle Le filtre à eau ne tient pas dans le réservoir d’eau. Cause La température de percolation est trop haute. Remède Baisser la température, voir au chapitre « Réglages menu – Temp. du café ». La mouture est trop fine ou Régler une mouture moins fine bien le café moulu est trop ou utiliser un café moulu moins fin. fin. Qualité de café non adaptée. Changer de qualité de café.
it A tutti gli intenditori e amanti del caffè, Indice congratulazioni per avere acquistato questa macchina automatica per espresso della società Siemens.
it Avvertenze di sicurezza Leggere, osservare e conservare le istruzioni con cura! Se l’apparecchio viene ceduto, allegare anche le presenti istruzioni. Questo apparecchio e destinato alla lavorazione di quantità adeguate all’utilizzo domestico, e in generale per usi domestici e non professionali. Gli utilizzi simili a quelli domestici comprendono, ad es.
it Non immergere mai l’apparecchio o il cavo di alimentazione in acqua. Utilizzare solo se il cavo e l’apparecchio non presentano danni. In caso di errore, estrarre immediatamente la spina dalla presa di corrente o disinserire la tensione di rete. L‘apparecchio è dotato di magneti permanenti che possono interferire con i dispositivi elettronici impiantati, come ad es. pacemaker o pompe per insulina.
it Contenuto della confezione (Figura A sui risvolti) 1 Macchina automatica per espresso 2 Istruzioni per l’uso 3 Istruzioni brevi 4 Sistema latte 5 Striscia per la misurazione della durezza dell’acqua 6 Dosatore del caffè macinato 7 Recipiente per il latte, isolato * Panoramica (Figure A, B, C, D ed F nelle pagine ripiegate) 1 Interruttore di rete O / I 2 Tasto á (Personalizzazione) 3 Tasto à (Programmi di assistenza) 4 Tasti selettori < > 5 Display a) Riga di stato b) Riga di selez
it Al primo impiego Informazioni generali Riempire i corrispondenti contenitori solo con acqua pulita, fredda, non addizionata con anidride carbonica e utilizzare esclusivamente chicchi tostati (preferibilmente miscele per macchine automatiche da caffè o macchine per caffè espresso). Non usare chicchi di caffè glassati, caramellati o trattati con altri additivi contenenti zucchero, in quanto otturano l’unità di infusione caffè. Questo apparecchio consente di impostare la durezza dell’acqua.
it ●● L’apparecchio è pronto per l’uso quando sul display 5 compaiono i simboli per selezione della bevanda ed il tasto 8 start si accende.. ËË Í ÂÃÀ Á Å Æ Espresso Informazione: La macchina automatica per espresso è programmata già in fabbrica con dei valori standard che garantiscono un funzionamento ottimale. L'apparecchio si spegne automaticamente dopo un tempo preimpostato (vedere capitolo “Impostazioni del menu – Auto spegn. in”).
it Display Il display 5 visualizza, mediante simboli, possibilità di selezione, intensità del caffè e quantità, e, mediante testi, impostazioni, processi in corso e messaggi. Le impostazioni si eseguono tramite il settore 6 e i tasti selettori 4. Lʼimpostazione selezionata viene contrassegnata con una cornice. ËË Í ÂÃÀ Á Å Æ Espresso 5a 5b 5c Esempio: Nella riga di stato 5a viene visualizzato il nome del tipo di bevanda e il valore impostato per lʼintensità 55 e per la quantità Î.
it Regolare il grado di macinatura Con il selettore 17 per il grado di macinatura è possibile impostare la finezza desiderata del caffè macinato. ¡¡ Attenzione! Impostare il grado di macinatura solo con dispositivo di macinatura funzionante! In caso contrario lʼapparecchio potrebbe venir danneggiato.
it Impostazioni del display Premendo i tasti selettori 4 < e > è possibile richiamare i seguenti menu di selezione dai livelli menu: Selezione delle bevande ËÍ ÂÃÀ Á Å Æ Espresso Intensità del caffè (solo per bevande a base di caffè) ËÍ Espresso 5 55 555 Quantità Espresso Î Ð ËÍ Ò Impostazione della quantità personale ËÍ Espresso Î ± 0 ml Con il selettore 6 è possibile impostare allʼinterno dei menu i seguenti parametri: Impostazioni – Selezione bevande: Â Ã À Á Å Æ È É Ê 2 x Espresso 2
it Impostazioni – Quantità Î Ð Ò piccolo medio grande Impostazioni – Quantità personale Ruotando il selettore 6 è possibile adeguare la quantità prefissata Î, Ð opp. Ò in modo personale alla rispettiva dimensione della tazza. La quantità si può impostare in funzione della bevanda scelta. Sul lato destro superiore del display una freccia simbolo Ò indica se la quantità è stata aumentata o ridotta. Nellʼimpostazione, ad es.
it Per il nome utente sono disponibili 6 campi. Per cancellare i dati inseriti selezionare il simbolo â e premere il tasto 8 start. Nota: Premendo il tasto selettore > lʼimmissione viene memorizzata. Premendo il tasto selettore < lʼoperazione viene interrotta. Informazione: Lʼimmissione può essere sempre sovrascritta. Per cancellare lʼutente, selezionare con il selettore Cancella nome start e premere il tasto 8 start. Memorizzazione delle temperature ●● Selezionare con il selettore Temp. caffè o Temp.
it Impostazioni del menu ●● Tenere premuto il tasto 7 j almeno 3 secondi. Vengono ora visualizzate le diverse possibilità di impostazione. Impostazioni Temp. caffè Temp. acqua calda Uscita menu <85°C Per selezionare le varie possibilità dʼimpostazione, usare i tasti selettori 4 < e >. Nota: Le modifiche eseguite vengono salvate automaticamente. Unʼulteriore conferma non è necessaria. Se dopo ca. 2 minuti non è stato dato alcun comando, il menu si chiude automaticamente.
it Livello 1 2 3 4 Grado di durezza dellʼacqua Tedesco (°dH) Francese (°fH) 1-7 1-13 8-14 14-25 15-21 26-38 22-30 39-54 Filtro acqua Prima di usare un nuovo filtro dellʼacqua, il nuovo filtro va risciacquato. ●● Per eseguire questa operazione spingere saldamente il filtro dellʼacqua nel serbatoio dellʼacqua 11 aiutandosi con il dosatore 14. Riempire il serbatoio dellʼacqua fino al contrassegno “max”. ●● Ruotando il selettore 6 scegliere start e premere il tasto 8 start. Pos. recip.
it Imp. predefinita È possibile cancellare le impostazioni personalizzate e ripristinare le impostazioni predefinite. ●● Per attivare le impostazioni predefinite, premere il tasto 8 start. Informazione: È possibile ripristinare manualmente le impostazioni predefinite dellʼapparecchio mediante una combinazione di tasti. Lʼapparecchio deve essere completamente spento. ●● Premere contemporaneamente i tasti 4 < e > e lʼinterruttore di rete 1 O / I per almeno 5 secondi.
it Sul display 5 viene visualizzata la bevanda selezionata e lʼimpostazione per lʼintensità e la quantità di caffè per questa bevanda. ËÍ ÂÃÀ Á Å Æ Espresso È possibile modificare le impostazioni (vedere capitolo “Impostazioni del display”) o richiamare le impostazioni personalizzate (vedere capitolo “Personalizzazione”). ●● Premere il tasto 8 start. Il caffè viene preparato e fluisce poi nella o nelle tazze. Preparazione di bevande con latte L’apparecchio deve essere pronto per l’uso.
it Preparazione di bevande con latte L’apparecchio deve essere pronto per l’uso. ●● Inserire nel recipiente per il latte 26 il tubicino 10d del sistema latte 10. ●● Posizionare lʼuscita caffè 9 verso destra fino a quando si sente uno scatto. ●● Posizionare la tazza o il bicchiere preriscaldato sotto l’uscita del caffè 9 e il sistema latte 10. ●● Selezionare Macchiato Å o C appuccino Æ ruotando il selettore 6. ●● Aprire il cassetto per caffè macinato 18.
it Prelievo di acqua calda Cura e pulizia quotidiana ¡¡ Pericolo di ustione! Il sistema latte 10 per latte / acqua calda si riscalda molto. Dopo l’utilizzo, prima di toccare l’apparecchio, lasciarlo raffreddare. ¡¡ Rischio di scossa elettrica! Prima della pulizia staccare la spina. Non immergere mai l’apparecchio nell’acqua. Non pulire con il vapore. Prima di prelevare acqua calda, è necessario pulire lo schiumeggiatore. L’apparecchio deve essere pronto per l’uso.
it mettere in lavastoviglie i KKNon seguenti componenti: Pannello del vassoio di sgocciolamento 23a, cassetto per il caffè macinato 18, bollitore 20, serbatoio per l’acqua 11, coperchio salva-aroma 16 e recipiente per il latte in acciaio inox. In lavastoviglie possono essere lavati i seguenti componenti: vassoio di sgocciolamento 23, griglia di sgocciolamento 23b, recipiente per fondi di caffè 23c, dosatore per caffè macinato 14 e componenti singoli del recipiente per il latte-coperchio.
it ●● Rimontare tutti gli elementi. Inserire nuovamente il sistema latte nell’apparecchio fino al suo incastro. ●● Rimuovere il coperchio 20b dell’unità infusione e pulire bene l’unità infusione stessa 20 sotto l’acqua corrente. Informazione: Tutti i pezzi del sistema latte 10 possono essere lavati in lavastoviglie. ●● Pulire a fondo il filtro dell’unità infusione tenendolo sotto il getto dell’acqua.
it Programmi di assistenza Consiglio: Vedere anche le istruzioni brevi nell’apposito scomparto 22. A determinati intervalli di tempo sul display 5 compare Risciacquo breve sistema latte o Decalcificare o Eseguire pulizia o c alc‘nClean. L’apparecchio dovrebbe essere immediatamente pulito e decalcificato con il corrispondente programma di assistenza. A scelta è possibile riunire i processi Decalcificare e Pulire tramite la funzione c alc‘nClean (vedere capitolo “calc‘nClean”).
it Decalcificare Durata: circa 30 minuti Pulizia e manutenzione start Decalcificare Pulire Durante le singole fasi di decalcificazione il tasto 8 start lampeggia. I numeri indicati in alto a destra indicano l’avanzamento della procedura. Importante: Se nel serbatoio per l’acqua 11 è presente un filtro dell’acqua, toglierlo assolutamente prima di avviare il programma di assistenza. ●● Premere il tasto 3 à. Decalcificare start ●● Premere il tasto 8 start, il display 5 guida nelle fasi del programma.
it Pulire Durata: circa 8 minuti. Pulizia e manutenzione Decalcificare start Pulire Durante le singole fasi del processo di pulizia, il tasto 8 start lampeggia. I numeri indicati in alto a destra indicano l’avanzamento della procedura. ●● Riempire il serbatoio dell’acqua 11 fino a “max”. ●● Premere il tasto 3 à. Pulire start ●● Premere il tasto 8 start, il display 5 guida nelle fasi del programma. Svuotare raccogligocce Inserire raccogligocce ●● Vuotare il raccogligocce 23 e reinserirlo.
it Pos. recip. da 1 L sotto innesto schiuma. Ins. tubo asp. nel recip. start ●● Posizionare sotto il sistema latte 10 un recipiente con capacità di almeno 1 litro. ●● Immergere l’estremità del flessibile 10d nel recipiente. ●● Premere il tasto 8 start. Pulizia in corso Aprire cassetto polvere Sciacquare e riempire il serbatoio acqua start ●● Lavare il serbatoio acqua 11 e riempire con acqua pulita fino al contrassegno “max”.
it Consigli per risparmiare energia Accessori per la conservazione ●● L’apparecchio dispone della funzione di regolazione dell’intensità luminosa del display, che si attiva automaticamente quando l’apparecchio non viene usato. Se il display è poco illuminato, premendo un tasto o ruotando il pulsante girevole diventa di nuovo ben illuminato. ●● Se la macchina non viene utilizzata, spegnerla con l’interruttore 1 O / I sul lato anteriore dell’apparecchio.
it Smaltimento J Si prega di smaltire le confezioni nel rispetto dell’ambiente. Questo apparecchio dispone di contrassegno ai sensi della direttiva europea 2012/19/UE in materia di apparecchi elettrici ed elettronici (waste electrical and electronic equipment – WEEE). Questa direttiva definisce le norme per la raccolta e il riciclaggio degli apparecchi dismessi valide su tutto il territorio dell’Unione Europea. Informarsi presso il rivenditore specializzato sulle attuali disposizioni per la rottamazione.
it Soluzione di piccoli guasti Guasto Messaggio sul display Riempire serbatoio chicchi anche se il serbatoio chicchi 15 è pieno o se il macinacaffè non macina chicchi. Prelievo acqua calda impossibile. Causa I chicchi non cadono nel macinacaffè (chicchi troppo oleosi). Il sistema latte 10 o l’alloggiamento del sistema latte è otturato. Troppo poca o troppo Il sistema latte 10 o l’allogschiuma oppure il sistema giamento del sistema latte latte 10 non aspira il latte. è otturato. Latte non adatto.
it Guasto Il caffè ha un gusto di “bruciato”. Messaggio sul display Errore Chiamare l’assistenza Causa Temperatura di bollitura troppo elevata Il grado di macinatura impostato è troppo fine oppure il caffè in polvere è troppo fine. Tipo di caffè non adatto. Nell’apparecchio si è verificato un errore. Il filtro dell’acqua non Il filtro dell’acqua non è resta incastrato nel serba- fissato correttamente. toio dell’acqua. Serbatoio dell’acqua non Messaggio sul display Controllare serbat.
Kundendienst-Zentren • Central-Service-Depots • Service Après-Vente • Servizio Assistenza • Centrale Servicestation • Asistencia técnica • Servicevaerkter • Apparatservice • Huolto DE Deutschland, Germany BSH Hausgeräte Service GmbH Zentralwerkstatt für kleine Hausgeräte Trautskirchener Strasse 6-8 90431 Nürnberg Online Auftragsstatus, Pickup Service für Kaffeevollautomaten und viele weitere Infos unter: www.siemens-home.de Reparaturservice, Ersatzteile & Zubehör, Produkt-Informationen: Tel.
FR France BSH Electroménager S.A.S. 50 rue Ardoin – BP 47 93401 Saint-Ouen cedex Service interventions à domicile: 01 40 10 12 00 Service Consommateurs: 0 892 698 110 (0,34 € TTC/mn) mailto:soa-siemens-conso@ bshg.com Service Pièces Détachées et Accessoires: 0 892 698 009 (0,34 € TTC/mn) www.siemens-home.fr GB Great Britain BSH Home Appliances Ltd.
NL Nederlande, Netherlands BSH Huishoudapparaten B.V. Taurusavenue 36 2132 LS Hoofddorp Storingsmelding: Tel.: 088 424 4020 Fax: 088 424 4845 mailto:siemens-contactcenter@ bshg.com Onderdelenverkoop: Tel.: 088 424 4020 Fax: 088 424 4801 mailto:siemens-onderdelen@ bshg.com www.siemens-home.nl NO Norge, Norway BSH Husholdningsapparater A/S Grensesvingen 9 0661 Oslo Tel.: 22 66 06 46 Fax: 22 66 05 55 mailto:Siemens-Service-NO@ bshg.com www.siemens-home.no NZ New Zealand BSH Home Appliances Ltd.
Garantiebedingungen DEUTSCHLAND (DE) Die nachstehenden Bedingungen, die Voraussetzungen und Umfang unserer Garantieleistung beschreiben, lassen die Gewährleistungsverpflichtungen des Verkäufers aus dem Kaufvertrag mit dem Endabnehmer unberührt. Für dieses Gerät leisten wir Garantie gemäß nachstehenden Bedingungen: Siemens Info Line (Mo-Fr: 8.00-18.00 Uhr erreichbar) Für Produktinformationen sowie Anwendungsund Bedienungsfragen zu kleinen Hausgeräten: Tel.
Beratung bei Störungen • Advice on troubleshooting • Conseils sur les problèmes • Consejos sobre problemas de • Consulenza su problemi Service-Hotlines www.siemens-home.
BSH Hausgeräte GmbH Carl-Wery-Straße 34 81739 München, GERMANY Reparaturauftrag und Beratung bei Störungen D 0911 70 440 044 A 0810 550 522 CH 0848 840 040 Die Kontaktdaten aller Länder finden Sie im beiliegenden Kundendienst-Verzeichnis. www.siemens-home.