Engineering Guide Intelligent Valve - Onboarding in Building Operator Minimum requirements: · Hardware model info: ASE4U10E; HW=2.21.0 · Firmware revision: 03.54.02.10; APP=1.16.2251; SVS-300.6.SBC=15.00; ISC=01.00 · Application software version: AAS-20:SU=SiUn; APT=HvacFnct34; APTV=2.010; APS=1 · ABT Go 4.0 · ABT Site 4.
Cyber security disclaimer Siemens provides a portfolio of products, solutions, systems and services that includes security functions that support the secure operation of plants, systems, machines and networks. In the field of Building Technologies, this includes building automation and control, fire safety, security management as well as physical security systems.
Table of Contents 1 Workflow of Intelligent Valve Cloud Preconditions and Onboarding.......... 4 2 Connecting Intelligent Valve to the Internet with ABT Go ........................... 5 3 Configuring Network in ABT Go ................................................................... 9 4 Updating Firmware .......................................................................................12 5 Activating Cloud Connection .......................................................................
1 Workflow of Intelligent Valve Cloud Preconditions and Onboarding 1 Workflow of Intelligent Valve Cloud Preconditions and Onboarding This guide focuses on onboarding Intelligent Valve into Siemens Building Operator using the ABT Go mobile application. It is also possible to set the corresponding settings and perform a firmware update on Intelligent Valve with the ABT Site tool. For information on how to perform these steps.
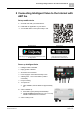
Connecting Intelligent Valve to the Internet with ABT Go 2 2 Connecting Intelligent Valve to the Internet with ABT Go Set up mobile device 1. Scan QR code with your mobile device. 2. Install ABT Go application on your device. a Your mobile device is set up and ready to use. Android device Apple device https://play.google.com/store/apps/details?id=com.siem ens.abtgo&hl=en https://itunes.apple.com/app/abtgo/id1293043551?l=en&ls=1&mt=8 Power up Intelligent Valve w Intelligent Valve is installed.
2 Connecting Intelligent Valve to the Internet with ABT Go Connecting Intelligent Valve to the Internet for the first time Although not recommended, from firmware version 1.15.1175 onward, it is possible to connect to Intelligent Valve via WLAN Direct. Below, option A for connection is described – however, option B, using a USB cable, is similar. Using options A or B is recommended. Ø Precondition: User’s mobile phone is connected via WLAN to the same IPv4 network as Intelligent Valve.
Connecting Intelligent Valve to the Internet with ABT Go 3 4 Select Connection [3]. Switch to Network [4.1]. 2 Select Connect [4.2]. 5 6 Device list may be empty. Device appears in list. Select Discover [5]. Switch to device by selecting it.
Connecting Intelligent Valve to the Internet with ABT Go 2 7 8 Enter role [7.1]: First login requires a password change. · Administrator: Full access Password rules: · Specialist: Balancing, control functions, configuration · 8 characters · Installer: Balancing · 1 number Enter password [7.2]. · 1 special character · · 1 capital letter Initial password for all roles: OneBT Remember your password! Resetting the password resets ALL settings.
Configuring Network in ABT Go 3 3 Configuring Network in ABT Go In order to connect your Intelligent Valve device to the cloud, your IPv4 network must fulfill certain requirements: · As of this release, Intelligent Valve does not support any HTTP proxies. · HTTPS port 443 must be open. · Intelligent Valve supports both DHCP and static IP mode. - DNS IP entry must be set explicitly either to the same IP address as the “IP default gateway” or to the address of the specific DNS server if applicable.
Configuring Network in ABT Go 3 3 Select Device name [3] to change it. The device name should not contain: · letters with diacritical marks like ä, à, á, ñ · special characters like €, £, ¥ Error message is always “Device name must be between 1 and 80 characters” – even for using a disallowed character. 4 · Select Device instance number [4] to enter BACnet device instance number.
Configuring Network in ABT Go 3 5 Select Ethernet settings to adjust them: Uncheck Enable (IP) DHCP [5.5]. · [5.1]: Enable (IP) DHCP · [5.3]: IP subnet mask Set DNS server [5.6]. · [5.2]: IP address · [5.4]: IP default gateway · 6 Default: same as IP default gateway. 7 Configuring the network node requires a device restart. After configuration, ABT Go returns to device list and discovery is necessary [7]. Startup time approximately 45 s. During the restart, the device will close.
4 Updating Firmware 4 Updating Firmware Update in ABT Site For documentation of firmware update through ABT Site, see ABT Site Online Help, or Intelligent Valve, Engineering and Commissioning in Desigo [A6V11572317]. Documents can be downloaded at the following Internet address: https://siemens.com/bt/download. Update in ABT Go 1. Send the software file to an e-mail account accessible from your mobile phone. 2. Open the e-mail on your smartphone and double-click the software file.
Updating Firmware 1 2 Select Configuration [1]. Select Update Software [2]. 3 4 Select the software version you need from the software list. Startup time approximately 30 s. 4 Duration approximately 8 min. Updating the software will take a few minutes. During this process, the device is out of order, the control function of the Intelligent Valve is stopped and the valve will close.
4 Updating Firmware 5 6 Update process will start. 2. Loading software. 1. Backing up all parameters. 3. Restoring stored parameters to updated device. 7 8 All settings such as Network Node Configuration, Volume Flow Limitations, etc. remain the same as before. Operation > Info shows the upgraded software version.
Activating Cloud Connection 5 5 Activating Cloud Connection 1 2 Select Configuration [1]. Select Cloud configuration [2]. 3 4 Select Enable connectivity [3] to change it. Expand the pop-up menu by clicking on the arrow [4].
5 Activating Cloud Connection 5 6 Choose Yes [5] to enable cloud connectivity. Scroll down to Command [6] and tap twice to expand the pop-up menu. 7 8 Select Activate [7] to establish a connection. After a few minutes, once the connection to the cloud is active, the Communication LED on top of the Intelligent Valve controller [8] will start to blink purple.
Claiming Intelligent Valve in Building Operator 6 6 Claiming Intelligent Valve in Building Operator Smart Infrastructure Building Products is driving the digitalization of buildings to the next level and is introducing a new family of software products and services, by leveraging state of the art internet technologies, like cloud computing, IoT, edge computing and big data analytics. Building Operator is a cloud-based software service for remote monitoring of a fleet of sites.
6 Claiming Intelligent Valve in Building Operator Signing up 6.1 Signing up To log in to the Building Operator application for the first time, complete the following steps: 1. Open your browser and go to https://buildingoperator.siemens.com. 2. Select Log In/Sign Up on the landing page. 3. Select the Sign Up tab and complete the fields to create a Siemens ID. Select Sign Up to confirm. Keep this tab in the browser open.
Claiming Intelligent Valve in Building Operator Signing up 6 4. Check your inbox for an email from Siemens ID. Select Confirm my account in the email. 5. Navigate back to the initial tab and select Continue.
6 Claiming Intelligent Valve in Building Operator Choosing a subscription type 6.2 Choosing a subscription type Once you’ve logged in to the Building Operator application for the first time, you need to select a subscription plan. For more details on each subscription plan, please see the Product and Service Datasheet [A6V11913114]. To select a subscription: 1. Select Start Now to start a Free Trial or Activate Now to activate the Standard subscription. 2.
Claiming Intelligent Valve in Building Operator Choosing a subscription type 6 3. If you select Activate Now to activate a Standard subscription: – Enter your Entitlement ID in the field provided. Select Continue to proceed. – Enter the company information in the fields provided. Select Continue. – Select the products you want to activate. Select Continue. – Review the information and select Activate when ready. 4.
6 Claiming Intelligent Valve in Building Operator Creating a new site 6.3 Creating a new site w In order to onboard Intelligent Valve to a new or existing site, switch from Building Operator to Asset Manager. 1. Select App Switcher in the top left corner. 2. Select Asset Manager. If you have not already created a site in Asset Manager, follow the steps below. w In Asset Manager: 1. You can add a site in two ways: – To add a site through the Overview tab, select Sites.
Claiming Intelligent Valve in Building Operator Creating a new site – 6 To add a site through the Sites tab, select Add. 2. Fill in the fields on the ensuing form appropriately. Select Add. The Address field will automatically suggest addresses. Selecting a suggested address will automatically populate the Time Zone field. If you enter in an address manually, the time zone will need to be entered in manually.
6 Claiming Intelligent Valve in Building Operator Claiming Intelligent Valve and adding it to a site 6.4 Claiming Intelligent Valve and adding it to a site To add a device to a site, follow the steps below. w In Asset Manager: 1. In the Sites tab, select the site where you want to add your device. 2. Select Add.
Claiming Intelligent Valve in Building Operator Claiming Intelligent Valve and adding it to a site 6 3. Enter the device activation key and select Validate.
6 Claiming Intelligent Valve in Building Operator Claiming Intelligent Valve and adding it to a site 4. Confirm the details of your device and select Add. 5. After successfully onboarding Intelligent Valve, use App Switcher to return to Building Operator.
Claiming Intelligent Valve in Building Operator Claiming Intelligent Valve and adding it to a site 6 6. In Building Operator, the newly created site appears. By clicking on it, navigate to Intelligent Valve onboarded through Asset Manager.
7 Intelligent Valve data push mechanism 7 Intelligent Valve data push mechanism In order to optimize the trade-off between the data quality available in the cloud and minimizing the network load generated by Intelligent Valves while transmitting the data, multiple data push mechanisms are leveraged. These mechanisms are described below. 7.1 Data push after start-up phase After the Intelligent Valve start-up phase is completed, the device pushes all the data points into the cloud. 7.
Intelligent Valve data push mechanism 7 Data points available per selected HVAC application 7.5 Data points available per selected HVAC application Some data points are only applicable depending on the HVAC application in use. If the HVAC application is changed, Intelligent Valve will restart and inform the cloud applications about the change. Data points that are no longer applicable will be hidden from the user’s view. At the same time, new data points will become accessible.
7 Intelligent Valve data push mechanism Overview of data points pushed to the cloud 7.6 Overview of data points pushed to the cloud The following table provides an overview of all the data points historized in the cloud and the data push mechanism behind each of the data points. Interface Interface description Unit Push mechanism CoV delta Periodically Pushed to Cloud starting from FW Version MnFlt Main fault - CoV and Periodically Any 15 min 1.16.
Issued by Siemens Switzerland Ltd Smart Infrastructure Global Headquarters Theilerstrasse 1a CH-6300 Zug Tel. +41 58 724 2424 www.siemens.com/buildingtechnologies Document ID A6V11999683_en--_b Edition 2020-11-26 © Siemens Switzerland Ltd, 2020 Technical specifications and availability subject to change without notice.