DESIGO™ FIRE SAFETY MODULAR AND CERBERUS™ PRO MODULAR Installation Manual for Zeus-D/Zeus-C Programming Tool Version 1.0 P/N 315-034686-15 Siemens Industry, Inc.
Table of Contents Title Page Introduction .....................................................................................................................................................1 Terminology .....................................................................................................................................................1 Minimum PC Requirements ..............................................................................................................................
Cyber security disclaimer Siemens products and solutions provide security functions to ensure the secure operation of building comfort, fire safety, security management and physical security systems. The security functions on these products and solutions are important components of a comprehensive security concept. It is, however, necessary to implement and maintain a comprehensive, state-of-the-art security concept that is customized to individual security needs.
NOTICE ON THE DOCUMENT UPDATE This is a common/combined FireFinder XLS/Desigo Safety Modular and Cerberus Pro Modular Document. While efforts to comprehensively update this document have been done you may find references to the other systems types in this document these references are applicable to all three system types. For example all of the screen shots included in this document display FireFinder XLS but are applicable for Desigo Safety Modular and Cerberus Pro Modular systems.
Introduction This manual describes the installation and security-unlocking of the Zeus programming tool for Siemens FireFinder XLS™ [1] fire detection systems. It addresses the procedures for Site Administrators, responsible for the security of their company’s copy of Zeus, as well as the Users they serve. Terminology Administrator / Site Admin The person directly responsible for Zeus at a site.
Minimum PC Requirements* Zeus is a Windows XP or Windows 7 based application that runs on a notebook or desktop computer.
Software Installation by Administrator or User The installation process for Administrator and User alike begins with the installation of the Zeus program itself onto the PC. Insert the Zeus CD into the CD-ROM drive after Windows has initialized. The Zeus program should install automatically. If it does not, you can install it by opening Windows Explorer, navigating to the CD-ROM drive and double-clicking the .exe Zeus Installation file. Once installation has begun, the following sequence of screens appears.
c) Installation Options dialog. Select the installation country and language. These will affect the Zeus tool’s project-compilation rules and the tool features available to the user. d) Choose Destination dialog. Browse, if necessary, to change the folder the Zeus program will be stored in. The default program folder is C:\Program Files\Siemens FireFinder XLS\Zeus 10.0 [4]. e) Setup Status window. Shows progress of software installation. No user input.
f) HTML Update window. Requests or confirms update of PC’s HTML Help capabilities, necessary for the Help feature in Zeus. Click OK to update HTML Help or to close the confirmation. If a newer version of HTML Help is already on the PC, no change is made. g) Wizard Complete dialog. Select whether to restart the PC immediately, or to wait until the next Windows session to unlock and use Zeus. h) Installation Files Cleanup.
Site Administrator Setup and Procedures Note This section of the Installation Manual pertains to the designated Zeus System Administrator only, and should not be provided to non-administrative users. When a License Holder obtains licensing to use Zeus, Siemens Industry, Inc.’s Sales Department provides it with the following: the Zeus setup software on CD-ROM, a 16-character License Holder ID (LHID) unique to the site, and a 17 to 31-character License Holder Name (LHN) unique to the site.
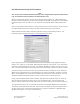
Setting Up User Accounts As Site Administrator, you set up user accounts by opening the Zeus program, and clicking Tools > User Administration, to get the User Administration dialog: Set up Site User accounts by adding to or copying from the default list of accounts. [Three default user accounts are provided with Zeus: sec (login password “sec”), tech (“tech”) and user (“user”). These correspond to typical accounts for a secretary, field technician and system design user.
Once one or more new user accounts are set up, you can export the account(s) to a User file (.usr extension) by clicking User > Export To at the User Administration dialog. The license file LicenseConfig.dat should also be exported: License > Export License Information. This file can then be transferred to a floppy disk or network location for Users to set up their own PCs.
Generating the Reset Password of the Day The Reset Password Tool is also used to generate Reset Passwords of the Day. Should a User forget his or her Password for Zeus login, or need to access an expired account, he or she can click the Request Password of the Day button on the Zeus Login dialog. A new Installation Code will be displayed, which the User provides to the Site Admin. Use this Code in the Password Tool to produce a 16-character Login Password good for a single use.
beyond the original license expiration date can be updated by re-exporting and loading those User files. User Setup As a Zeus User, you will need the Zeus CD, a License File (LicenseConfig.dat) and a User file (.usr) exported by your Administrator, to set up Zeus on your PC. These files may reside on a floppy disk or on a network drive to which the host computer is connected. Begin by installing Zeus in accordance with the first section of this manual.
Returning to the Zeus License Information dialog, make sure the Administrator Install box is not checked, since you are importing a User file that your Administrator has set up for you. Click Import User File to browse for your User file (.usr) using the Import From dialog: Browse and select the appropriate .usr file, then click Save. The User file information will apply the User Name and Login Password as set up by the Administrator.
The new Login Password you enter and re-enter will allow you to use this User account for one use. You would need to request another Reset Password of the Day each additional time you would use this expired account (or have the Site Admin fully update the account). If the User account is within 2 weeks of expiring, a warning dialog comes up each time Zeus is started. After the expiration date, Zeus will not start for this User unless a Reset Password of the Day is entered, or the account is updated.
Select Remove, then click Next. The following two dialogs will then appear in succession: Clicking No on the first dialog cancels the uninstall process. Clicking No on the second dialog will cause all information, including Installation unlocking, to be removed. After the second dialog, the Zeus program is removed. After a moment, the Siemens Zeus listing on the Add/Remove Programs dialog is removed. Click OK to close the Add/Remove Programs dialog.
Zeus Installation Manual P/N 315-034686-15 14 Siemens Industry, Inc.
APPENDIX A Installing Office Password Release Form [In order for Siemens Industry, Inc. to issue an Installing Office Password, this letter must be provided on the letterhead of the fire system end user.] It is our understanding that Siemens Industry, Inc. is the owner of Siemens Zeus™ software and that (insert original distributor name here), under a software license from Siemens Industry, Inc.
APPENDIX B Installing Virtual COM Port Driver for PMI[2] Introduction The PMI-C/PMI-D[2] person machine interface uses USB-USB communication between the PMIC/PMI-D[3] and the computer with the installed Zeus Tool. In order to use this communication protocol, the PMI-C/PMI-D[3] and the computer must be connected with the USB A-USB B cable. In addition, special Windows drivers must be installed on the USB port(s) of the computer that will be used to connect to the PMI-C/PMI-D[3].
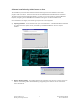
The wizard then asks for your search and installation options as shown in Figure 2. Select the option “Don’t search. I will choose the driver to install” and press the “Next” button. Figure 2: Search and Installation Options The wizard then asks for the “Hardware Type” as shown in Figure 3. Select “Ports” and press the “Next” button. Figure 3: Select a Hardware Type The wizard next asks you to select the device driver you want to install for this hardware as shown in Figure 4.
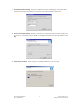
In the “Install From Disk” dialog, press the “Browse” button and select the directory where the Zeus Tool is installed (“Copy manufacturer’s files from:”). In Figure 5, the location is shown as “D:\Zeus”. (In most cases, the Zeus Tool is installed in “C:\Program Files (x86)\Siemens Desigo FS Modular\Zeus-D ?.??” or “C:\Program Files (x86)\Siemens Cerberus PRO Modular\Zeus-C ?.??”.) When “D:\Zeus” has been selected, press “OK.
Installation on Subsequent Windows XP USB Ports After installing the Zeus VCP driver on the first USB port of your computer, move the PMI-C/D[2] panel USB connector from the port where the driver was installed to the next USB port where you wish to install the driver. (Windows XP requires installation of the Zeus VCP driver software on every USB port of the computer that you use to connect to the PMI-C/PMI-D[2] panel.) Make sure the other end of the USB-USB cable is connected to the PMI-C/PMI-D[2] panel.
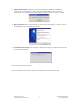
After the Zeus VCP driver has been successfully installed on the USB port, press the “Finish” button as shown in Figure 11. You will now be able to communicate on this USB port with the PMI-C/PMID[2] panel using the Zeus Tool. Figure 11: Zeus VCP Driver Successfully Installed on Subsequent USB Port If the installation was not successful for the second or subsequent port, try again using the instructions for installing the first Windows XP USB port.
In the “System and Security” window, open “Administrative Tools.” (See Figure 14.) Figure 14: Control Panel > System and Security Window Showing Administrative Tools In the “Administrative Tools” window, open “Computer Management.” (Refer to Figure 15.) Figure 15: Computer Management Window In the “Computer Management” window, select “Device Manager” from the tree in the window on the left side of the screen. In the tree on the right side of the window, select other devices.
Figure 16: Gadget Serial v2.4 Properties Then select the “Browse my computer for driver software” option shown in Figure 17. Figure 17: Browse Computer for Driver Software Click on the “Browse” button as shown in Figure 18 to search for the directory where the Zeus Tool is installed on your computer. The default program folder is “C:\Program Files (x86)\Siemens Desigo FS Modular\Zeus-D ?.??”[4] or “C:\Program Files (x86)\Siemens Cerberus PRO Modular\ZeusC ?.??”[4]. The location shown in Figure 18 is D:\Zeu
Windows Security will display the warning shown in Figure 19 that the publisher of this driver software can’t be verified. Select the option “Install this driver software anyway.” Figure 19: Windows Security Warning Windows will begin installing the driver software as indicated in Figure 20. Figure 20: Installing Driver Software Progress Screen When the Zeus VCP driver has been successfully installed as shown in Figure 21, press the “Close” button.
Notice that in the “Device Manager” window shown in Figure 22, “Gadget Serial” hardware no longer appears under Other Devices and “Zeus Virtual COM” is displayed between the Communications and Printer Ports. Figure 22: Device Manager Showing Zeus Virtual COM Port Installing Zeus Virtual COM Hardware When a Windows 7 System does not display “Gadget Serial” hardware under “Other devices” after selecting the Device Manager (as shown in Figure 23), it is necessary to install Zeus Virtual COM hardware.
Select the option “Install the hardware that I manually select from a list,” and press the “Next” button. (Refer to Figure 25.) Figure 25: Choosing to Install Hardware that is Manually Selected Use the scroll bar to find and select the “Ports” hardware type as shown in Figure 26. Then press the “Next” button. Figure 26: Selecting “Ports” Hardware Type Click on the “Have Disk” button when the screen asks what device driver you want to install as shown in Figure 27.
Click on the “Browse” button as shown in Figure 28 to search for the directory where the Zeus Tool is installed on your computer. The default program folder is “C:\Program Files (x86)\Siemens Desigo FS Modular\Zeus-D ?.??” [4] or “C:\Program Files (x86)\Siemens Cerberus PRO Modular\Zeus-C ?.??”[4]. The location shown in Figure 28 is “D:\Zeus”[4]. After selecting the directory where the Zeus Tool is installed on your computer, press the “OK ” button.
Windows Security will display a window stating that “Windows can’t verify the publisher of this driver software.” (Refer to Figure 31.) Select the option “Install this driver software anyway.” Figure 31: Select Option “Install This Driver Software Anyway” Windows will install the “Zeus Virtual COM” driver software. After the driver has been successfully installed, communication between the Zeus Tool and the panel using the USB ports is possible.
Windows 8.1 or 10 Installation The installation for Windows 8.1 or 10 is the same as for Windows 7 above, except that users need to disable the driver signature enforcement setting in their Windows first, since the setting is defaulted to “Enabled” in both Windows. Please follow the steps below to disable the Driver Signature Enforcement setting in Windows 8.1 or 10 first, then go back to section Windows 7 Installation, following the steps there to get the driver installed.
Click Advanced options. Click Startup Settings. Siemens Industry, Inc.
Since we are modifying boot time configuration settings, you will need to restart your Computer one last time. Click the Restart button. Finally, you will be given a list of startup settings that you can change. Search for “Disable driver signature enforcement”. To choose the setting, press the F7 key. Zeus Installation Manual P/N 315-034686-15 30 Siemens Industry, Inc.
Your PC will reboot and you will be able to install unsigned drivers without any error message. At this point, go back to the section Windows 7 Installation and follow the steps there. Siemens Industry, Inc.
APPENDIX C Installing Virtual COM Port Driver for XDLC Installation of this USB-Serial Port driver is optional. It is required only if your configuration contains XDLC (Detector Loop Card with Class X Isolation) module and you need to transfer Firmware to the module. Installation Open web page http://www.ftdichip.com/Drivers/VCP.htm. Download the latest driver for your operating system type. (We recommend using setup executable version, because installation process is more straightforward).