
Installation Instructions


Siemens Siemens
Siemens Siemens
Siemens
IndustryIndustry
IndustryIndustry
Industry
,,
,,
,
Inc. Inc.
Inc. Inc.
Inc.
Building Building
Building Building
Building
TT
TT
T
ecec
ecec
ec
hnologies Dihnologies Di
hnologies Dihnologies Di
hnologies Di
visionvision
visionvision
vision
P/N 315-050066-2
Installation Instructions
GPMI-UK
INTRODUCTION The GPMI-UK from Siemens Industry, Inc., provides the user with the materials to
upgrade a Revision 5 standalone XLS node PMI to a Revision 8 Global PMI.
The GPMI-UK includes one each of the following:
• Global PMI Memory Card
• Foam Cube
• Installation Instructions
If the PMI is revision 4 or earlier, PMI-UK2, P/N 500-650065, must be installed prior to
installing the GPMI-UK.
PRE-INSTALLATION
Remove all system power before installation, first
battery then AC. (To power up, connect the AC first,
then the battery.)
1. Remove the battery connection to the system.
2. Remove the power connection to the system.
3. Remove all other connections to the PMI.
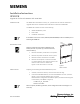
4. Remove the rear plastic cover from the PMI.
It is held in place by four mounting screws. The
location of the screws is marked A in
Figure 1. Place the screws to one side.
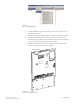
INSTALLATION Preparing and Installing the Global PMI Memory Card:
1. Carefully remove the memory card from the anti-static bag.
2. Insert the Global PMI Memory Card into the PCMCIA slot of of your Zeus
laptop. Log on to Zeus 8.00.0023. Then, using the
Build>Transfer>Configuration To PCMCIA option, transfer the following files
to the memory card (Refer to Figure 2):
ChildBoot05_01_0004.BIN
PMI08.01.0010.BIN
When complete, do NOT log off Zeus, as the configuration will be used again in a
later step.
Upgrade Kit For Rev.5 Standalone XLS Node PMIs
REAR
OF PMI
A
A
A
A
Figure 1
Rear Of PMI