Sold by: http://www.TWAcomm.
Congratulations Congratulations on your purchase of the Siemens Gigaset 4015 telephone system! This phones 2.4 GHz frequency and high-speed digital voice encoding provide reception and voice clarity that is superior to other cordless phones. And, its digital spread spectrum technology will provide you with secure, private conversations. DO NOT RETURN THIS PRODUCT TO THE STORE! Please read the following important information.
General Quick reference Handset Turn handset on/off (see page 7) Turn keypad protection on/off (see page 7) Turn tones on/off Hold down Make an external call (see page 12) Redial a number (see page 16) Copy telephone number to the Directory (see page 16) Dial from the Directory (see page 17) Dial from the Call Log (see page 23) Set the handset volume (see page 42) Make an internal call (see page 12) Call all handsets (see page 12) Transfer call to another handset (see page 39) Consultation Calls (see
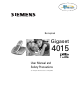
General Handset Diagram LED lights up during a call; flashes at: - incoming calls - new calls - new messages - alarm call Headset jack Charging status Talk key - answer a call - dial a telephone number 5'/ Directory key Open the directory -- Display ,17 & END TALK Key 1 (programmable) Hold down to select the answering machine/Telco mailbox 1 2ABC 3 DEF 4 GHI 5JKL 6 MNO 7 PQRS 8TUV 9 WXYZ 00OPER Star key Hold down to on/off the ringer R MEM Microphone Flash key Pause
General Display symbols General 5'/ -- ,17 & RDL INT MENU Automatic redial Mailbox icon: Intercom key: key: Opens the messages/ Call other regisOpens the list entries in the answering tered handsets. with the last five machine/in the Call Log/ telephone numTelco voice mail. bers dialed. There are new messages if the icon flashes. Menu key: To access menu (when the telephone is idle or during a call). ALARM CLOCK 2.
General VI
Table of Contents Installing the Telephone System ........................ 3 Date and Time ...................................................... 8 Making Calls ....................................................... 12 Enhanced Telephone Features ......................... 16 Call Waiting ........................................................ 26 Operating the Answering Machine .................. 27 Customizing the Answering Machine Settings 32 Handset Operation ...........................................
Table of Contents Troubleshooting ............................................... 49 Customer Care Warranty for Cordless Products 50 Safety Precautions ............................................ 52 Limited Warranty ............................................... 53 Menu .................................................................. 55 Index ...................................................................
Installing the Telephone System Press Keys: Installing the Telephone System The package contains the following: • • • • • • • • 100°F 1 Gigaset 4015 base station 1 Gigaset 4000 handset 1 power supply unit 1 telephone cord 1 belt clip 2 AA rechargeable NiCd batteries 1 User Manual 1 Quick Start Guide Installing the Base Station The base station is designed for operation in protected rooms with a temperature range from +40°F to +100°F.
Installing the Telephone System Connecting the Base Station Power supply unit (110 V AC/60 Hz with cord ) Telephone jack and telephone cord 1 • Insert the small plug on cord into phone jack • Place cord in the base cable channel • insert power supply unit into wall outlet Key to register additional handsets/Page handsets.
Installing the Telephone System Press Keys: Setting Up the Handset Remove the protective plastic film from display. Inserting the batteries – –+ + –+ • Insert the batteries, as shown above. • Place cover and push gently upward until it clicks into place (the unit is shipped with the battery cover off). • To open, press the grooved area on the cover and slide back. • Use only “AA” rechargeable NiCd or NiMH batteries. Do not use Alkaline, Lithium or non-rechargeable batteries.
Installing the Telephone System Press Keys: Leave the handset for about 12–14 hours in the base station to charge the batteries. The charging status symbol flashes on the handset, indicating that the batteries are being charged: K Batteries empty (symbol flashes) J Batteries charged 1/ 3 I Batteries 2/3 charged H Batteries fully charged • Once the initial charging operation is completed, replace your handset into the base station after each call. Charging is controlled electronically.
Installing the Telephone System Press Keys: Turning Handset On/Off To turn handset on/off, hold down the End key – you will hear a confirmation beep*. The handset is turned on as soon as you insert the batteries and place the handset in the base station. Turning Keypad Lock On/Off You can disable the handset keys when carrying the unit in your pocket or bag. This protects the keypad against inadvertent activation.
Date and Time Press Keys: Date and Time Setting the Date and the Time The date and time settings are necessary in order for the date and time of the arrival of messages/incoming calls to be displayed correctly. If you subscribe to Caller ID, the time and date will be automatically set with the first incoming call. If not, manually set by using the steps below. You can also set the clock mode, to the 12 hour mode (AM and PM) or 24 hour mode. • The default setting is 12 hour mode.
Date and Time Press Keys: The current setting is displayed as HH:MM. For example: L L Enter the hours/minutes for example, 10:30 as shown. NNNNNNN NNNNNNN If necessary, skip to a digit to correct it. NNNNNNN Save the setting by pressing OK. If 12 hour mode is set as Clock Mode: AM NNNNNNN NNNNNNN Select AM and press OK. or PM NNNNNNN NNNNNNN NNNNNNN Scroll to PM and and press OK. NNNNNNN Save the setting by pressing OK.
Date and Time Press Keys: Setting the Alarm Your Gigaset has an alarm function to help you keep track of your schedule. A prerequisite for this function that you have set date and time (see page 8). Turning the Alarm On The active alarm rings every day at the set time. MENU Open the Menu. NNNNNNNNNNNN ALARM CLOCK NNNNNNNNNNNNNNNNNNNNNNNNNNNNNNNN NNNNNNN NNNNNNN Scroll to Alarm Clock and press OK (marked with a '). For example: L L Enter the time for the alarm (hours/minutes).
Date and Time Press Keys: Stopping the Alarm Sound An alarm clock rings and the LED flashes (about 30 seconds). Press any key on the handset to turn off the alarm sound. There is no snooze setting. The alarm will sound until turned off. Area Codes To conveniently call back a user from the call log (see page 23) you will need to key in and store the code for the area where your telephone is installed (Local Area Code).
Making Calls Press Keys: Making Calls Making an External Call Dial the telephone number. If necessary use the backspace key to correct single digits. Press the Talk key. To end the call, press the End key. • You can also press the Talk key first and then enter the telephone number – each digit is dialed immediately. • You can cancel the dialing operation with the End key.
Making Calls Press Keys: Answering a Call Press the Talk key. or F? Pick up the handset from the base station or charger (default: Auto talk, see page 43). Answering Caller ID Calls Caller ID is a service provided by the local telephone company which allows your Gigaset to display the name and number of the person who is calling you. Contact your local telephone company to subscribe to Caller ID service.
Making Calls Press Keys: Listening in at the Base Station You can switch on the base station speaker, so that people in the room can hear what your caller is saying. MENU Open the Menu. NNNNNNNNNNNN BASE SPKR NNNNNNNNNNNNNNNNNNNNNNNNNNNNNNNN NNNNNNN NNNNNNN Scroll to Base Speaker and press OK. To deactivate, repeat this procedure. This is for listening only. It is not a speakerphone because it has no microphone. Before you activate this feature, you should inform your caller about your intention.
Making Calls Press Keys: Telco Voice Mail If you subscribe to voice mail from your local telephone company, you may use your Gigaset handset to retrieve messages. It is recommended you store the access number in the "1" key. Storing Access Number for Retrieving Voice Mail MENU Open the Menu. NNNNNNNNNNNN VOICE MAIL NNNNNNNNNNNNNNNNNNNNNNNNNNNNNNNN NNNNNNN NNNNNNN Scroll to Voice Mail and press OK. SET KEY 1 NNNNNNNNNNNNNNNNNNNNNNNNNNNNNNNN NNNNNNN NNNNNNN Scroll to Set Key 1 and press OK.
Enhanced Telephone Features Press Keys: Enhanced Telephone Features In addition to standard telephoning, your Gigaset offers a number of other fast, convenient features. Redial Your handset automatically saves the last five telephone numbers dialed. RDL Select RDL. NNNNNNNNN NNNNNNN NNNNNNN Scroll to the desired telephone number. Press the Talk key – the telephone number is dialed. Delete the Redialing List You can delete all numbers from your redialing list. RDL Select RDL.
Enhanced Telephone Features Press Keys: Directory The Directory allows you to store up to 20 telephone numbers. Storing a Directory Entry Open the Directory list. MENU Open the Menu. NNNNNNNNNNNN NNNNNNNNNNNNNNNNNNNNNNNNNNNNNNNN NEW ENTRY NNNNNNN NNNNNNN Scroll to New Entry and press OK. Enter the telephone number (max. 22 digits). NNNNNNN Press OK. Follow all local telephone company dialing requirements, such as 7-digit, 10-digit or 11-digit dialing. Enter the name (max. 12 characters).
Enhanced Telephone Features Press Keys: Displaying and Editing a Directory Entry Open the Directory. For example: Enter the first letter of the name, such as Eric. MENU Open the Menu. NNNNNNNNNNNN NNNNNNNNNNNNNNNNNNNNNNNNNNNNNNNN DISPLAY ENT NNNNNNN NNNNNNN Scroll to Display Entry and press OK. The number is displayed. NNNNNNN Using the keypad, edit the number and press OK. NNNNNNN Using the keypad, edit the name and press OK.
Enhanced Telephone Features Press Keys: Memory Dial List The Memory Dial allows you to store up to 9 frequently dialed numbers for quick access using the 1–9 keys. It is recommended that you use the "1" for answering machine or voice mail from the telephone company. Storing a Memory Dial Entry Open the Memory Dial list. MENU Open the Menu. NNNNNNNNNNNN NEW ENTRY NNNNNNNNNNNNNNNNNNNNNNNNNNNNNNNN NNNNNNN NNNNNNN Scroll to New Entry and press OK. NNNNNNN Enter the telephone number (max.
Enhanced Telephone Features Press Keys: Dialing a Number from the Memory List Press the Memory Dialing key. Select the memory location desired and give the key a long press. Example: Long press on key is for Eric. The telephone number is displayed. Press the Talk key. Displaying and Editing a Memory Dial Number Open the Memory Dial list. MENU Select a telephone number and open the Menu.
Enhanced Telephone Features Press Keys: Call Log * The numbers of the last 30 incoming calls are saved in the Call Log. • Calls picked up on the first ring will not be logged in the Call Log. Call Waiting calls are included in the Call Log if you have subscribed to Caller ID with Call Waiting from your local telephone company. • If several calls are received under the same number, all calls are recorded. • You must subscribe to Caller ID for the Call Log to record numbers.
Enhanced Telephone Features Press Keys: New Call Indicator NNNNNNN If there are new calls or a telco voice message, the new call symbol in the display and the LED on top of the handset will flash. New Calls NNNNNNN Select the new call symbol. C LOG NNNNNNN NNNNNNNNNNNNNNNNNNNNNNNNNNNNNNNN NNNNNNN Scroll to Call Log and press OK. The display in the example means: C LOG symbolizes Call Log. symbolizes 2 new calls and 6 old calls The telephone number received last is displayed.
Enhanced Telephone Features Press Keys: Calling from Call Log When your Local Area Code and any Extra Codes have been stored in your telephone, it will behave as described below in the case of a call from the call log list: Single Area Code Area (Local Area Code and no Extra Code are stored) If the Area Code of the call log entry is identical to the stored Local Area Code, only the 7digit DID number will be dialed. A "1" will otherwise be prefixed to the call log entry number.
Enhanced Telephone Features Press Keys: Copying Call Log Number to the Directory NNNNNNN C LOG NNNNNNN NNNNNNNNNNNNNNNNNNNNNNNNNNNNNNNN NNNNNNN NNNNNNN NNNNNNN MENU NNNNNNNNNNNN SEND TO DIR NNNNNNN NNNNNNNNNNNNNNNNNNNNNNNNNNNNNNNN NNNNNNN NNNNNNN NNNNNNN Open the Call Log. Scroll to Call Log and press OK. Scroll to the telephone number. Open the Menu. Scroll to Send To Directory and press OK. If necessary, using the keypad, edit the number and press OK.
Enhanced Telephone Features Press Keys: NEW NET MSG OLD NET MSG The Telco Voice Mail message is new in the list. The Telco Voice Mail message is old in the list.
Call Waiting Press Keys: Call Waiting If you subscribe to Call Waiting on Caller ID, the incoming name and number is displayed while on a call. Answering a Waiting Call While engaged in an active call, you hear the Call Waiting tone. Announce to the first caller that you will be put them or her on hold. Press the Flash key on the bottom left of the handset to answer the second caller. Reconnecting to the first Call Press Flash key again, to reconnect the first caller.
Operating the Answering Machine Press Keys: Operating the Answering Machine Your Gigaset 4015 is equipped with an answering machine that will record messages in your absence or allow you to screen calls and answer them selectively. The answering machine in the Gigaset 4015 is automatically turned on when you install your phone and completely operated through any registered 4000 or 4200 handset.
Operating the Answering Machine Press Keys: Setting a Different Language You may change the language for acoustic operation and for the standard announcement. English is the default language. MENU Open the Menu. NNNNNNNNNNNN 3 6 - Press the key combination 8, 9, 2, then choose the language from the chart below: U.S.A. - Canada English Spanish - English French Recording Your Own Announcement The standard announcement is already preset: “There is nobody available to take your call right now.
Operating the Answering Machine Press Keys: The standard announcement is active again. Recording is automatically terminated: • if you exceed the maximum recording time of 170 seconds • if you pause for more than two seconds when recording your announcement Playing or Deleting a Recorded Announcement MENU Open the Menu. NNNNNNNNNNNN VOICE MAIL NNNNNNNNNNNNNNNNNNNNNNNNNNNNNNNN NNNNNNN NNNNNNN Scroll to Voice Mail and press OK.
Operating the Answering Machine Press Keys: Pause During the Message Playback - Press the 2 key to pause. - Press the 2 key again to resume playing messages. If playback is paused for more than a minute, the answering machine reverts to idle status. Skip Forward and Backward While Playing Back Messages NNNNNNN NNNNNNN Select backward and forward arrows while in answering machine mode. Deleting Messages You can either delete individual messages or all old messages.
Operating the Answering Machine Press Keys: Setting Instant Access to the Answering Machine or Voice Mail You can set your telephone to instantly access the answering machine or to dial your voice mail. MENU Open the Menu. NNNNNNNNNNNN VOICE MAIL NNNNNNNNNNNNNNNNNNNNNNNNNNNNNNNN NNNNNNN NNNNNNN Scroll to Voice Mail and press OK. SET KEY 1 NNNNNNNNNNNNNNNNNNNNNNNNNNNNNNNN NNNNNNN Select Set Key 1 and press OK.
Customizing the Answering Machine Settings Press Keys: Customizing the Answering Machine Settings The answering machine has already been preset for you at the factory. However, you may customize the settings using the handset. Setting the Number of Rings and the Toll Saving Function For remote operation, you can set how many times the telephone rings before the answering machine picks up the call. You can choose between two to nine rings and an automatic toll saving function.
Customizing the Answering Machine Settings Press Keys: Setting Message Length You can set the length of message recording time for your answering machine if desired. The factory default setting is 120 seconds. MENU Open the Menu. NNNNNNNNNNNN VOICE MAIL NNNNNNNNNNNNNNNNNNNNNNNNNNNNNNNN NNNNNNN NNNNNNN Scroll to Voice Mail and press OK. MSG SETT NNNNNNNNNNNNNNNNNNNNNNNNNNNNNNNN NNNNNNN NNNNNNN Scroll to Message Settings and press OK.
Customizing the Answering Machine Settings Press Keys: Call Screening from Base Station MENU Open the Menu. NNNNNNNNNNNN VOICE MAIL NNNNNNN NNNNNNNNNNNNNNNNNNNNNNNNNNNNNNNN NNNNNNN Scroll to Voice Mail and press OK. SPKR ON/OFF NNNNNNNNNNNNNNNNNNNNNNNNNNNNNNNN NNNNNNN NNNNNNN Scroll to Speaker On/Off and press OK The loudspeaker at the base station is activated and marked with a '. NNNNNNN To deactivate, press OK with Speaker On/Off selected again.
Customizing the Answering Machine Settings Press Keys: or Go to the next message. To go to forward to subsequent messages (press repeatedly). or L Delete the current message. For remote replay, your telephone must support tone dialing (DTMF). You can hear a tone when you press a key. If not, you must use a tone generator (available in stores). Turning On the Answering Machine Remotely If you forgot to turn on your answering machine, you may switch it on remotely.
Handset Operation Press Keys: Handset Operation 1 2 ... 3 You can register and operate up to three handsets at the Gigaset 4015 base station. Registering and Deregistering Handsets The handset that comes with the system is automatically registered with the base station. To register additional handsets, follow the procedures described in this chapter. F Automatic Registration Automatic registration is possible for only the supplied handset and any additional Gigaset 4000 or 4200 handsets.
Handset Operation Press Keys: Manual Registration You may also manually register additional handsets to your base station. MENU Open the Menu. NNNNNNNNNNNN REGISTER HS NNNNNNN NNNNNNNNNNNNNNNNNNNNNNNNNNNNNNNN NNNNNNN Scroll to Register Handsets and press OK. PIN is displayed. NNNNNNN Enter the 4-digit system PIN (default: 0000) and press OK (see page 45 for Changing System PIN). REGISTER HS Entry will be flashing. NNNNNNNNNNNNNNNNNNNNNNNNNNNN NNNNNNN Press OK at the flashing prompt.
Handset Operation Press Keys: Changing the Name of a Handset The names INT 1, INT 2, and so on are assigned automatically. However, you can change these names, for example, to ANNE or OFFICE (10 characters maximum). INT Press the intercom soft key. NNNNNNN NNNNNNN NNNNNNN Scroll to the required handset. MENU Open the Menu. NNNNNNNNNNNN CHANGE NAME NNNNNNNNNNNNNNNNNNNNNNNNNNNNNNNN NNNNNNN NNNNNNN Scroll to Change Name and press OK. Enter name (see character map on page 48). NNNNNNN Press OK.
Handset Operation Press Keys: Transferring a Call You can transfer an external call to another handset. INT Press the Intercom soft key. NNNNNNN The external caller hears music on hold. For example: - Enter the intercom handset number. When the internal user answers, announce the external call. Press the End key. The call is transferred. or Press the End key without announcing. If the internal user does not answer or his line is busy, the call is automatically returned to you.
Handset Operation Press Keys: Joining a Call ("Barging In") An internal user conducts an external call. A second internal user can join in on this call and speak to the other users. Turning this Function On/Off MENU Open the Menu. NNNNNNNNNNNN BASE SETT NNNNNNNNNNNNNNNNNNNNNNNNNNNNNNNN NNNNNNN NNNNNNN Scroll to Base Settings and press OK. SPECIAL FCT NNNNNNNNNNNNNNNNNNNNNNNNNNNNNNNN NNNNNNN NNNNNNN Scroll to Special Functions and press OK.
Handset Operation Press Keys: Paging Press the Page/Registration button on the bottom side of the base station very briefly. All handsets ring at the same time. To End Paging Press the Page/Registration button again. or Press the Talk key on a handset. Resetting a Handset to the Default Setting You may want to reset your handset to its default settings. The Directory, the Memory Dial list, and the Call Log are not deleted when you reset the handset. Registration at the base station is not affected.
Individual Handset Settings Press Keys: Individual Handset Settings You can set your handset according to your wishes to distinguish it from the standard settings and to maximize convenience. Change the Display Language of a Handset MENU Open the Menu. NNNNNNNNNNNN 6M or Mor M Press the 9 key and the 2 key followed by: English (default), French, Spanish. Modifying the Volume and Changing the Melody Handset Volume You can choose from three levels of volume for the handsets – even during a call.
Individual Handset Settings Press Keys: Ringer Melody You can choose from ten ringer melodies (1–10). MENU Open the Menu. NNNNNNNNNNNN HS SETT NNNNNNNNNNNNNNNNNNNNNNNNNNNNNNNN NNNNNNN NNNNNNN Scroll to Handset Settings and press OK. MELODY NNNNNNNNNNNNNNNNNNNNNNNNNNNNNNNN NNNNNNN NNNNNNN Scroll to Melody and press OK. NNNNNNN NNNNNNN You hear the current melody and its number is displayed. Scroll to the the desired melody and press OK.
Base Station Settings Press Keys: F Base Station Settings All base station settings are conveniently made using the handset! Modifying Base Volume and Melody You can choose the loudspeaker volume for open listening from five levels (1–5) (see page 44). The base is not a speakerphone. It does not have a microphone. Loudspeaker Volume MENU Open the Menu. NNNNNNNNNNNN BASE SETT NNNNNNNNNNNNNNNNNNNNNNNNNNNNNNNN NNNNNNN NNNNNNN Scroll to Base Settings and press OK.
Base Station Settings Press Keys: Ringer Melody You can choose from ten ringer melodies (1–10). MENU Open the Menu. NNNNNNNNNNNN BASE SETT NNNNNNNNNNNNNNNNNNNNNNNNNNNNNNNN NNNNNNN NNNNNNN Scroll to Base Settings and press OK. AUDIO SET UP NNNNNNNNNNNNNNNNNNNNNNNNNNNNNNNN NNNNNNN Select Audio Set Up and press OK. MELODY NNNNNNN NNNNNNNNNNNNNNNNNNNNNNNNNNNNNNNN NNNNNNN Scroll to Melody and press OK. NNNNNNN NNNNNNN You hear the current melody and its number is dis- played.
Connecting the Base Station to a PBX Press Keys: Connecting the Base Station to a PBX Your Gigaset may be operating behind a PBX. Changing the Dialing Mode It is necessary to change the dialing mode only if your PBX does not operate with the preset tone dialing (DTMF – dual-tone multifrequency). Please refer to the operating instructions of your PBX. Options: • Tone dialing (DTMF), • Pulse dialing (P). Open the Menu.
Connecting the Base Station to a PBX Press Keys: Switching Temporarily to Tone Dialing If your PBX still operates with dial pulsing (DP) but tone dialing (DTMF) is required (for example, to check the mailbox), you must switch to tone dialing (DTMF) during the call. Prerequisite: You are making a call. MENU Open the Menu. NNNNNNNNNNNN TEMP DTMF NNNNNNNNNNNNNNNNNNNNNNNNNNNNNNNN NNNNNNN NNNNNNN Scroll to Temp DTMF and press OK. Tone dialing is active.
Appendix Appendix Character Map / 0 1 2 3 6 L 5 4 1x 2x 3x 4x ! 1 A 5x B C 2 D E F 3 G H I 4 J K L 5 M N O 6 P Q R S T U V 8 W X Y Z 9 + 0 – | ? * / ( ) , 6x 7 _ Press the relevant key repeatedly or hold it down. Control the cursor with . Delete a character with are always inserted to the left of the cursor. . Characters The entries are sorted in the following sequence: 1. 2. 3. 4.
Troubleshooting Maintenance Simply wipe the base station and handset with a damp cloth or an antistatic wipe. Never use a dry cloth as this can cause static discharge! Troubleshooting If your telephone does not behave the way you want it to, first try to solve the problem using the following list. Siemens Customer Care 1-888-777-0211. Problem No display. Possible cause Handset not on Solution Hold down the end call for 1 second key Batteries empty Charge or replace the batteries (see page 5).
Customer Care Warranty for Cordless Products Customer Care Warranty for Cordless Products To obtain Siemens Customer Care Warranty service, product operation information, or for problem resolution, call: Toll Free: 1-888-777-0211 7:00 a.m. – 10:00 p.m. Central Standard Time EVERY DAY THIS WARRANTY IS VALID ONLY ON SIEMENS CORDLESS PRODUCTS PURCHASED AND USED IN THE UNITED STATES OF AMERICA, EXCLUDING ALL U.S. TERRITORIES AND PROTECTORATES. IT IS ALSO VALID IN CANADA AND ITS TERRITORIES.
Customer Care Warranty for Cordless Products FCC Information :DUQLQJ Changes or modifications to this unit not expressly approved by Siemens Cordless Products could void the FCC authority to operate the equipment. This includes the addition of any external antenna device. This telephone system complies with Part 68 of the FCC rules. On the bottom of the base station is labeling that contains, among other information the FCC Registration Number and the Ringer Equivalence number (REN).
Safety Precautions Industry Canada Certification NOTICE: The Industry Canada label identifies certified equipment. This certification means that the equipment meets certain telecommunications network, protective, operational and safety requirements as prescribed in the appropriate Terminal Equipment Technical Requirements document(s). The Department does not guarantee the equipment will operate to the user’s satisfaction.
Limited Warranty 12. Unplug the product from the wall outlet and refer servicing to qualified service personnel under the following conditions: a.) When the power cord is damaged or frayed. b.) If liquid has been spilled into the product. c.) If the product has been exposed to rain or water. d.) If the product does not operate normally by following the operating instructions.
Limited Warranty This warranty does not apply to defects outside of our control, including but not limited to acts of God, fire, flood, damage while in transit to service facility. We do not warranty that the product will be compatible with any telephone equipment or systems or party lines.
Gigaset 4015 Classic, USA, A31008-G4015-U101-1- menu.fm 24.08.0 Menu Menu It is faster to select a menu function by pressing MENU than selecting the digit combinations by scrolling, e.g. 0 - - = 5-2-2 to set the time.
Gigaset 4015 Classic, USA, A31008-G4015-U101-1- menu.fm Menu Directory/Memory access list Press / to open the corresponding list. The following MENU functions are now available: 1 EDIT ENTRY Add number 2 NEW ENTRY Save new telephone number 3 DISPLAY ENT Display/change telephone number 4 DELETE Delete entry/entries Call Log Press to open the list with the messages.
Gigaset 4010 Classic, Inland, A31008-G4010-B101-1- 4015 BookSIX.fm 24.08.
Gigaset 4010 Classic, Inland, A31008-G4010-B101-1- volume 42 Headset 7 4015 BookSIX.
Gigaset 4015 Classic, USA, A31008-G4015-U101-1-6019 fernbedien.fm 08.24.01 Answering machine remote operation The functions of the keys for operating the answering machine remotely are the same for all telephones, handsets and tone transmitters. This “credit card” shows you how to perform remote operations on an external telephone (for example from a pay phone or a hotel phone) and shows you the meanings of the keys. s Gigaset 4015 + Gigaset 4015 Back Next Dial your own telephone number.
Be inspired Gigaset 4015 Instrucciones de manejo e indicaciones de seguridad Visite nuestro sitio Web para obtener Instrucciones en Español: www.icm.siemens.
Felicitaciones ¡Felicitaciones por la compra de su sistema telefónica Gigaset 4015 Siemens! La frecuencia de 2,4 GHz y la codificación de voz digital de alta velocidad de este teléfono ofrece recepción y claridad de voz superior en comparación con otros teléfonos inalámbricos. Y, su tecnología digital de espectro de propagación le ofrecerá conversaciones seguras y privadas. ¡NO DEVUELVA ESTE PRODUCTO AL REVENDEDOR! Por favor leer las siguientes informaciones importantes.
Indice Instalación del sistem de teléfono ..............................................2 Fecha y horario .................................................................................7 Establecimiento de llamadas ..................................................... 11 Características Realzadas del Teléfono .................................. 15 Funciones durante una segunda llamada .............................. 25 Uso del Contestador Automático ..............................................
Instalación del sistem de teléfono Presionar las teclas: Instalación del sistem de teléfono El embalaje contiene lo siguiente: • • • • • • • • 100°F 40°F 2 1 estación-base Gigaset 4015 1 auricular Gigaset 4000 1 unidad de alimentación 1 cable telefónico 1 clip de cinturón 2 baterías de NiCd AA recargables 1 manual del propietario 1 Guía de Inicialización Rápida Instalación de la estación-base La estación-base se ha proyectado para operación en salas protegidas con un rango de temperatura de +40°F a +1
Instalación del sistem de teléfono Conexión de la estación-base Unidad de alimentación (110 V AC/ 60 Hz con cable) Enchufe del teléfono con el cable telefónico 1 • Insertar el conector pequeño del cable telefónico en el enchufe del teléfono • insertar el cable en la guía • insertar la unidad de alimentación en el tomacorriente de la pared. Llave para registrar auriculares adicionales/auriculares de page.
Instalación del sistem de teléfono Presionar las teclas: Activación del auricular Remover el plástico protector del display. Inserción de las baterías – –+ + –+ • Insertar las baterías, como se muestra arriba. • Reponer la tapa y empujarla suavemente hasta que se encaje en su sitio. • Para abrir, presionar el área en relieve de la tapa y deslizarla hacia atrás. • Utilizar solamente baterías de NiCd o NiMH "AA" recargables. No utilizar baterías alcalinas, de litio o no recargables.
Instalación del sistem de teléfono Presionar las teclas: Your answering machine is set with a standard announcement. Dejar el auricular por aproximadamente 12-14 horas en la estación-base para cargar las baterías.
Instalación del sistem de teléfono Presionar las teclas: Encendiendo/apagando el auricular Para dar vuelta del auricular con desc mantega el clave Del "End", used Oirá una senal acústica de la confirmación.* El auricular se activa en seguida de que las baterías se insertan y de que se pone el auricular en la estación-base. Activación/desactivación del bloqueo del teclado Las teclas del auricular pueden deshabilitarse al transportar la unidad en su bolsillo o portafolios.
Fecha y horario Presionar las teclas: Fecha y horario Ajuste de la fecha y del horario Los ajustes de la fecha y el horario son necesarios para que la fecha y el horario de llegada de los mensajes/llamadas de entrada se exhiban correctamente. El modo del reloj también puede ajustarse en el modo de 12 horas (AM y PM) o de 24 horas. • El ajuste estándar está en el modo de 12 horas. • Si usted se ha inscrito en el ID del llamador, la fecha y el horario serán transmitidos por su servicio telefónico.
Fecha y horario Presionar las teclas: El ajuste actual se exhibe como HH:MM. Por ejemplo: L L Introducir las horas/minutos, por ejemplo, 10:30 como mostrado. NNNNNNN NNNNNNN Si es necesario, salta a un dígito para corregirlo. NNNNNNN Salvar el ajuste al presionar OK. Si se quiere ajustar el Modo del Reloj en el modo de 12 horas: AM NNNNNNN NNNNNNN Selecione a.m. y presione OK. o PM NNNNNNN NNNNNNN NNNNNNN Desplazarse hasta p.m. y presionar OK. NNNNNNN Salvar el ajuste al presionar OK.
Fecha y horario Presionar las teclas: Ajuste de la alarma Su Gigaset posee una función de alarma para ayudarlo a mantener su agenda. Activación de la alarma A prerequisite for this function that you have set date and time (ver la página 7). La alarma activa toca todos los días en el mismo horario. MENU Abrir el Menú. NNNNNNNNNNNN DESPERT NNNNNNNNNNNNNNNNNNNNNNNNNNNNNNNN NNNNNNN NNNNNNN Desplazarse hasta DESPERT y presionar OK (marca- do con un ').
Fecha y horario Presionar las teclas: Desconexión del sonido de la alarma Una alarma toca y el LED titila (por aproximadamente 30 segundos). Presionar cualquier tecla en el auricular para desconectar el sonido de la alarma. No hay ajuste del "snooze" (siesta).
Establecimiento de llamadas Presionar las teclas: Establecimiento de llamadas Estableciendo una llamada externa Marcar el número telefónico. Si es necesario, utilizar la tecla backspace para corregir dígitos. Presionar la tecla Talk. Para terminar la llamada, presionar la tecla End. • También es posible presionar la tecla Talk primero y entonces introducir el número telefónico - cada dígito se marca inmediatamente. • La operación de marcación puede cancelarse con la tecla End.
Establecimiento de llamadas Presionar las teclas: Contestando una llamada Presionar la tecla Talk. o F? Retirar el auricular de la estación-base (estándar: Auto talk, ver página 43). Contestando Llamadas de ID de Llamador La ID de Llamador es un servicio proporcionado por la compañía local de teléfono que permite que su Gigaset exhiba el nombre y el número de la persona que le está llamando. Contacte a su compañía local de teléfono para abonarse al servicio de ID de Llamador.
Establecimiento de llamadas Presionar las teclas: Escuchar en la base (“Escucha por altavoz“) Para que otras personas presentes en la sala puedan escuchar lo que está diciendo su interlocutor, puede activar también el altavoz de la estación base. MENU Abrir el menú. NNNNNNNNNNNN ESC ALTAV NNNNNNNNNNNNNNNNNNNNNNNNNNNNNNNN NNNNNNN NNNNNNN Seleccionar y confirmar. Para la desactivación, seguir el mismo procedimiento. • Antes de activar esta función se recomienda comunicarlo a su interlocutor.
Establecimiento de llamadas Presionar las teclas: NNNNNNN Introducir el número telefónico de acceso de la caja de correo y presionar OK. • Ya que usted haya introducido el número de acceso en la caja de correo de voz, simplemente mantenga presionada la tecla en el auricular. Usted está conectado diretamente al sistema de caja de correo de la operadora. Siga las instrucciones de la operadora • Se pueden almacenar números adicionales después del número de acceso (contraseña, pausa).
Características Realzadas del Teléfono Presionar las teclas: Características Realzadas del Teléfono Además de telefonía estándar, su Gigaset le ofrece otras características rápidas y convenientes. Remarcación Su auricular almacena automáticamente los últimos cinco números telefónicos marcados. RDL Seleccionar RDL. NNNNNNNNN NNNNNNN Desplazarse hasta el número telefónico deseado. Presionar la tecla Talk – el número telefónico se marcará.
Características Realzadas del Teléfono Presionar las teclas: El Directorio El directorio permite que usted salve hasta 20 números de telefóno. Almacenamiento de una entrada en la agenda Abrir la lista de la agenda. MENU Abrir el Menú. NNNNNNNNNNNN NUEVO REGIST NNNNNNN NNNNNNNNNNNNNNNNNNNNNNNNNNNNNNNN NNNNNNN Desplazarse hasta NUEVO REGIST y presionar OK. Introducir el número telefónico (máx. 22 dígitos). NNNNNNN Presionar OK.
Características Realzadas del Teléfono Presionar las teclas: Exhibición y edición secctión Abrir la agenda. Por ejemplo: Introducir la primera letra del nombre, tal como Eric. MENU Abrir el Menú. NNNNNNNNNNNN MOSTRAR NUM NNNNNNN NNNNNNNNNNNNNNNNNNNNNNNNNNNNNNNN NNNNNNN Ir a MOSTRAR NUM y presionar OK. Se exhibirá el número deseado. NNNNNNN Con el teclado numérido, corrija el número y presionar OK. NNNNNNN Con el teclado numérido, corrija el nombre y presionar OK.
Características Realzadas del Teléfono Presionar las teclas: Lista de marcación de la memoria La Marcación de Memoria le permite almacenar hasta 9 números de marcaión frecuente para un acceso rápido usando las teclasde 1-9. Es recomendable que usted use el "1" para el contestador automático o el Correo de Voz de la compañía de teléfonos. Almacenando una Entrada de Marcación de Memoria Abrir la Lista de marcación de la memoria. Nuevo registro Seleccionar el ítem de menú y presionar OK.
Características Realzadas del Teléfono Presionar las teclas: Marcación de un Número desde la Lista de la Memoria Presionar la tecla de Marcación de la Memoria. Seleccione la posición de memoria deseada y mantenga la tecla presionada durante cierto tiempo. Ejemplo: presionando durante un cierto tiempo la tecla se llega la entrada Eric. Entonces se visualizara el número de teléfono. Presione la tecla Hablar.
Características Realzadas del Teléfono Presionar las teclas: Registro de llamadas* Los números de las últimas 30 llamadas se memorizarán en el registro de llamadas. • Las llamadas atendidas al primer toque no se registrarán en el registro de llamadas. Las llamadas en espera se inclurán en el registro de llamadas si usted se ha inscrito en ID de llamador con llamada en espera en su compañía telefónica local. • Si se reciben varias llamadas con el mesmo número, solamente se registrará la última llamada.
Características Realzadas del Teléfono Presionar las teclas: Indicador de nueva llamada NNNNNNN Si hay nuevas llamadas, el símbolo de nueva llamada en el display y el LED en la parte superior del auricular se pondrán a titilar. Si el LED no titila, no se ha almacenado ningún mensaje o nueva llamada. NNNNNNN LIS LL NNNNNNN NNNNNNNNNNNNNNNNNNNNNNNNNNNNNNNN NNNNNNN Seleccionar el símbolo de nueva llamada. Desplazarse hasta LIS LL y presionar OK.
Características Realzadas del Teléfono Presionar las teclas: Llamando desde el Registro de Llamadas Cuando su Código de Área Local y cualesquier Códigos Extra han sido almacenados en su teléfono, este se comportará como se describe a continuación en el caso de una llamada de la lista de Registro de Llamadas: Área de Código Único (se almacena el Código de Área Local pero ningún Código Extra) Si el Código de Área de la entrada del registro de llamadas es idéntico al Código de Área Local almacenado, solamente
Características Realzadas del Teléfono Presionar las teclas: Copia del número del registro de llamadas en la agenda NNNNNNN LIS LL NNNNNNN NNNNNNNNNNNNNNNNNNNNNNNNNNNNNNNN NNNNNNN NNNNNNN NNNNNNN MENU NNNNNNNNNNNN COP A LISTIN NNNNNNN NNNNNNNNNNNNNNNNNNNNNNNNNNNNNNNN NNNNNNN NNNNNNN NNNNNNN Abrir el registro de llamadas. Desplazarse hasta LIS LL y presionar OK. Desplazarse hasta el número telefónico. Abrir el Menú. Desplazarse hasta COP A LISTIN y presionar OK.
Características Realzadas del Teléfono Presionar las teclas: ANTIGUO 01/03 CONTESTADAS CONTESTADOR MENS RED NVO MENS RES ANT 24 La primera de las tres llamadas que ya están en la lista. La llamada se ha atendido. El contestador automático ha respondido a la llamada. El mensaje en la caja de correo de la operadora es nuevo en la lista. El mensaje en la caja de correo de la operadora es viejo en la lista.
Funciones durante una segunda llamada Presionar las teclas: Funciones durante una segunda llamada* Si Usted dispone de la facilidad de llamada en espera con ID de llamante, se visualizarán el nombre y el número entrantes mientras se está realizando una llamada. Responder a una llamda en espera Mientras Usted está realizando una llamada, escuchará el tono de Llamada en Espera. Comunique al actual llamante que va a retener su llamada.
Funciones durante una segunda llamada Presionar las teclas: o RELLAMADA NNNNNNN NNNNNNNNNNNNNNNNNNNNNNNNNNNNNNNN NNNNNNN Desplazarse hasta RELLAMADA y presionar OK. Transmitir después para rellamada. o AGREGAR LLAM NNNNNNN NNNNNNNNNNNNNNNNNNNNNNNNNNNNNNNN NNNNNNN Desplazarse hasta AGREGAR LLAM y presionar OK. Señal para operadora iniciar una llamada de conferencia.
Uso del Contestador Automático Presionar las teclas: Uso del Contestador Automático El modelo Gigaset 4015 incluye un contestador automático. Además el contestador automático del teléfono, es posible seleccionar un servicio de correo de voz o caja postal de su compañía telefónica. Ninguna de las siguientes funciones está relacionada con los servicios de correo de voz de la compañía telefónica.
Uso del Contestador Automático Presionar las teclas: Ajuste de un idioma diferente Es posible cambiar el idioma para la operación sonora y para el mensaje grabado estándar. MENU Abrir el Menú. NNNNNNNNNNNN 3 6 - Presionar la combinación de las teclas y seleccionar el idioma. - Inglés Español Francés Grabación de su propio mensaje grabado MENU Abrir el Menú. NNNNNNNNNNNN BUZON DE RED NNNNNNNNNNNNNNNNNNNNNNNNNNNNNNNN NNNNNNN NNNNNNN Desplazarse hasta BUZON DE RED y presionar OK.
Uso del Contestador Automático Presionar las teclas: El mensaje grabado estándar está nuevamente activo. La grabación es automaticamente parada: • se el tiempo de grabación fuera más que 170 segundos (tiempo máximo de grabación) • se Usted tuviera una pausa de más de dos segundos mientas la grabación de su mensaje grabado Reproducir o Borrar un Mensaje Grabado MENU Abrir el Menú. NNNNNNNNNNNN BUZON DE RED NNNNNNNNNNNNNNNNNNNNNNNNNNNNNNNN NNNNNNN NNNNNNN Desplazarse hasta BUZON DE RED y presionar OK.
Uso del Contestador Automático Presionar las teclas: Pausa durante la Reprodución del Mensaje - Presionar la tecla 2 para parar. Presionar nuevamente la tecla 2 para reproducir los mensajes. Si la reprodución parar por más de un minuto, el contestador automático regresa al estado inactivo. Desplazarse para Frente y para Trás durante la Reprodución de los Mensajes NNNNNNN NNNNNNN Seleccionar las setas para trás y para frente durante el modo de contestador automático.
Uso del Contestador Automático Presionar las teclas: Ajuste del Contestador Automático MENU Abrir el Menú. NNNNNNNNNNNN BUZON DE RED NNNNNNN NNNNNNNNNNNNNNNNNNNNNNNNNNNNNNNN NNNNNNN Desplazarse hasta BUZON DE RED y presionar OK. MARC RAPIDA NNNNNNNNNNNNNNNNNNNNNNNNNNNNNNNN NNNNNNN Seleccionar MARC RAPIDA y presionar OK. CONTESTADOR NNNNNNN NNNNNNNNNNNNNNNNNNNNNNNNNNNNNNNN NNNNNNN Desplazarse hasta CONTESTADOR y presionar OK.
Ajustes Individuales del Contestador Automático Presionar las teclas: Ajustes Individuales del Contestador Automático El contestador automático viene pre-ajustado de la fábrica. Sin embargo, se puede hacer ajustes individuales con el auricular. Número de Función Toll-Saver (Cantidad de sonidos) Para la operación remota, es posible ajustar la cantidad de veces que el teléfono toca antes que el contestador automático sea activado.
Ajustes Individuales del Contestador Automático Presionar las teclas: Extensión del Mensaje e Calidad de Grabación MENU Abrir el Menú. NNNNNNNNNNNN BUZON DE RED NNNNNNNNNNNNNNNNNNNNNNNNNNNNNNNN NNNNNNN NNNNNNN Desplazarse hasta BUZON DE RED y presionar OK. MENSAJES NNNNNNNNNNNNNNNNNNNNNNNNNNNNNNNN NNNNNNN NNNNNNN Desplazarse hasta MENSAJES y presionar OK. DURAC MAX NNNNNNNNNNNNNNNNNNNNNNNNNNNNNNNN NNNNNNN Seleccionar DURAC MAX y presionar OK.
Ajustes Individuales del Contestador Automático Presionar las teclas: La estación base no es un teléfono altavoz. La base no posee un micrófono. Altavoz de la Estación Base Es posible también escuchar mensajes y mensajes grabados (fecha, horario) en la estación base. MENU Abrir el Menú. NNNNNNNNNNNN BUZON DE RED NNNNNNNNNNNNNNNNNNNNNNNNNNNNNNNN NNNNNNN NNNNNNN Desplazarse hasta BUZON DE RED y presionar OK.
Ajustes Individuales del Contestador Automático Presionar las teclas: Operación Remota Es posible accesar su contestador automático remotamente a partir de otro teléfono (como un teléfono de hotel o público) después de cambiar su PIN (ver página 45). Acceso remoto al contestador automático Seleccionar su própio número telefónico. Usted escucha su mensaje grabado. Mientras la reproducción del mensaje grabado : 6 Presionar la tecla 9 e introduzir el PIN de sistema.
Operación del auricular Presionar las teclas: Operación del auricular 1 2 .. . 3 Usted puede registrar y operar hasta 3 auriculares en su estación-base Registro y cancelamiento de auriculares El auricular que viene con el sistema se registra automáticamente con la estación-base. Para registrar auriculares adicionales, seguir los procedimientos que se describen en este capítulo.
Operación del auricular Presionar las teclas: Registro manual Usted puede también hacer el registro manual de auriculares adicionales para la estación-base. Los auriculares sólo pueden registrarse en una estación-base Gigaset. MENU Abrir el Menú. NNNNNNNNNNNN REGIS TEL NNNNNNNNNNNNNNNNNNNNNNNNNNNNNNNN NNNNNNN NNNNNNN Desplazarse hasta REGIS TEL y presionar OK. Se exhibirá el PIN.
Operación del auricular Presionar las teclas: Alteración del nombre de un auricular Los nombres INT 1, INT 2, y así sucesivamente se atribuirán automáticamente. Sin embargo, usted puede alterar esos nombres, por ejemplo, para ANNE u OFFICE (máximo de 10 caracteres). INT Presionar la tecla Intercom. NNNNNNN NNNNNNN NNNNNNN Desplazarse hasta el auricular deseado. MENU Abrir el Menú. NNNNNNNNNNNN CAMB NOMBRE NNNNNNNNNNNNNNNNNNNNNNNNNNNNNNNN NNNNNNN NNNNNNN Desplazarse hasta Camb Nombre y presionar OK.
Operación del auricular Presionar las teclas: Transferencia de una llamada Usted puede transferir una llamada externa a otro auricular. INT Presionar la tecla Intercom. NNNNNNN El usuario externo oye una melodía mientras espera. Por ejemplo: - Introducir el número intercom del auricular. Cuando el usuario interno atiende, se anuncia la llamada externa. Presionar la tecla End. Se conecta la llamada. o Presionar la tecla End sin anuncio.
Operación del auricular Presionar las teclas: Juntándose a una llamada ("Barging In") Un usuario interno conduce una llamada externa. Un segundo usuario interno puede juntarse a esta llamada y hablar con los otros usuarios. Activación/desactivación de esta función MENU Abrir el Menú. NNNNNNNNNNNN CONF BASE NNNNNNNNNNNNNNNNNNNNNNNNNNNNNNNN NNNNNNN NNNNNNN Desplazarse hasta Config Base y presionar OK. FUN ESP NNNNNNNNNNNNNNNNNNNNNNNNNNNNNNNN NNNNNNN NNNNNNN Desplazarse hasta Fun Esp y presionar OK.
Operación del auricular Presionar las teclas: Paging Presionar el botón Page Registration en la parte inferior de la estación-base rápidamente. Todos los auriculares tocan al mismo tiempo (Paging). Para cancelar el paging Presionar el botón Page Registration nuevamente. o Presionar la tecla Talk en un auricular. Reset de un auricular para el ajuste estándar Usted puede desear un reset del auricular para las configuraciones estándar.
Ajustes del auricular Presionar las teclas: Ajustes del auricular Usted puede ajustar su auricular de acuerdo con sus parámetros para diferenciarlo de los ajustes estándares y para maximizar su comodidad. Alteración del idioma del display de un auricular MENU Abrir el Menú. NNNNNNNNNNNN 6M o Mo M Presionar la tecla 9 y la tecla 2 seguidas por: inglés (estándar), francés, español.
Ajustes del auricular Presionar las teclas: Melodía del timbre Usted puede escoger de entre diez melodías de timbre (1–10). MENU Abrir el Menú. NNNNNNNNNNNN AUDIO NNNNNNN NNNNNNNNNNNNNNNNNNNNNNNNNNNNNNNN NNNNNNN Desplazarse hasta AUDIO y presionar OK. MELODIA NNNNNNNNNNNNNNNNNNNNNNNNNNNNNNNN NNNNNNN NNNNNNN Desplazarse hasta MELODIA y presionar OK. NNNNNNN NNNNNNN Usted oirá la melodía actual y se exhibirá su número. Desplazarse hasta la melodía deseada y presionar OK.
Ajustes de la estación-base Presionar las teclas: F Ajustes de la estación-base ¡Todos los ajustes de la estación-base se hacen convenientemente a través del auricular! Cambiar el volumen y la melodía Puede variar el volumen del altavoz integrado en cinco niveles (1–5) (ver página 44). Volumen del altavoz MENU Abrir el menú. NNNNNNNNNNNN CONF BASE NNNNNNN NNNNNNNNNNNNNNNNNNNNNNNNNNNNNNNN NNNNNNN Desplazarse hasta CONF BASE y presionar OK.
Ajustes de la estación-base Presionar las teclas: Melodía del timbre Puede elegir entre diez melodías de timbre de llamada (1 – 10). MENU Abrir el menú. NNNNNNNNNNNN CONF BASE NNNNNNN NNNNNNNNNNNNNNNNNNNNNNNNNNNNNNNN NNNNNNN Desplazarse hasta CONF BASE y presionar OK. AUDIO NNNNNNNNNNNNNNNNNNNNNNNNNNNNNNNN NNNNNNN Desplazarse hasta AUDIO y presionar OK. MELODIA NNNNNNN NNNNNNNNNNNNNNNNNNNNNNNNNNNNNNNN NNNNNNN Desplazarse hasta MELODIA y presionar OK.
Ajustes de la estación-base Presionar las teclas: F Restablecimiento (reset) de la estación-base para la configuración estándar El restablecimiento (reset) de la estación-base no afecta el PIN del sistema o el registro del auricular. MENU Abrir el Menú. NNNNNNNNNNNN CONF BASE NNNNNNN NNNNNNNNNNNNNNNNNNNNNNNNNNNNNNNN NNNNNNN Desplazarse hasta CONF BASE y presionar OK. REST BASE NNNNNNNNNNNNNNNNNNNNNNNNNNNNNNNN NNNNNNN NNNNNNN Desplazarse hasta REST BASE y presionar OK.
Conexión de la estación-base a un PBX Presionar las teclas: Conexión de la estación-base a un PBX El Gigaset es capaz de operar con un PBX. Alteración del modo de marcación Es necesario alterar el modo de marcación solamente si su PBX no es capaz de operar con la marcación por tonos preajustada (DTMF – tonos multifrecuenciales). Por favor ver las instrucciones de operación de su PBX. Opciones: • Marcación por tonos (DTMF), • Marcación por pulsos (DP). Abrir el Menú.
Conexión de la estación-base a un PBX Presionar las teclas: Conmutación temporal a marcaciones por tonos Si su PBX todavía opera con marcación por pulsos (DP), no necesita marcación por tonos (DTMF) (por ejemplo, para verificar la caja de correo), usted deberá conmutar a marcación por tonos (DTMF) durante la llamada. Requisito previo: Usted está efectuando una llamada. MENU Abrir el Menú. NNNNNNNNNNNN MARC TONOS NNNNNNNNNNNNNNNNNNNNNNNNNNNNNNNN NNNNNNN NNNNNNN Desplazarse hasta Marc.
Anexo Anexo Mapa de caracteres 1x / 0 1 2 3 6 L 5 4 2x 3x 4x 5x ! 1 A B C 2 D E F 3 G H I 4 J K L 5 M N O 6 P Q R S T U V 8 W X Y Z 9 + 0 – | ? * / ( ) , 6x 7 _ Presionar la tecla relevante repetidamente o mantenerla presionada. Control del cursor con . Borrado de un carácter con racteres siempre se insertan a la izquierda del cursor. . Los ca- Las entradas se clasifican de la siguiente manera: 1. 2. 3. 4.
Eliminación de fallas Mantenimiento Limpe la estación-base y el auricular solamente con un paño húmedo o con un paño antiestático.¡Nunca utilice un paño seco ya que este podría causar una descarga electrostática! Eliminación de fallas Si su teléfono no funciona de la forma que usted desea, primero intente solucionar el problema a través de la siguiente lista. Problema Sin display.
Garantía de atención al cliente Problema Causa posible Los mensajes del conte- Fecha/hora no ajustados stador automático no tienen indicación horaria Solución Ajustar fecha y hora (v. pág. 9) Garantía de atención al cliente Sólo para productos inalámbricos de Siemens Para obtener la garantía de atención al cliente para los productos inalámbricos de Siemens, llame al teléfono gratuito indicado más abajo.
Garantía de atención al cliente LA DURACIÓN DE CUALQUIER OTRA GARANTÍA IMPLÍCITA QUE PUEDA SER REQUERIDA POR LEY (INCLUYENDO AQUELLAS SOBRE LA COMERCIABILIDAD O IDONEIDAD DEL PRODUCTO) SE LIMITA AL PLAZO DE LA PRESENTE GARANTÍA. EN NINGÚN CASO EL SAC SERÁ RESPONSABLE POR LOS DAÑOS ESPECIALES, INCIDENTALES O INDIRECTOS QUE PUDIEREN SURGIR DE LA PROPIEDAD O EL USO DEL PRODUCTO, O POR CUALQUIER RETRASO EN EL CUMPLIMIENTO DE SUS OBLIGACIONES DEBIDO A CAUSAS AJENAS A SU CONTROL.
Garantía de atención al cliente Sin embargo, no hay garantía de que no se producirán interferencias en alguna instalación en particular. Si este sistema telefónico causa interferencias nocivas en la recepción de radio o televisión cuando se encuentra en uso, el usuario debe eliminar la interferencia intentando una o más de las siguientes medidas: 1. Aumente la distancia entre la base del sistema y el receptor afectado. 2.
Garantía de atención al cliente instrucciones de operación, ya que el ajuste inadecuado de otros puede causar desperfectos que sólo podrán ser reparados por un técnico cualificado. e.) Si el producto se ha caído al suelo o tiene daños en su superficie. f.) Si el producto sufre una disminución significativa en su funcionamiento. 13. Evite usar un teléfono (que no sea inalámbrico) durante una tormenta eléctrica. Existe un posible riesgo de choque eléctrico por un rayo. 14.
Garantía de atención al cliente Esta garantía quedará sin efecto si el producto ha sido dañado como resultado de abuso, mal uso, negligencia, accidente, destrucción o alteración del número de serie, voltajes incorrectos reparaciones, modificaciones o mantenimiento realizados por personas distintas a nuestro centro de servicio o en violación de las instrucciones suministradas por nosotros.
Gigaset 4015 Classic, USA, A31008-G4015-B101-1- menu.fm 27.08.01 Menú Menú Es más rápido seleccionar una función del menú al presionar MENU antes que seleccionar las combinaciones de dígitos a través del desplazamiento de, p.ej. 0 - - = 5-2-2 para ajustar el horario.
menu.fm Gigaset 4015 Classic, USA, A31008-G4015-B101-1- 27.08.01 Menú 6 BUZON DE RED 6-1 MARC RAPIDA 6-1-1 BUZON RED 6-1-2 CONTESTADOR 6-2 CONTESTADOR on/off on/off 6-3 ALTAVOZ 6-5 ANUNCIO 6-5-1 GRAB MENSAJE 6-5-2 REPR MENSAJE 6-5-3 BORR MENSAJE 6-6 MENSAJES 6-6-1 DURAC MAX 6-6-2 CALIDAD 6-6-2-1 LARGA DURAC 6-6-2-2 ALTA CALID 6-7 ESCUCHAR 6-8 CONTESTAR 7 REGIS TEL Agenda/lista de acceso a la red Presionar / para abrir la lista correspondiente.
Gigaset 4015 Classic, USA, A31008-G4015-B101-1-6019 4015 BookSIX.fm 27.08.
Gigaset 4015 Classic, USA, A31008-G4015-B101-1- 4015 BookSIX.fm 27.08.
Gigaset 4015 Classic, USA, A31008-G4015-B101-1-6019 fernbedien.fm 27.08.01 Operación a distancia del contestador automático Las funciones de las teclas para la operación del contestador automático a distancia son las mismas para todos los teléfonos, auriculares y transmisores de tonos. Esta “tarjeta” muestra como hacer las operaciones a distancia en un teléfono externo (por ejemplo desde un teléfono público o un teléfono en un hotel ) y muestra los significados de las teclas.
Generalidades Referencia rápida Auricular Mantener presionada Activar/desactivar la proteción Mantener presionada del teclado 4 Activar/desactivar los tonos 5 Activar/desactivar el auricular Hacer una llamada externa Mantener presionada Volver a marcar un número RDL Si se aplica , seleccionar una entrada Copiar el número telefónico en la agenda MENU COP A LISTIN Marcar a partir de la agenda Marcar a partir del registro de llamadores LIS LL Ajustar el volumen del auricular O
Generalidades Diagrama del auricular LED enciende durante una llamada; titila en: - llamadas de entrada - nuevas llamadas - nuevos mensajes - llamada de alarma Estado de carga Enchufe para el auricular Tecla Talk - atender una llamada - marcar un número telefónico 5'/ Tecla de agenda Abrir la agenda -- ,17 & END TALK Tecla 1 (programable) Mantenerla presionada para seleccionar el contestador automático/caja de correo de la operadora 1 2ABC 3 DEF 4 GHI 5JKL 6 MNO 7 PQRS 8T
Generalidades Símbolos del display 5'/ -- ,17 & RDL INT MENU Ícono de caja de correo: Tecla Intercom: Existen mensajes/entradas Llama a otros teléAbre la lista con los en el contestador automáti- fonos registrados. cinco números tele- co/en el registro de llamadas/caja de correo de la opefónicos marcados radora. Existen nuevos por último. mensajes si el ícono está titilando.
1 2 –+ –+ 3 2ABC 9 WXYZ 6 MNO 3 DEF INT 1 5JKL © Siemens AG 2001 All rights reserved. Subject to availability. Right of modification reserved. Printed in Germany (06/2001). Siemens AG http://www.my-siemens.com Reference No.