
IP Phone User's Manual
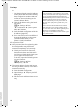
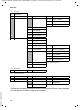


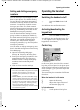
Table Of Contents
- The handset at a glance
- Base station at a glance
- Contents
- Safety precautions
- Gigaset C450 IP - more than just making calls
- VoIP - Making calls via the Internet
- First Steps
- Menu tree
- Making calls with VoIP and the fixed network
- Operating the handset
- VoIP telephony via the Gigaset.net
- Using the directory and lists
- SMS (text messages)
- Setting handset/base station
- Adjusting the loudspeaker volume
- Setting the ringer volume
- Activating/deactivating advisory tones
- Using the handset as an alarm clock
- Changing the base station system PIN
- Restoring the handset default settings
- Restoring the base station to factory settings
- Setting the default connection
- Assigning the phone a fixed IP address
- Web configurator
- Appendix

19
VoIP telephony via the Gigaset.net
Gigaset C450 IP / IM-Nord EN / A31008-M1713-R201-3-7643 / telephony.fm / 01.03.2007
Version 4, 16.09.2005
Calling up the Gigaset.net
directory
Your handset is in idle status.
¤ Open the directory with the s button.
¤ Select the <Gigaset.net> entry and press
the talk key c.
For information on how to find and call up
phone numbers in the Gigaset.net direc-
tory, please see the full user guide on the
Internet.
Entering your own name
You are connected to the Gigaset.net
directory:
¤ Select §Menu§ ¢ Own information and
press
§OK§.
Your Gigaset.net number and, where
applicable, your currently entered name
are displayed.
§Edit§ Press the display key.
~ Enter/edit the name and press
§OK§.
Please note:
– Calls to the Gigaset.net directory are always
free of charge.
–If the <Gigaset.net> entry has been acciden-
tally deleted from your handset directory,
dial 1188#9 (the Gigaset.net directory
phone number) and press the talk key
c.
Or create a new directory entry with this
number.