Congratulations By purchasing a Gigaset, you have chosen a brand that is fully committed to sustainability. This product’s packaging is eco-friendly! To learn more, visit www.gigaset.com. VoIPon www.voipon.co.uk sales@voipon.co.
VoIPon www.voipon.co.uk sales@voipon.co.
Contents Contents Overview of handset . . . . . . . . . . . . . . . . . . . . . . . . . . . . . . . . . . . . . . . . . . . . . . . . . . . . . . 3 Display icons . . . . . . . . . . . . . . . . . . . . . . . . . . . . . . . . . . . . . . . . . . . . . . . . . . . . . . . . . . . . . . 4 Safety precautions . . . . . . . . . . . . . . . . . . . . . . . . . . . . . . . . . . . . . . . . . . . . . . . . . . . . . . . . 6 First steps . . . . . . . . . . . . . . . . . . . . . . . . . . . . . . . . . . . . . . .
Contents ECO DECT: reducing energy consumption and radiation . . . . . . . . . . . . . . . . . . . 27 Using a handset as a room monitor . . . . . . . . . . . . . . . . . . . . . . . . . . . . . . . . . . . . . . . 28 Setting an appointment (calendar) . . . . . . . . . . . . . . . . . . . . . . . . . . . . . . . . . . . . . . . 29 Displaying missed appointments, anniversaries . . . . . . . . . . . . . . . . . . . . . . . . . . . . . . . . . . . . . . . . . 29 Setting a reminder call . . . . . . . . . . . .
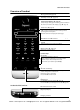
Overview of handset Overview of handset ¢ page 22) Proximity sensor (¢ page 17) Message LED ( ¢ page 11) Touchscreen/display ( Sample display: "dial page" for entering phone numbers in idle mode (one of three idle display pages; page 11). ¢ Status bar ( ó ¼ 06:00 V Ð INT 1 < > ÅÄÄ ¢ page 12) The internal handset name (e.g., INT 1) and icons ( page 4) that display the current settings and the operating status of the phone Touch the status bar to display the status page.
Display icons Display icons Icons in the status bar The following icons are displayed in the status bar depending on the settings and the operating status of your telephone: Icon Meaning Icon Signal strength (Eco Mode+ off ) } Meaning Battery charge status: { White: charged over 66% { White: charged between 34% and 66% y White: charged between 11% and 33% y Red: charged below 11% y Flashing red: battery almost empty (less than 10 minutes talktime) Ð 76%–100% i 51%–75% Ñ 26%–50% Ò 1%–
Display icons Option slider icons The functions on the option slider change depending on the operating situation.
Safety precautions Safety precautions Warning Read the safety precautions and the user manual before use. Explain their content and the potential hazards associated with using the telephone to your children. u Use only the power adapter supplied. page 41) as this could otherwise result in significant u Use only the supplied, original batteries ( health risks and personal injury. Replacement batteries can be obtained via the Gigaset Service Hotline.
First steps First steps Checking the package contents One Gigaset SL910H handset, one battery cover (rear cover of the handset), one battery, one charger, one power adapter for the charger and one user guide. Setting up the charger The charger is designed for use in dry rooms in a temperature range of +5°C to +45°C. The phone's feet do not usually leave any marks on surfaces.
First steps Inserting the battery and closing the battery cover Warning Use only rechargeable batteries ( page 41) recommended by Gigaset Communications GmbH, as doing otherwise could result in significant health risks and personal injury. For example, the outer casing of the battery could be destroyed or the battery could explode. The phone could also malfunction or be damaged as a result of using batteries that are not of the recommended type.
First steps Charging the battery The battery is supplied with a partial charge. Please charge it completely before use. Charge the handset in the charger for 5 hours. ¤ Please note The handset must only be placed in the designated charger. 5h ¤ Place your handset back in the charger after every call. Please note u The battery is also charged if the handset is connected via a USB connection to a PC with a power supply of 500 mA. u The battery may heat up during charging. This is not dangerous.
First steps If the system PIN 0000 (default setting) is set on the base, the message "‰ Handset registered" appears. Skip the following step. If the base system PIN is not 0000: L Registration ¤ Using the keypad displayed, enter the system PIN System PIN ¤ ç 1 2 3 4 5 6 7 8 9 ‰ for the base. You can correct incorrect entries using $. Touch è after entering the PIN to complete the entry. After successful registration, the message "‰ Handset registered" appears.
Operating the handset Operating the handset Activating/deactivating the handset ¤ Press and hold the end call key a in idle status to deactivate the handset. You will hear a melody. ¤ Press and hold the end call key a again to reactivate the handset. Operating the touchscreen The Gigaset SL910H handset is primarily operated using the display and only to a small extent using the three buttons on the handset. Icons, list entries, buttons and sliders shown on the display are sensitive areas.
Operating the handset Navigation area, changing the page You have to scroll right or left to move from one page to the next. Each idle display page therefore has a navigation area (example): < > Ä Å Ä The page position marker Ä Å Ä shows which idle display page is currently being displayed. The example shows the middle page. To scroll to the right, touch the ë icon in the navigation area or place a finger on the display and drag it to the left.
Operating the handset Using the menus All the functions for the base and the handset are provided in a menu (main menu). Open the menu: Briefly press the middle key v when the handset is in idle status. The main menu is divided into two "pages" that are displayed separately. The Applications page (subsequently referred to as the Applications menu) comprises all the applications offered by your base or handset.
Operating the handset Opening the submenu Touch an icon on one of the main menu pages and it will be highlighted. The corresponding submenu or a new display page is opened up with settings options for the application. The submenus are displayed as lists. The lists contain the parameters that can be configured and the current setting, available options or buttons to activate/deactivate.
Operating the handset Options Many display pages (especially lists like directories, call lists) have an option slider in the lower section. This displays all the actions that you can apply in the current context. ¤ Touch an option to perform the corresponding action. < Example (moveable option slider): ˜ Calls  Contacts í å QuickDial Internal > If all of the options cannot be displayed at the same time in one row, a moveable option slider is generally used.
Operating the handset ¤ Touch §123§ if you want to enter a digit or a special character. Touch More... to view other special characters. Touch §abc§ to return to the normal keypad (lower case). ¤ You enter special characters (marked/diacritical characters, e.g., umlauts) by pressing and holding the corresponding initial letter and selecting the required character from the list displayed.
Making calls Activating/deactivating key and display lock The key and display lock prevents the phone being operated unintentionally. When the handset is in idle status: Press and hold the v menu key to activate or deactivate the lock. ¤ When you activate the key and display lock, the message Keys and display locked is displayed briefly. The display backlight switches itself off.
Making calls Making internal calls Internal calls to other handsets registered to the same base are free of charge. Open the dial page ( page 11). ¤ Touch [ ‡ Internal]. ¤ If necessary, select the handset from the list or touch All Handsets. After opening the list, press c to initiate a group call to all handsets. ¤ ¢ Accepting a call You have the following options: Press c. Take the handset out of the charger if Auto Answer is activated ( ¤ ¤ ¢ page 34).
Menu tree Menu tree ¤ Briefly press the v key when the handset is in idle status to open the main menu. The main menu consists of the Applications (¢ page 19) and Settings pages. ¤ Drag your finger horizontally across the display to switch between the pages. Menu Settings â Date + Time ì Audio Settings Ringtones Volume page 35 Crescendo Int. Calls Ext. Calls Time Ctrl (Ringer Off ) Anon. Call Silenc.
Menu tree Keypad with R/P Keypad w.
Using lists Using lists The options are: redial list, text messages inbox, call lists, list of missed appointments, answering machine list (dependent on base). Redial list The redial list contains the twenty numbers last dialled with the handset (max. 32 digits per number). To dial using the redial list, when the handset is in idle status: Press c briefly. ¤ Touch an entry in the list. ¤ Managing entries in the redial list ¤ Open redial list. ¤ Touch ’ next to an entry.
Using lists Deleting lists You can delete the entire contents of the individual lists: In the Settings menu ( page 13), touch [ Ê System]. ¤ (If necessary, scroll). ¤ Touch ’ next to Clean-up List. ¤ Touch the symbol next to the list to be emptied. ¤ Press Yes to confirm. ¤ ¢ Configuring the display of new messages Specify whether receipt of new messages should be displayed on the handset. In the Settings menu ( page 13), [ g Display and Keypad] submenu touch [ g Display and Keypad].
Using Contacts Using Contacts You can create the Contacts list (with up to 500 entries) individually for your handset. You can also send lists/entries to other handsets ( page 24). ¢ Please note To quickly access a number from Contacts, you can place the number on the configurable page in the idle display ( page 32). ¢ You can save up to eight numbers, together with the associated first name and surname, birthdays/ anniversaries with signalling, VIP ringtone and caller picture in each Contacts entry.
Using Contacts Selecting a Contacts entry, navigating in Contacts If your Contacts has too many entries to display all at once, an alphabetical index is shown on the right side. You have the following options: page 14). u Scroll vertically to the name you are searching for ( u Touch the first letter in the index. The display jumps to the first name that begins with this letter. If necessary, scroll on to the desired entry. While you are scrolling, the index is temporarily covered by a scroll bar.
Using Contacts Transferring individual entries page 24). ¤ Touch [ = Copy]. ¤ Answer the prompt with Open the detail view for the entry ( Internal Handset. Select the recipient handset. ¢ ¤ After a successful transfer: ¤ Touch Yes if another entry should be sent. Otherwise touch No. Transferring the entire Contacts list Open Contacts (page 23).¤ Touch [ : Copy List].¤Answer the following prompt with Internal Handset.¤Select the recipient handset.
Using Bluetooth devices Using Bluetooth devices You can register up to five data devices (PC, PDA, mobile phones) and one Bluetooth headset. You must activate Bluetooth on the handset, ensure the devices are visible if necessary and then register the handset. You can exchange Contacts entries using the data devices and load ringtones and pictures to the page 42). handset using the Gigaset QuickSync software ( ¢ Please note u A headset must have the headset or speaker profile.
ECO DECT: reducing energy consumption and radiation Ending the search Close the Bluetooth submenu (touch ‘) or deactivate Bluetooth. ¤ Editing the list of known (trusted) devices Opening the list In the Bluetooth submenu, touch ’ next to Known Devices. A ô next to the device name in the list indicates a headset and * indicates a data device. ¤ Viewing device information, deregistering a device Open the Known Devices list. ¤ Touch [ ü Delete]. Yes. ¤ ¤ Select device. ¤ Touch [ ü Delete].
Using a handset as a room monitor Using a handset as a room monitor If room monitor mode is activated, the saved destination number is called as soon as a defined noise level is exceeded in the vicinity of the handset. You can save an internal or external number in your handset as the destination number. The room monitor call to an external number is cancelled after approx. 90 seconds, even if the call is accepted. The room monitor call to an internal number is cancelled after approx.
Setting an appointment (calendar) Setting an appointment (calendar) You can remind yourself of up to 100 appointments. Birthdays in Contacts are transferred into the calendar. Saving an appointment Mo Prerequisite: the date and time have already been set. In the Applications menu, touch [ } Calendar]. The current day is highlighted in the calendar. Days with appointments are marked with a coloured bar. ¤ ¤ Touch ë / ê to set the month. ¤ Select the required day in the graphical calendar.
Setting the alarm Setting a reminder call ¤ In the Settings menu (¢ page 13), touch [ ì Audio Settings]. ¤ Touch the ’ next to Reminder Signal. ¤ Adjust the volume with Ô / Ó or activate the crescendo call with the button next to Crescendo. ¤ Touch the ’ next to Sound. ¤ Select the ringtone. ¤ Back with ‘. Setting the alarm Prerequisite: the date and time have already been set.
Using the handset on the base Using the handset on the base Registering a handset to another Gigaset SL910/SL910A base You can register your handset on up to four bases. You must initiate registration of the handset on the base (1) and on the handset (2). Once registration is complete, the handset returns to idle status. If multiple handsets are registered, the internal number of the handset is displayed in the display status bar, e.g., INT 1. If not, repeat the procedure.
Configuring the handset Configuring the handset Your handset comes with default settings, but you can change the settings to suit your individual requirements. Quick access to functions, QuickDial – customising your own idle display page ¢ On the configurable page of the idle display ( page 11, example applications, functions and phone numbers for quick access. ¢ page 10), you can customise Starting the configuration process ¤ While in idle status, open the configurable page (¢ page 13).
Configuring the handset Selectable applications and functions Icon March 2011 28 Description Display of the current date (if set). If the date has not yet been set, the icon flashes. Set the date: Touch the icon. ¤ Thursday Display of the current time (if set). If the time has not yet been set, the icon flashes. Set the time: Touch the icon. ¤ Ù Display of the alarm status and (if the alarm is activated) the wake-up time. Touching the icon opens up the alarm menu ( page 30).
Configuring the handset Please note u The QuickDial number changes if you change the corresponding number in Contacts. u If you delete the number assigned to the QuickDial shortcut from Contacts, the QuickDial icon is deleted from the configurable page without prompting. Changing the display language ¤ In the Settings menu (¢ page 13), touch [ ° Language and Location]. ¤ Touch ’ next to Display Language. ¤ Select language (Ø = selected). ¤ Confirm with è. ¤ Back with ‘.
Configuring the handset Changing the earpiece, speaker and headset volume The volume of the mode currently in use (speaker, earpiece, headset) is changed. During a call: Touch [ R Volume]. ¤ Adjust the volume with Ô / Ó. If a headset is connected: To adjust the Microphone Sensitivity, touch Ô / Ó in the second row several times if necessary. Touch À at the bottom of the display to save the settings. Automatic saving occurs after approx. 2 seconds.
Configuring the handset Please note During this period, you will continue to receive calls from numbers to which you have assigned a personalised ringtone in Contacts (VIP). Activating/deactivating the ringtone for anonymous calls The phone should not ring for calls from withheld phone numbers; instead, it should only show them on the display: You can activate/deactivate this function using the button to the right of Anon. Call Silenc. (if the function is activated, the ringtone is deactivated).
Service (Customer Care) Service (Customer Care) You have questions? As a Gigaset customer, you can take advantage of our comprehensive service offerings. You can find help quickly in this User Manual and in the service pages of our Gigaset online portal. Please register your phone right after purchase. This enables us to provide you with even better service regarding questions or a warranty claim. Your personal user account enables you to directly contact our customer service by email.
Service (Customer Care) Authorisation This device is intended for use within the European Economic Area and Switzerland. If used in other countries, it must first be approved nationally in the country in question. Country-specific requirements have been taken into consideration. We, Gigaset Communications GmbH, declare that this device meets the essential requirements and other relevant regulations laid down in Directive 1999/5/EC.
Service (Customer Care) Guarantee Certificate - Ireland Without prejudice to any claim the user (customer) may have in relation to the dealer or retailer, the customer shall be granted a manufacturer’s Guarantee under the conditions set out below: u In the case of new devices and their components exhibiting defects resulting from manufacturing and/or material faults within 24 months of purchase, Gigaset Communications shall, at its own option and free of charge, either replace the device with another devic
Environment Environment Our environmental mission statement We, Gigaset Communications GmbH, bear social responsibility and are actively committed to a better world. Our ideas, technologies and actions serve people, society and the environment. The aim of our global activity is to secure sustainable life resources for humanity. We are committed to a responsibility for our products that comprises their entire life cycle.
Appendix Appendix Care Wipe the base station, charging cradle and handset with a damp cloth (do not use solvent) or an antistatic cloth. Never use a dry cloth. This can cause static. Impairments in high-gloss finishes can be carefully removed using display polishes for mobile phones. Contact with liquid ! If the handset has come into contact with liquid: 1 Switch off the handset and remove the battery pack immediately. 2 Allow the liquid to drain from the handset.
Accessing additional functions via the PC interface Accessing additional functions via the PC interface To enable your handset to communicate with a PC, the "Gigaset QuickSync" program must be installed on your PC (free to download and more information at www.gigaset.com/gigasetSL910). A detailed description can be found in the Gigaset QuickSync help file. 42 VoIPon www.voipon.co.uk sales@voipon.co.
Index Index A Activating advisory tones . . . . . . . . . . . . . . . . . . . . . . 36 appointment . . . . . . . . . . . . . . . . . . . . . . . 29 auto answer . . . . . . . . . . . . . . . . . . . . . . . . 34 display lock . . . . . . . . . . . . . . . . . . . . . . . . . 17 key lock . . . . . . . . . . . . . . . . . . . . . . . . . . . . 17 Advisory tones . . . . . . . . . . . . . . . . . . . . . . . . 36 Alarm . . . . . . . . . . . . . . . . . . . . . . . . . . . . . . . . 30 Anniversary . . . . . . . .
Index D H Deactivating advisory tones . . . . . . . . . . . . . . . . . . . . . . 36 appointment . . . . . . . . . . . . . . . . . . . . . . . 29 auto answer . . . . . . . . . . . . . . . . . . . . . . . . 34 display lock . . . . . . . . . . . . . . . . . . . . . . . . . 17 key lock . . . . . . . . . . . . . . . . . . . . . . . . . . . . 17 room monitor . . . . . . . . . . . . . . . . . . . . . . 28 unknown call . . . . . . . . . . . . . . . . . . . . . . . 36 De-registering (handset) . . . . . . . . . .
Index K N Key lock . . . . . . . . . . . . . . . . . . . . . . . . . . . . . . 17 Key/display lock on/off . . . . . . . . . . . . . . . . . .3 Keypad . . . . . . . . . . . . . . . . . . . . . . . . . . . . . . . . .3 Keys end call/end key . . . . . . . . . . . . . . . . . . . . 17 handset . . . . . . . . . . . . . . . . . . . . . . . . . . . . . .3 menu key . . . . . . . . . . . . . . . . . . . . . . . . . . . .3 talk key. . . . . . . . . . . . . . . . . . . . . . . . . . . . . . .3 Navigation area . .
Index S U Screensaver. . . . . . . . . . . . . . . . . . . . . . . . . . . 34 Scrolling in lists . . . . . . . . . . . . . . . . . . . . . . . 14 Searching in Contacts . . . . . . . . . . . . . . . . . 24 Selecting a list entry . . . . . . . . . . . . . . . . . . . 11 Selecting an entry from Contacts . . . . . . . 24 Sending Contacts entry to handset . . . . . . . . . . . 24 Service . . . . . . . . . . . . . . . . . . . . . . . . . . . . . . . 37 Setting up base . . . . . . . . . . . . . . . . . . . . .
VoIPon www.voipon.co.uk sales@voipon.co.