>HQ@ ,QVWUXFWLRQ PDQXDO +% *% %XLOW LQ RYHQ
Ú Table of contents e[nuoIrs]ctimanul Important safety information.....................................................4 Causes of damage .............................................................................5 Your new oven ............................................................................6 Control panel .......................................................................................6 Buttons and display............................................................................
: Important safety information Read these instructions carefully. Only then will you be able to operate your appliance safely and correctly. Retain the instruction manual and installation instructions for future use or for subsequent owners. This appliance is only intended to be fully fitted in a kitchen. Observe the special installation instructions. Check the appliance for damage after unpacking it. Do not connect the appliance if it has been damaged in transport.
Risk of injury! Scratched glass in the appliance door may develop into a crack. Do not use a glass scraper, sharp or abrasive cleaning aids or detergents. Risk of electric shock! ■ Incorrect repairs are dangerous. Repairs may only be carried out by one of our trained after-sales engineers. If the appliance is faulty, unplug the mains plug or switch off the fuse in the fuse box. Contact the after-sales service. ■ The cable insulation on electrical appliances may melt when touching hot parts of the appliance.
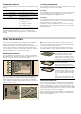
Your new oven Here you will learn about your new oven. The control panel and the individual operating controls are explained. You will find information on the cooking compartment and the accessories. Control panel Here, you will see an overview of the control panel. All of the symbols never appear in the display at the same time. Depending on the appliance model, individual details may differ. & %XWWRQV DQG GLVSOD\ )XQFWLRQ VHOHFWRU Control knobs The control knobs are retractable.
Temperature selector Cooking compartment The temperature selector is used to set the temperature or grill setting. The oven light is located in the cooking compartment. A cooling fan protects the oven from overheating. Setting Oven light Meaning Ú Off position The oven does not heat up. 50-270 Temperature range The temperature in the cooking compartment in °C. û, ûû, ûûû Grill settings The grill settings for the small * and large ( area grills.
Optional accessories HZ number Use Wire rack HZ334000 For ovenware, cake dishes, joints, grilled items and frozen meals. Enamel baking tray HZ331003 For cakes and biscuits. Push the baking tray into the oven with the sloping edge facing towards the oven door. universal pan HZ332003 For moist cakes, baked items, frozen meals and large joints. It can also be used to catch dripping fat when grilling directly on the wire rack.
Optional accessories HZ number Use Appliances with one oven light and a folding grill element HZ329020 You can retrofit the ceiling and side walls so that the cooking compartment automatically cleans itself during operation. Appliances with two oven lights and a folding grill element HZ329022 You can retrofit the ceiling and side walls so that the cooking compartment automatically cleans itself during operation.
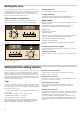
Setting the oven There are various ways in which you can set your oven. Here we will explain how you can select the desired type of heating and temperature or grill setting. You can select the oven cooking time and end time for your dish. Please refer to the section on Setting the time-setting options. Type of heating and temperature Switching off the oven Turn the function selector to the off position.
Cooking time End time The cooking time for your dish can be set on the oven. When the cooking time has elapsed, the oven switches itself off automatically. This means that you do not have to interrupt other work to switch off the oven. The cooking time cannot be accidentally exceeded. You can change the time at which you wish your dish to be ready. The oven starts automatically and finishes at the desired time.
Checking the time settings Changing the clock If several time-setting options are set, the relevant symbols are illuminated on the display. The time-setting options symbol is in the foreground and preceded by the N arrow. No other time-setting option should have been set. 1. Press the 0 button four times. To call up the V timer, x cooking time, y end time or 0 clock, press the 0 button repeatedly until the N arrow is next to the relevant symbol. The display shows the value for a few seconds.
Care and cleaning With good care and cleaning, your oven will remain clean and fully-functioning for a long time to come. Here we will explain how to maintain and clean your oven correctly. Notes ■ Slight differences in the colours on the front of the oven are caused by the use of different materials, such as glass, plastic and metal. ■ ■ Cleaning the self-cleaning surfaces in the cooking compartment The back wall in the cooking compartment is coated with a highly porous ceramic layer.
Refitting the rails : Risk of injury! 1. First insert the rail into the rear socket, press it to the back Whenever the hinges are not locked, they snap shut with great force. Ensure that the locking levers are always fully closed or, when detaching the oven door, fully open. slightly (figure A), 2. and then hook it into the front socket (figure B). $ % Detaching the door 1. Open the oven door fully. 2. Fold up the two locking levers on the left and right (figure A). 3.
Removing and installing the door panels : Risk of injury! To facilitate cleaning, you can remove the glass panels from the oven door. Scratched glass in the appliance door may develop into a crack. Do not use a glass scraper, sharp or abrasive cleaning aids or detergents. Removal 1. Detach the oven door and lay it on a cloth with the handle Installation 2. Pull off the cover at the top of the oven door.
Replacing the bulb in the oven ceiling light 3. Replace the bulb with one of the same type. If the bulb in the oven light fails, it must be replaced. Heatresistant, 40 watt spare bulbs can be obtained from our aftersales service or a specialist retailer. Only use these bulbs. 4. Screw the glass cover back in. 5. Remove the tea towel and switch on the circuit breaker. : Risk of electric shock! Glass cover Switch off the circuit breaker in the fuse box. 1.
Tested for you in our cooking studio Here you will find a selection of dishes and the ideal settings for them. We will show you which type of heating and which temperature are best suited for your dish. You can find information about suitable accessories and the height at which they should be inserted. There are also tips about cookware and preparation methods. Baking trays that are placed in the oven at the same time will not necessarily be ready at the same time.
Cakes on trays Accessories Level Type of heating Temperature in °C Cooking time in minutes Sponge with dry topping Baking tray 2 % 170-190 20-30 Universal pan + baking tray 3+1 : 150-170 35-45 Universal pan 2 % 180-200 25-35 Universal pan + baking tray 3+1 : 140-160 40-50 Baking tray 3 % 170-190 25-35 Universal pan + baking tray 3+1 : 150-170 35-45 Universal pan 3 % 160-180 40-50 Universal pan + baking tray 3+1 : 150-170 50-60 Shortcrust pastry with dry topping
Bread and rolls When baking bread, preheat the oven, unless instructions state otherwise. Never pour water into the hot oven. Bread and rolls Accessories Level Type of heating Temperature in °C Cooking time in minutes Yeast bread with 1.2 kg flour Universal pan 2 % 270 5 200 30-40 270 8 200 35-45 Sourdough bread with 1.
Roasting dishes made from stainless steel are not ideal. The meat cooks more slowly and browns less fully. Use a higher temperature and/or a longer cooking time. Grilling When grilling, preheat the oven for approx. 3 minutes, before placing the food into the cooking compartment. Always grill with the oven door closed. As far as possible, the pieces of food you are grilling should be of equal thickness. This will allow them to brown evenly and remain succulent and juicy.
Meat Weight Accessories and ovenware Level Type of heating Temperature Cooking time in °C, grill set- in minutes ting Saddle of venison on the bone 1.5 kg Uncovered 2 % 200-220 50 Boned leg of roe venison 1.5 kg Covered 2 % 210-230 100 Roast game 1.5 kg Covered 2 % 180-200 140 Joint of venison 1.5 kg Covered 2 % 180-200 130 Rabbit 2.
Tips for roasting and grilling The table does not contain information for the weight of the joint. Select the next lowest weight from the instructions and extend the time. How to tell when the roast is ready. Use a meat thermometer (available from specialist shops) or carry out a “spoon test”. Press down on the roast with a spoon. If it feels firm, it is ready. If the spoon can be pressed in, it needs to be cooked for a little longer. The roast is too dark and the crackling is partly burnt.
Dish Accessories Level Type of heating Temperature in °C Cooking time in minutes Universal pan 3 ;/6 190-210 20-30 Universal pan + baking tray 3+1 : 180-200 30-40 Potato products, frozen Chips Croquettes Universal pan 3 ;/6 190-210 20-25 Rösti, stuffed potato pockets Universal pan 3 ;/6 200-220 15-25 Bread rolls, baguette Universal pan 3 ;/6 180-200 10-20 Pretzels (dough) Universal pan 3 ;/6 200-220 10-20 Part-cooked rolls, part-cooked baguette Universal pan 3 % 1
Drying With : 3D hot air, you can dry foods brilliantly. Use unblemished fruit and vegetables only and wash them thoroughly. Drain off the excess water, then dry them. Line the universal pan and the wire rack with greaseproof or parchment paper. Turn very juicy fruit or vegetables several times. Remove fruit and vegetables from the paper as soon as they have dried.
Acrylamide in foodstuffs Acrylamide is mainly produced in grain and potato products prepared at high temperatures, such as potato crisps, chips, toast, bread rolls, bread or fine baked goods (biscuits, gingerbread, cookies). Tips for keeping acrylamide to a minimum when preparing food General Baking ■ Keep cooking times to a minimum. ■ Cook meals until they are golden brown, but not too dark. ■ Large, thick pieces of food contain less acrylamide. With top/bottom heating max. 200 °C.
Grilling If you are grilling food directly on the wire rack, the universal pan should also be inserted at level 1. The liquid is then collected, keeping the oven cleaner. Dish Accessories Level Type of heating Grill setting Cooking time in minutes Toast Preheat for 10 minutes Wire rack 5 ( 3 ½-2 Beefburgers, 12 pieces* do not preheat Wire rack + universal pan 4+1 ( 3 25-30 * turn over after Z of the cooking time.
Siemens-Electrogeräte GmbH Carl-Wery-Straße 34 81739 München Germany *9000760672* 9000760672 45 930830