Siemens Dual-Fuel Range with threeD Surround Convection® Installation Instructions Models: HD2525U, HD2528U Please read instructions before using. Important: Save these instructions. Cuisinières mixtes Siemens Instructions d’installation Modèle: HD2525U, HD2528U Merci de lire les instructions avant d'utiliser. Important : Conserver ces instructions. Estufas de doble combustible de Siemens Instrucciones de instalación Modelo: HD2525U, HD2528U Favor de leer las instrucciones antes de usar.
Table of Contents Important Safety Instructions ................................................................................................. 1 Preparation .......................................................................................................................... 4 Installation .......................................................................................................................... 6 Final Steps .............................................................................
Service Final Steps Installation Preparation Safety Instructions ! IMPORTANT SAFETY INSTRUCTIONS WARNING Before installing, turn power OFF at the service panel. Lock service panel to prevent power from being turned ON accidentally. • Installation must conform with local codes or, in the absence of local codes, with the National Fuel Gas Code, ANSI Z223.1.
IMPORTANT SAFETY INSTRUCTIONS Electrical Safety: Gas Safety If required by the National Electrical Code (or Canadian Electrical Code), this appliance must be installed on a separate branch circuit. For appliances equipped with a cord and plug, do not cut or remove the ground prong. It must be plugged into a matching grounding type receptacle to avoid electrical shock.
1. Install Ventilation Siemens strongly recommends the installation of a ventilation hood above this range. For most kitchens a certified hood rating of not less than 300 CFM is recommended. The range hood must be installed according to instructions furnished with the hood. 2. Prepare Cabinets This unit is designed for installation near adjacent walls and projecting surfaces constructed of combustible materials. 18” Min. 4” Min. 4” Min.
5. Prepare Electrical Connection Ranges are dual rated for use on either 120/240 VAC or 120/208 VAC. See chart below for power ratings and circuit breaker sizes based on the supply voltage for each model. MODEL HDS, HD VOLTS HZ RATING CIRCUIT A.C. KW BREAKER 120/240 60 6.5 30 AMPS 120/208 60 4.8 30 AMPS Install Strain Relief Place strain relief in knockout below terminal block (See Figure 4). Feed range cord through hole and strain relief up to terminal block.
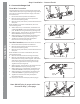
Safety Instructions Preparation Step 6: Installation - Connect Electric 6. Connect the Range Cord Three Wire Connection The Four Wire Connection is preferred, but where local codes and ordinances permit grounding through neutral, unit may be connected to the power supply via a three wire connection. 1. Disconnect electrical power at breaker box. 2. Remove the terminal block cover to expose the terminal block (See Figure 6). 3. Remove top nut, star washer, and round washer from each post.
Important note for LP users: The appliance is shipped from the factory for use with natural gas. It must be converted for use with propane. A qualified technician or installer must do the conversion. The gas connection is located below the back panel of the range (See Figure 4, Page 4). It is accessible through the warming drawer access panel or from the back of the range. To reach access panel, remove warming drawer.
Safety Instructions Preparation Installation Final Steps Service Step 8: Test the Installation 8A. Test Electric Ignition 8B. Test/Adjust Flame Turn on power at breaker. High Setting: The combustion quality of the flame for each burner must be visually inspected. For propane, the flame should be blue with yellow tips. For natural gas, it should be soft blue in color. The flame should carry over, or surround, the entire burner and should not lift or blow off the burner. To inspect, turn the burner on.
Preparation Safety Instructions Instructions Preparation Before Calling Service See Use and Care Manual for troubleshooting information. Refer to the Warranty in the Use and Care Manual. To reach a service representative, see the contact information at the front of the manual. Please be prepared with the information printed on your product data plate when calling. Product Data Plate The data plate shows the model and serial number. Refer to the data plate on the appliance when requesting service.
! Instructions de sécurité importantes LIRE ET CONSERVER CES INSTRUCTIONS AVANT D’UTILISER CET APPAREIL PIÈCES FOURNIES AVERTISSEMENT • Fixation antibascule PIÈCES NÉCESSAIRES : • • • • • • • • * Non requis pour installation au Canada ** Teflon est une marque de commerce de DuPont AVERTISSEMENT RISQUE DE BASCULE − • Ne pas ranger ni utiliser de matériaux combustibles, essence ou autres liquides ou vapeurs inflammables à proximité de cet appareil ou de tout autre appareil.
! AVERTISSEMENT Instructions de sécurité Installation Préparation Étapes finales Service INSTRUCTIONS DE SÉCURITÉ IMPORTANTES Avant d’installer, mettre l’alimentation hors circuit au panneau de service. Le verrouiller pour empêcher la mise en circuit accidentelle. • L’installation doit être conforme aux codes locaux ou en l’absence des codes, avec le code national pour combustibles, ANSI Z223.1.
! INSTRUCTIONS DE SÉCURITÉ IMPORTANTES Sécurité relative aux équipements à gaz: Si requis par le Code national d’électricité (ou Code d’électricité canadien), cet appareil doit être installé sur un circuit séparé. Installer une soupape d’arrêt de gaz à proximité de l’appareil ; elle doit être facilement accessible en cas d’urgence. Pour les appareils dotés d’un cordon d’alimentation, ne pas couper ni enlever la broche de mise à la terre.
Service 1. Installation de la ventilation Siemens recommande fortement l’installation d’une hotte au-dessus de la cuisinière. Pour la plupart des cuisines, une cote de hotte certifiée de pas moins de 300 CFM est recommandée. La hotte doit être installée selon les instructions fournies avec la hotte. 30 po minimum centré 30 po Min.m 2. Préparation des armoires Cet appareil est conçu pour une installation près de murs adjacents et surfaces de projection fabriqués de matériaux combustibles. 4 po min.
Étape 5 - Préparation de la connexion électrique Généralités Les cuisinières ont une cote jumelée pour utilisation avec 120/240 VAC ou 120/208 VAC. Voir le tableau à droite pour les cotes d’alimentation et les dimensions de coupecircuit en fonction de la tension d’alimentation pour chaque modèle. MODÈLE HDS, HD VOLTS HZ COTE COUPEA.C. KW CIRCUIT 120/240 60 6.5 30 AMPS 120/208 60 4.8 30 AMPS ATTENTION ATTENTION Le réducteur de tension fourni avec le cordon de la cuisinière doit être adéquatement installé.
Service Étapes finales Installation Préparation Instructions de sécurité Étape 6 : Installation - connexion électrique 6. Connexion du cordon de la cuisinière Connexion à 3 fils La connexion à 4 fils est préférée, mais là où les codes locaux et les lois permettent la mise à la terre par l’entremise du neutre et/ou la conversion à 4 fils n’est pas pratique, l’appareil peut être branché sur l’alimentation électrique via une connexion à 3 fils. 1. Débrancher l’alimentation électrique au disjoncteur. 2.
Étape 7 : Installation - connexion de l’alimentation en gaz Le test de fuite doit être fait par l’installateur conformé-ment aux instructions données dans cette section. Ouvrir le gaz. Appliquer un liquide de détection non corrosif pour fuites sur tous les joints et racords de connexion de gaz entre la soupape d’arrêt et la cuisinière. Comprend les raccords et joints de la cuisinière si les connexions ont été bougés pendant l’installation.
Service Étapes finales Installation Préparation Instructions de sécurité Étape 8 : Test de l’installation 8A. Test d’allumage électrique 8B. Test/réglage de la flamme Mise en circuit au coupe-circuit. Réglage élevé : La qualité de combustion de la flamme de chaque brûleur doit être vérifiée visuellement. Pour le propane, la flamme doit être bleue avec une pointe jaune. Pour le gaz naturel, elle doit être d’un bleu doux.
Avant d’effectuer un appel de service Instructions de sécurité Voir le guide de dépannage du guide d’utilisation et d’entretien. Consulter la garantie. Pour communiquer avec un représentant de service, voir l’information au début du guide. Avoir l’information imprimée sur la plaque signalétique sous la main avant de téléphoner. Plaque signalétique La plaque signalétique donne les numéros de modèle et de série. La consulter au moment de faire un appel de service.
Contenido Instrucciones Importantes de Seguridad ................................................................................. 1 Preparación ......................................................................................................................... 4 Instalación .......................................................................................................................... 6 Pasos Finales ............................................................................................
Seguridad ! INSTRUCCIONES IMPORTANTES DE SEGURIDAD ADVERTENCIA Antes de instalar, APAGUE la corriente en el panel de servicio. Bloquee el panel para evitar que se PRENDA la corriente accidentalmente. • La instalación debe cumplir con los códigos locales o, a falta de códigos locales, con el Código Nacional de Gas Combustible, ANSI Z223.1.
INSTRUCCIONES IMPORTANTES DE SEGURIDAD Nota para instalaciones en gran altitud: Esta estufa está certificada por CSA para una operación segura hasta una altitud de 10,000 pies (3,000 m) sin ninguna modificación. Excepción: para el uso con gas LP, se debe convertir la estufa primero usando las instrucciones de instalación LP que se incluyen en este juego de literatura.
1. Instalar la Ventilación Siemens recomienda fuertemente instalar una campana de ventilación arriba de esta estufa. Para la mayoría de cocinas se recomienda una campana con un régimen eléctrico nominal no menor de 300 CFM. La campana debe ser instalada de acuerdo a las instrucciones incluidas con ésta. 30” Mínimo Centrado Pasos Finales Instalación Preparación 2.
5. Preparar la Conexión Eléctrica CUIDADO: Asegúrese que la válvula de cierre de gas y todos los controles de quemadores estén APAGADOS antes de comenzar. CONSEJO Se puede quitar el panel botador de la estufa (abajo del bloque de terminales) para instalar el prensacable: Quite el panel de la estufa, instale el prensacable en el panel y vuelva a fijarlo. NO quite todo el panel trasero de la estufa.
Seguridad Preparación Instalación Pasos Finales Servicio Paso 6: Instalación - Conexión Eléctrica 6. Conectar el cable de la estufa Conexión con Tres Hilos La Conexión de Cuatro Hilos es el método preferido, pero donde los códigos locales permiten el aterrizaje a través del neutral se puede conectar la unidad a la fuente de alimentación vía una conexión de tres hilos. 1. Desconecte la corriente eléctrica en el cortacircuito. 2.
Aviso importante para usuarios de gas LP: La estufa viene de fábrica para el uso con gas natural. Para usar gas propano (LP), ud. debe convertir primero su estufa usando el kit de conversión a gas LP. CUIDADO Antes de enchufar un cable eléctrico, asegúrese que todos los controles están APAGADOS.
Seguridad Preparación Instalación Paso 8: Probar la Instalación 8A. Probar el Encendido Eléctrico 8B. Probar/Ajustar la Llama Prenda el interruptor de corriente. Alto Calor: Se debe inspeccionar visualmente la calidad de combustión de la llama para cada quemador. Para gas propano, la llama debe ser azul con puntas amarillas. Para gas natural, debe ser de un color azul suave. La llama debe envolver todo el quemador y no debe elevarse o apagar el quemador. Para inspeccionarlo, prenda el quemador.
Seguridad Antes de llamar al servicio Vea el manual de uso y cuidado para información sobre cómo resolver proble-mas. Consulte la garantía en el manual de uso y cuidado. Preparación Para hablar con un representante de servicio, vea la información de contacto al principio del manual. Por favor, tenga a la mano la información impresa en la placa de información de su producto cuando llame. Placa con datos del pro-ducto La placa con información indica el número de modelo y de serie.
BSH reserves the right to change specifications or design without notice. Some models are certified for use in Canada. BSH is not responsible for products which are transported from the United States for use in Canada. Check with your local Canadian distributor or dealer. BSH Home Appliances Corporation, 5551 McFadden Avenue, Huntington Beach, CA 92649. For the most up to date critical installation dimensions by fax, use your fax handset and call 702/833-3600. Use code #8030.