Documentation OpenScape Office, myPortal for HiPath OpenOffice ME and HiPath 3000 V8 and higher User Guide A31003-P1000-U102-7-7619 Communication for the open minded Siemens Enterprise Communications www.siemens.
Copyright © Siemens Enterprise Communications GmbH & Co. KG 2009 Hofmannstr. 51, D-80200 München Siemens Enterprise Communications GmbH & Co. KG is a Trademark Licensee of Siemens AG Reference No.: A31003-P1000-U102-7-7619 Communication for the open minded Siemens Enterprise Communications www.siemens.
Contents 0 1 Introduction . . . . . . . . . . . . . . . . . . . . . . . . . . . . . . . . . . . . . . . . . . . . . . . . . . . . . . . . . . . . . . . . . . . . . . . . . . . 1.1 myPortal . . . . . . . . . . . . . . . . . . . . . . . . . . . . . . . . . . . . . . . . . . . . . . . . . . . . . . . . . . . . . . . . . . . . . . . . . . . . . 1.2 Types of Topics . . . . . . . . . . . . . . . . . . . . . . . . . . . . . . . . . . . . . . . . . . . . . . . . . . . . . . . . . . . . . . . . . . . . . . . 1.
Contents 4.5.2 How to Sort the Journal . . . . . . . . . . . . . . . . . . . . . . . . . . . . . . . . . . . . . . . . . . . . . . . . . . . . . . . . . . . . . 34 5 Screen Pops . . . . . . . . . . . . . . . . . . . . . . . . . . . . . . . . . . . . . . . . . . . . . . . . . . . . . . . . . . . . . . . . . . . . . . . . . . 35 5.1 How to Enable or Disable Screen Pops on Inbound Calls . . . . . . . . . . . . . . . . . . . . . . . . . . . . . . . . . . . . . . 36 5.
Contents 8.2.3 How to Determine the Dial-in Number for a Scheduled or Permanent Conference . . . . . . . . . . . . . . . 8.2.4 How To Determine the PIN for a Scheduled or Permanent Conference . . . . . . . . . . . . . . . . . . . . . . . 8.2.5 How to Change the Password for a Scheduled or Permanent Conference . . . . . . . . . . . . . . . . . . . . . 8.2.6 How To Display a Scheduled or Permanent Conference as the Conference Controller . . . . . . . . . . . 8.2.7 How to Extend a Scheduled Conference . . . .
Contents 11 Configuration . . . . . . . . . . . . . . . . . . . . . . . . . . . . . . . . . . . . . . . . . . . . . . . . . . . . . . . . . . . . . . . . . . . . . . . 103 11.1 How to Edit your own Name . . . . . . . . . . . . . . . . . . . . . . . . . . . . . . . . . . . . . . . . . . . . . . . . . . . . . . . . . . . 104 11.2 How to Specify an E-Mail Address . . . . . . . . . . . . . . . . . . . . . . . . . . . . . . . . . . . . . . . . . . . . . . . . . . . . . . 104 11.
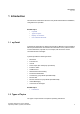
Introduction myPortal 1 Introduction This document is intended for the users of myPortal and describes its installation, configuration and operation. Related Topics • • • • myPortal Types of Topics Display Conventions User Interface Elements 1.1 myPortal myPortal is an application for unified communications.
Introduction Display Conventions Type of topic Contents Caption Concept Explains the "What". Usually without a verb, e.g.: Call Functions. Operating instructions Describe task-oriented application cases – i.e., the "How" – and assumes familiarity with the associated concepts. Starts with "How to" followed by a verb, for example: How to Dial a Call Number. Related Topics • • Introduction Display Conventions 1.
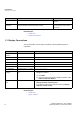
Introduction User Interface Elements 1.4 User Interface Elements The user interface of myPortal consists of the main window and various screen pops, depending on the situation. The Main Window consists of the following elements: 1 3 2 4 5 • Menu bar (1) with: – Drop-down list for call numbers with the Dial button (Answer during an incoming call or Hang Up during an ongoing call). The drop-down list contains already dialed numbers and is an input field for call numbers.
Introduction User Interface Elements • Workspace (4): The information and actions available in the workspace depend on the selected tab. • Status bar (5) with: – Status of myPortal, e.g., Connected – Date and Time – Version information on the communication system, myPortal and Java Context menus Context menus provide situation-based actions for selection. Context menus can be opened by clicking on the relevant object with the second (usually the right) mouse button.
Installing and Starting myPortal Prerequisites for myPortal 2 Installing and Starting myPortal The installation of myPortal is subject to specific hardware and software requirements. myPortal myPortal supports operation with multiple Windows user accounts on shared PCs. The individual settings of all users are retained. Related Topics • • • • Prerequisites for myPortal How to Install myPortal How to Start myPortal How to Uninstall myPortal 2.
Installing and Starting myPortal How to Install myPortal Conferencing is only available with HiPath OpenOffice ME and only with the Comfort Plus User license. The Fax functionality (incoming and outgoing) is likewise only available with HiPath OpenOffice ME and only with the Comfort Plus User license. Fax messages can only be displayed under Windows operating systems. Related Topics • • Installing and Starting myPortal How to Install myPortal 2.
Installing and Starting myPortal How to Uninstall myPortal 4. If you want to use myPortal with an automatic logon in the future, enable the check box Save Password. The Login window will then no longer be displayed. You can change this option at any time. NOTICE: Use the automatic login only if you are sure that no one else has access to your Windows user account.
First Steps 3 First Steps The First Steps describes the recommended actions to be taken right at the beginning. Change the password NOTICE: For security reasons, you should change your password after logging in for the first time. Otherwise, unauthorized users could, for example, potentially access your voicemails and fax messages or redirect your station number to external toll-based destinations by simply using the default password.
First Steps How to Change your Password Create your Favorites list Your Favorites list will provide you with a constant view of your most important contacts and enable you to call them with one click. Importing Outlook Contacts in myPortal You can have your Outlook contacts imported into the personal directory of myPortal automatically on starting myPortal. You can then call them conveniently by using myPortal, for example.
First Steps How to Select the Language of the User Interface 5. Enter your new password in the New and Confirm fields. The password must not consist of only digits. INFO: The password applies to myPortal, myPortal for Outlook and myPortal for Outlook as well as phone access to your voicemail. 6. Click on OK, followed by Save. Related Topics • First Steps 3.2 How to Select the Language of the User Interface Step by Step: 1. Click Setup. 2. Click on the Program Settings tab. 3.
First Steps How to Record your Personal Greeting Step by Step: 1. Click Setup. 2. Click on the Profiles tab. 3. Click Record. 4. Click on My VoiceMail Name in the list of announcements. 5. Click Record. The voicemail box will now call you on your phone. 6. Answer the call. 7. Speak out your name after the tone. 8. Click Stop. 9. If you want to listen to the announcement on the phone, click on Play. To exit the playback loop, click on Stop. 10. If you want to record the announcement again, click on Record.
First Steps How to Specify an E-Mail Address 9. If you want to listen to the announcement on the phone, click on Play. To exit the playback loop, click on Stop. 10. If you want to record the announcement again, click on Record. 11. Click on Close, followed by Save. Related Topics • • • First Steps Voicemail Phone Menu of the Voicemail Box 3.6 How to Specify an E-Mail Address Prerequisites: Step by Step: • Your administrator of the communication system has configured e-mail forwarding. 1. Click Setup.
First Steps How to Enable the Import of Outlook Contacts at Startup 3.8 How to Enable the Import of Outlook Contacts at Startup Step by Step: 1. Click Setup. 2. Click on the Program Settings tab. 3. Enable the Import Outlook Contacts on Startup check box. 4. Click Save.
Making Calls Call Number Formats 4 Making Calls You can use myPortal for simple call functions as well as all the convenient functions offered via the directories, the Favorites list and the Journal. Related Topics • • • • • Call Number Formats Call Functions Directories Favorites List Journal 4.1 Call Number Formats Call numbers can be specified in different formats.
Making Calls Call Functions 4.2 Call Functions You can control call functions with myPortal, e.g., answer calls or pick up calls for another subscriber. You can also dial phone numbers directly from the Journal, the Favorites list or a directory. The call functions can be controlled both in screen pops and in the menu bar.
Making Calls Call Functions 4.2.3 How to Dial a Number Step by Step: 1. Select one of the following options: • Enter the phone number in dialable format or in canonical format in the drop-down list for phone numbers in the menu bar and press the Enter key. • Select a phone number from the drop-down list for phone numbers in the menu bar and press the Enter key. Related Topics • • • Call Functions User Interface Elements Call Number Formats 4.2.
Making Calls Directories • Click in the context menu of the relevant subscriber on the desired station number. Related Topics • • • Call Functions Favorites List How to Specify a Default Number for a Favorite 4.2.6 How to Make a Call from the Journal Step by Step: 1. Click on the Journal tab. 2. Click on one of the folders: Open, All Calls, Missed, Answered, Internal, External, Inbound or Outbound. 3.
Making Calls Directories Symbol Directory Personal directory: Make Call Send Instant Message Add to Favorites Add to Conference x - x x x x x x x - x x x - x x You can use the personal directory to either add, edit and delete your personal contacts individually or to import your Outlook contacts on starting myPortal. If you import the Outlook contacts, you cannot edit them in myPortal.
Making Calls Directories Zooming in on an Entry You can zoom in on a specific entry one character at a time in the column by which the entries are sorted. For example, you could jump to the first Last Name starting with "Sen" one letter at a time. This method can also be used in the results of a search.
Making Calls Directories 6. To abort an ongoing search, click Stop. 7. To delete the list of search terms used, click Clear History. 8. To return from the hit list to the directory, click on the directory. Related Topics • • • Directories How to add a Contact to the Favorites List How to Add Conference Participants 4.3.2 How to Sort a Directory Step by Step: 1. Click on the Directories tab. 2. Click on the desired directory, e.g., Internal Directory. 3. Click on one of the column titles, e.g.
Making Calls Directories 4.3.4 How to Add a Personal Contact Prerequisites: Step by Step: • The importing or Outlook contacts at startup is disabled. 1. Click the Directories tab. 2. Click on Personal Directory. 3. Click Add. 4. Enter the contact data in the Personal Contact window. 5. Click Save. Related Topics • • • • Directories How to Edit a Personal Contact How to Delete a Personal Contact How to Enable or Disable the Import of Outlook Contacts at Startup 4.3.
Making Calls Favorites List • Click on the relevant personal contact. • Mark the relevant personal contacts. 4. Click on Remove, followed by Yes. Related Topics • • • • Directories How to Add a Personal Contact How to Edit a Personal Contact How to Enable or Disable the Import of Outlook Contacts at Startup 4.3.7 How to Enable or Disable the Import of Outlook Contacts at Startup Step by Step: 1. Click Setup. 2. Click on the Program Settings tab. 3.
Making Calls Favorites List When an internal subscriber is absent, you can determine the scheduled time of his or her return by positioning the mouse pointer over the entry for that subscriber, provided the subscriber has allowed his or her Presence status to be visible to you. For favorites with multiple phone numbers, you can specify a default number with which the contact is to be called.
Making Calls Favorites List 4.4.2 How to Rename a Group in the Favorites List Step by Step: 1. Click on Rename Group in the context menu for the relevant group name in the Favorites list. 2. Enter a Group Name. 3. Click OK. Related Topics • • • Favorites List How to Add a Group to the Favorites List How to Delete a Group from the Favorites List 4.4.3 How to Delete a Group from the Favorites List Step by Step: 1.
Making Calls Favorites List 3. Drag the desired contact to the group name in the Favorites list. Related Topics • • • • • • Favorites List Directories How to Search in Directories How to Specify a Default Number for a Favorite How to Add a Group to the Favorites List How to Delete a Contact from the Favorites List 4.4.5 How to Delete a Contact from the Favorites List Step by Step: 1. Click on Remove Favorite in the context menu for the relevant contact in the Favorites list.
Making Calls Journal 4.5 Journal The Journal is the list of all your inbound and outbound calls. You can use it to quickly and easily call back your contacts or call them again directly from within the Journal. Storage duration The communication system saves a record of the calls in the Journal for a limited period of time, which can be configured by the administrator. When this time period expires, the entries are automatically deleted by the communication system.
Making Calls Journal Grouping The calls in all folders are grouped by the same criterion, as selected by you: • Date (for example, Today, Yesterday, etc., Last Week, Two Weeks Ago, Three Weeks Ago, Last Month and Older) • Call number • Last Name, First Name • First Name, Last Name • Company The number of Journal entries contained in the group is displayed on the right of the group designation in parentheses.
Making Calls Journal 4. Double-click on the triangle on the left of the relevant group to expand the associated Journal entries. Related Topics • • Journal How to Sort the Journal 4.5.2 How to Sort the Journal Step by Step: 1. Click on the Journal tab. 2. Click on one of the groups: Open, All Calls, Missed, Answered, Internal, External, Inbound or Outbound. 3. If required, double-click on the triangle on the left of the relevant group to expand the associated Journal entries. 4.
Screen Pops 5 Screen Pops Screen Pops (also called pop-up windows) offer you convenient ways to respond to incoming calls or new voicemails with a single click, for example. A screen pop appears in the lower right corner of the screen. You can enable or disable screen pops by different methods. Some buttons in the screen pops change, depending on the situation. Screen Pops on Inbound Calls Screen pops show the caller's phone number and name (if the name details are available in a directory).
Screen Pops How to Enable or Disable Screen Pops on Inbound Calls Screen Pops for New Fax Messages Screen pops show the caller's phone number and name (if the name details are available in a directory) as well as the date and time the call was received. This can only be activated collectively for voicemails and fax messages. The View function is available.
Screen Pops How to Enable or Disable the Opening of Personal Contacts on Inbound Calls 5.2 How to Enable or Disable the Opening of Personal Contacts on Inbound Calls Step by Step: 1. Click Setup. 2. Click on the Program Settings tab. 3. Choose one the following options in the Notifications area: • If you want to enable the opening of personal contacts on inbound calls, select the check box Display screen pop on inbound calls.
Screen Pops How to Enable Screen Pops for New Voicemails and Fax Messages • If you want to enable screen pops for new voicemails and Fax messages, select the check box Display tray pop on new voice mail. • If you want to disable screen pops for new voicemails and Fax messages, clear the check box Display tray pop on new voice mail. 4. Click Save.
Functions During a Call How to Configure the Transfer Method 6 Functions During a Call Many control functions are available from the Desktop during a call. For example, you can record a call, place a call on hold and then resume (unhold) the call, transfer it to another subscriber or end the call. Control functions during a call are also available in screen pops and in the menu bar.
Functions During a Call How to Transfer a Call • If you want to use a blind (i.e., unscreened) transfer, select Blind Transfer. • If you want to use a consultation (i.e., screened) transfer, select Consultation Transfer. 4. Click Save. Related Topics • • Functions During a Call How to Transfer a Call 6.2 How to Transfer a Call Prerequisites: Step by Step: • Screen pops for inbound and outbound calls have been activated. 1. Click on Transfer in the Inbound Call and Outbound Call to … screen pops.
Functions During a Call How to End a Call Step by Step: 1. Click on Record in the Inbound Call and Outbound Call to … screen pops. 2. If you want to stop the recording before the call ends, click on Stop Rec.. Related Topics • • • • • Functions During a Call How to Enable or Disable Screen Pops on Inbound Calls How to Enable or Disable Screen Pops on Outbound Calls Ad-hoc conference Scheduled Conference 6.5 How to End a Call Step by Step: 1.
Controlling Availability How to Forward a Call to your Voicemail Box 7 Controlling Availability You can control your availability by using a number of powerful functions of the communication system. Forwarding a Call to the Voicemail Box If you do not want to accept a call, you can forward it to your voicemail box with one click.
Controlling Availability Presence status 7.2 Presence status The Presence status indicates the availability of internal subscribers in the Favorites list, the internal directory, the virtual conference room and via voicemail announcements. In addition, the Presence status controls the availability of internal subscribers with status-based call forwarding, rule-based call forwarding and the personal AutoAttendant.
Controlling Availability Presence status CallMe is shown in the Favorites list and in the internal directory as Office. The following additional symbols are available there: Symbol Presence or connection status Phone is ringing Subscriber is calling Subscriber is on the phone Presence status is not visible Phone is not connected INFO: For subscribers without system telephones (e.g.
Controlling Availability Presence status • Meeting • Sick • Pause • Out of the Office • Vacation • Lunch • Gone Home The keywords depend on the language set for the user interface. The keywords may be located anywhere in the Subject line. If the Subject line contains more than one such keyword, only the fist takes effect. When this function is enabled, your Presence status changes automatically at the start and end time of the relevant appointment. Your PC need not be operating at this time.
Controlling Availability Presence status Screen Pops on Changing the Presence Status You can have changes to your Presence status indicated by a screen pop. You can set this separately for the Office status.
Controlling Availability Presence status 3. Click OK. Related Topics • • • • Presence status How to Change the Presence Status to Office How to Enable or Disable Automatic Resetting of the Presence Status How to Enable the CallMe Service 7.2.2 How to Change the Presence Status to Office Step by Step: 1. Select Office in the drop-down list for the Presence status. 2. Click on Return to the office and then on OK.
Controlling Availability Presence status 3. Select one of the following options in the Presence Visibility area: • If you want to make your presence visible to a specific subscriber, enable the check box in the appropriate row. • If you want to make your presence invisible to a specific subscriber, clear the check box in the appropriate row. • If you want to make your presence visible to all subscribers, click Select All.
Controlling Availability Presence status 7.2.6 How to Enable or Disable the Automatic Creation of Outlook Appointments when Absent Step by Step: 1. Click Setup. 2. Click on the Program Settings tab. 3. Choose one the following options in the Outlook area: • If you want to enable the automatic creation of Outlook appointments when you are absent, select the check box Automatically generate calendar appointments from my presence changes..
Controlling Availability CallMe service 7.2.8 How to Enable or Disable Screen Pops on Changing the Presence Status to Office Step by Step: 1. Click Setup. 2. Click on the Program Settings tab. 3. Choose one the following options in the Notifications area: • If you want to enable screen pops on changing the Presence status to Office, select the check box Display tray pop for In Office presence.
Controlling Availability Status-based Call Forwarding Activation You can activate the CallMe service manually. In addition, the CallMe service also reactivated by an automatic reset of the Presence status following an absence, provided it was active earlier. Deactivation The CallMe service remains active until your Presence status changes. Related Topics • • • Controlling Availability How to Enable the CallMe Service Presence status 7.3.1 How to Enable the CallMe Service Step by Step: 1.
Controlling Availability Rule-Based Call Forwarding You can configure status-based call forwarding for every Presence status except Office, CallMe and Do Not Disturb. When you change your Presence status, the communication system activates call forwarding to the destination defined by you for this purpose. For example, if you are away from the office, to your mobile phone or if you are on vacation, to your representative.
Controlling Availability Rule-Based Call Forwarding When an inbound call is received, the communication system checks the applicability of the active rule in accordance with its sequential order in the Rules wizard. Only the first applicable rule is executed. In this case, your phone will ring once, and the communication system will then forward your call to the defined destination. You can define several types of conditions and exceptions (except when ...) in one rule.
Controlling Availability Rule-Based Call Forwarding • If you do not want the rule to take effect yet, clear the check box This rule is active. 6. Click Destination. 7. Enter the phone number in dialable format or in canonical format and click OK. 8. Click Next. 9. If you want to add a condition, enable the check box When ...
Controlling Availability Rule-Based Call Forwarding 5. If you want to change the phone number, click in the lower area on the underlined phone number and then enter the desired phone number in dialable format or in canonical format and click OK. 6. Click Next. 7. Select one of the following options: • If you want to add a condition, enable the check box When ...
Controlling Availability Rule-Based Call Forwarding 7.5.3 How to Copy a Call Forwarding Rule Step by Step: 1. Click Setup. 2. Click on the Forwarding Destinations tab. 3. Click on the relevant rule in the Rules Engine area and then on Copy. 4. Enter a name for the new rule (max. 15 characters) and click OK. 5. Click Save.
Controlling Availability Personal AutoAttendant 4. Click on Yes, followed by Save. Related Topics • • • • • • Rule-Based Call Forwarding How to Add a Call Forwarding Rule How to Edit a Call Forwarding Rule How to Copy a Call Forwarding Rule How to Rename a Call Forwarding Rule How to Change the Order of Call Forwarding Rules 7.5.6 How to Change the Order of Call Forwarding Rules Step by Step: 1. Click Setup. 2. Click on the Forwarding Destinations tab. 3.
Controlling Availability Personal AutoAttendant Announcements When this profile is activated, the voicemail box plays back the following announcements: • Name announcement: If you have enabled dynamic announcements, the name announcement you recorded is used for the greeting, unless your Presence status is Office, CallMe or Do Not Disturb.
Controlling Availability Personal AutoAttendant Example: dynamic announcements enabled Profile Name announcement Meeting "Natalie Dubois" Dynamic greetings Personal announcement for profile "is in a meeting until two thirty p.m. today". "To leave a message, press 1. To speak with my representative, press 2." Example: dynamic announcements disabled Profile Name announcement Out of the Office - Dynamic greetings - Personal announcement for profile "I am currently out of the office.
Controlling Availability Personal AutoAttendant 7.6.1 How to Edit a Profile for the AutoAttendant Prerequisites: Step by Step: • You have recorded an announcement for the relevant status. 1. Click Setup. 2. Click on the Profiles tab. 3. Select the profile for the relevant status in the Profiles drop-down list. 4.
Conferencing (only HiPath OpenOffice ME) 8 Conferencing (only HiPath OpenOffice ME) In a conference, multiple participants can communicate with one another at the same time. The Conference Management function of myPortal enables you to quickly and easily host different types of conferences and also to schedule them in advance. INFO: Only conferences initiated with myPortal can be used in myPortal. Conferences initiated by phone can only be used with a phone.
Conferencing (only HiPath OpenOffice ME) Symbol Meaning Communication system – Conference has started Communication system – Conference is being recorded Communication system – Conference is being stopped Scheduled conference participant (symbol in accordance with current Presence status) Called conference participant Dial-in conference participant Authenticating conference participant Connected conference participant Every arrow between the communication system and the conference controller or it
Conferencing (only HiPath OpenOffice ME) • Disconnect or reconnect conference participants: Disconnected participants remain in the virtual conference room. When connecting or disconnecting a conference participant, the other participants hear an alert tone. When the conference controller is connecting a conference participant, all other conference participants remain connected to one another. If there is only one participant connected, that participant will hear music on hold.
Conferencing (only HiPath OpenOffice ME) Ad-hoc conference 8.1 Ad-hoc conference An ad-hoc conference occurs spontaneously and is started manually by the conference controller. The conference controller can save ad-hoc conferences in order to set them up again at some later point in time. Starting the Conference The communication system opens the window with the virtual conference room automatically for all conference participants, provided the participants have started myPortal or myPortal for Outlook.
Conferencing (only HiPath OpenOffice ME) Ad-hoc conference 4. Click in the AdHoc Conference window on Conference Room > Start. The communication system now calls you and the conference participants. 5. If you want to repeat the ad-hoc conference with the same set of participants later, you can now save it. To do this: a) Click File > Save b) Click on the General Settings tab and enter a name for the conference in the input field. c) Click Save.
Conferencing (only HiPath OpenOffice ME) Ad-hoc conference • From a directory: Using the mouse, drag one of the participants from the Directories into the AdHoc Conference window. Select a station number from the Number To Contact drop-down list in the Select Participant Contact Number window and click OK. • From the results of a search: Search the directories (see How to Search in Directories for details) and then drag any of the participants from the listed results into the AdHoc Conference window.
Conferencing (only HiPath OpenOffice ME) Ad-hoc conference 8.1.5 How to Reconnect Conference Participants Prerequisites: Step by Step: • An active conference with you as the conference controller has been started in the virtual conference room. 1. Click in the context menu of the relevant conference participant on Reconnect Participant. Related Topics • • • Ad-hoc conference How to Disconnect a Conference Participant Scheduled Conference 8.1.
Conferencing (only HiPath OpenOffice ME) Ad-hoc conference 5. Click Save. Related Topics • • • Ad-hoc conference Scheduled Conference Permanent Conference 8.1.8 How to End an Ad-hoc or Scheduled Conference Prerequisites: • An active conference with you as the conference controller has been started in the virtual conference room. INFO: You can also end an ad-hoc conference by hanging up. Step by Step: 1. Click Conference Room > Stop. 2.
Conferencing (only HiPath OpenOffice ME) Scheduled Conference 8.2 Scheduled Conference A scheduled conference (Meet-Me conference) occurs at some point in the future with a defined duration and may be set up to recur repeatedly at the same time. A scheduled conference will run for the entire scheduled duration even if there are no active participants. The conference controller saves a scheduled conference under a specified name.
Conferencing (only HiPath OpenOffice ME) Scheduled Conference system announces every participant who joins the conference by name, as in: ".... has joined the conference", provided the initiator has recorded his or her name announcement. INFO: In order to enable the participants of a conference you have scheduled without authentication to hear the name announcement at the start of the conference, you will need to have first already initiated a conference with authentication on one occasion.
Conferencing (only HiPath OpenOffice ME) Scheduled Conference Ending the Conference The conference ends at the time scheduled for the end of the conference or if the conference controller terminates the conference in the virtual conference room.
Conferencing (only HiPath OpenOffice ME) Scheduled Conference 9. Select the desired Conference Language in which the announcements for the authentication of the conference participants is to occur. 10. Click on the Schedule tab and select the Start Date, Start Time and End Time. 11. If the conference is to occur recurrently, click on Recurring Conference. a) Select an End Date for the last recurrence.
Conferencing (only HiPath OpenOffice ME) Scheduled Conference 8.2.3 How to Determine the Dial-in Number for a Scheduled or Permanent Conference Prerequisites: • You are the conference controller. INFO: As the conference controller, you can obtain the dial-in number from the e-mail with the invitation to the conference. Step by Step: 1. Click Conference. 2. Click Manage my conferences. 3. Click on the My Conferences tab. 4. Click on a conference under Conference Name. 5. Click Edit. 6.
Conferencing (only HiPath OpenOffice ME) Scheduled Conference 9. Click Close. Related Topics • • Scheduled Conference Permanent Conference 8.2.5 How to Change the Password for a Scheduled or Permanent Conference Prerequisites: Step by Step: • You are the conference controller. 1. Click Conference. 2. Click Manage my conferences. 3. Click on the My Conferences tab. 4. Click on a conference under Conference Name. 5. Click Edit. 6. Click on the Participants tab. 7.
Conferencing (only HiPath OpenOffice ME) Permanent Conference 4. Click on a conference under Conference Name and then on View. Related Topics • • • • Scheduled Conference How to Display a Scheduled Conference as the Conference Controller Permanent Conference How to Display a Permanent Conference as the Conference Controller 8.2.7 How to Extend a Scheduled Conference Prerequisites: Step by Step: • An active conference with you as the conference controller has been started in the virtual conference room.
Conferencing (only HiPath OpenOffice ME) Permanent Conference The conference controller saves a scheduled conference under a specified name. The conference is retained until it is explicitly deleted. Options for Configuring a Scheduled Conference The initiator of the conference can specify: • whether the conference participants need to authenticate themselves by entering a PIN and password via the phone keypad when joining the conference.
Conferencing (only HiPath OpenOffice ME) Permanent Conference 8.3.1 How to Configure a Permanent Conference Prerequisites: Step by Step: • Your administrator has configured a dial-in number for conferences. 1. Click Conference. 2. Click Start new conference. The AdHoc Conference window opens with you set as the conference controller. 3. Add any conference participants as needed; see How to Add Conference Participants for details. 4. Click in the AdHoc Conference window on Conference Room > Properties.
Conferencing (only HiPath OpenOffice ME) Permanent Conference 6. If you want to display the general settings of the conference, click on Edit and then on the General Settings tab. Related Topics • • Permanent Conference How To Display a Scheduled or Permanent Conference as the Conference Controller 8.3.3 How to Delete a Permanent Conference Prerequisites: Step by Step: • You are the conference controller. 1. Click Conference. 2. Click Manage my conferences. 3. Click on the My Conferences tab. 4.
Instant Messaging How to Send an Instant Message 9 Instant Messaging Instant Messaging enables you to exchange instant messages (i.e., to chat) with other internal subscribers. Sent and received instant messages appear on your screen and on the screens of your communication partners as a dialog in a separate Instant Messaging window An instant message always has only one recipient.
Voice Messages and Fax Voicemail 10 Voice Messages and Fax The unified messaging services Voicemail and Fax offer you convenient user interfaces for receiving and managing messages. The Fax service is only available if your administrator of the communication system has configured it for you. Related Topics • • • • • • • Voicemail Managing Voicemail Fax Box Managing Fax Messages Sending Fax Messages Notification Service for Messages Phone Menu of the Voicemail Box 10.
Voice Messages and Fax Voicemail Announcements You can record or import the following types of announcements: • Name announcement: Your name announcement is used at the start of conferences for which you have invited others and to announce when you join a conference. In addition, the name announcement you have recorded is used as a greeting when you have enabled the announcement of your Presence status for the caller involved and your Presence status is not Office, CallMe or Do Not Disturb.
Voice Messages and Fax Voicemail Profile Meeting Sick Name announcement Announcement of your Presence status Personal greeting x (if you have enabled the x (if you have enabled the general announcement of your Presence announcement of your Presence status for the caller involved) status for the caller involved) Pause Out of the Office Vacation Lunch Gone Home Do Not Disturb - - general Example: Announcement of your Presence status is enabled for the caller Profile Meeting Name announcement "Nata
Voice Messages and Fax Voicemail Bypassing the Password Prompt If you call the voicemail box from one of your additional phone numbers, you can bypass the password prompt. This setting also applies to the phone notification service of the voicemail box. Language the Voicemail Box You can define in which language the voicemail box plays back the menu choices and the internal system announcements.
Voice Messages and Fax Voicemail 4. Click on Close, followed by OK. Related Topics • Voicemail 10.1.2 How to Select Recording or Announcement Mode Step by Step: 1. Click Setup. 2. Click on the Forwarding Destinations tab. 3. Select one of the following values for each Presence status in the Voicemail Recording area: • If you want callers to be able to leave messages in your voicemail box, select Active. • If you want callers to only hear the announcements of your voicemail box, select Inactive. 4.
Voice Messages and Fax Voicemail 11. Click on Close, followed by Save. Related Topics • • • Voicemail How to Edit a Profile for the AutoAttendant How to Import an Announcement 10.1.4 How to Import an Announcement Prerequisites: Step by Step: • The audio file is available as a PCM file with the following properties: 8 kHz, 16 bit, mono. 1. Click Setup. 2. Click on the Profiles tab. 3. Click Record. 4. Click Upload. 5. Click on OK in the Warning!!! window. 6. Click OK. 7.
Voice Messages and Fax Voicemail 4. Click Save. Related Topics • • • • • Voicemail Presence status How to Change the Visibility of your Presence Status for Others Personal AutoAttendant How to Enable or Disable the Announcement of your Presence Status for Specific Callers 10.1.
Voice Messages and Fax Voicemail 10.1.7 How to Grant or Deny the Attendant Permission to Retrieve Voicemail and Fax Messages Step by Step: 1. Click Setup. 2. Click on the Program Settings tab. 3. Select one of the following options in the Security and Access area: • If you want to allow your voicemail and fax messages to be retrieved by the Attendant, enable the check box Receptionists are able to listen to my voicemail.
Voice Messages and Fax Managing Voicemail 10.1.9 How to Select the Language of the Voicemail Box Step by Step: 1. Click Setup. 2. Click on the Program Settings tab. 3. Choose the language from the VoiceMail Language drop-down list in the Miscellaneous area. 4. Click Close. Related Topics • Voicemail 10.2 Managing Voicemail You can listen to and forward voicemails, for example, or move them to another folder, save them as WAV files or call the sender.
Voice Messages and Fax Managing Voicemail • Group, if available • Call number, if available • Last Name, if available For recorded conferences: conference name, if available; otherwise, Last Name of the second conference participant, if available • First Name, if available • Company, if available • Priority Color coding: urgent (rot), private (blue), normal (black). When listening to the voicemail Inbox, an announcement notifies you of the number of messages per priority.
Voice Messages and Fax Managing Voicemail You can save a voice messages as a WAV file in the file system of your PC to archive it permanently or send it to any recipient by e-mail.
Voice Messages and Fax Managing Voicemail 5. Click on the Play button in the screen pop. Related Topics • • Managing Voicemail How to Listen to a Voice Message on the Phone 10.2.3 How to Call the Sender of a Voice Message Step by Step: 1. Click on the VoiceMail tab. 2. Click on the desired folder, e.g., Played. 3. Click on the desired voicemail. 4. Click in the context menu on the item Dial ... with the appropriate phone number. Related Topics • Managing Voicemail 10.2.
Voice Messages and Fax Managing Voicemail 10.2.6 How to Save a Voice Message as a WAV File Step by Step: 1. Click on the VoiceMail tab. 2. Click on the desired folder, e.g., Played. 3. Click on the desired voicemail. 4. Click on Save as WAV in the context menu. 5. Select a folder in the Save window, enter a file name of your choice in the input field, and click Save. Related Topics • Managing Voicemail 10.2.7 How to Sort Voice Messages Step by Step: 1. Click on the VoiceMail tab. 2.
Voice Messages and Fax Fax Box a) Click on the Deleted folder. b) Select the desired voice message(s). c) Select Move Message to > Permanently Delete Message in the context menu. Related Topics • Managing Voicemail 10.3 Fax Box The Fax box saves Fax messages centrally. You can access these messages using myPortal. You can view or edit the following settings of your Fax box: Determining your own Fax Number You can determine under which Fax number you can be reached.
Voice Messages and Fax Managing Fax Messages 4. Click on Close, followed by OK. Related Topics • Fax Box 10.4 Managing Fax Messages You can display or forward Fax messages, for example, or move them to another folder, save them as TIFF files and even call the sender.
Voice Messages and Fax Managing Fax Messages Saving a Fax Message as a File You can save a Fax message as a TIFF file in the file system of your PC to archive it permanently or send it by e-mail to any recipient. Displaying Fax Messages When a new Fax message is viewed for the first time, the communication system moves it automatically from the Inbox folder to the Read folder.
Voice Messages and Fax Managing Fax Messages 4. Click in the context menu on the item Dial ... with the appropriate phone number. Related Topics • Managing Fax Messages 10.4.3 How to Forward a Fax Message Step by Step: 1. Click on the Fax Messages tab. 2. Click on the desired folder, e.g., Read. 3. Select Forward Message in the context menu of the appropriate Fax message. 4. Enable the check box for the desired recipient in the Forward Fax Message window and click OK.
Voice Messages and Fax Managing Fax Messages 5. Select a folder in the Save window, enter a file name of your choice in the input field, and click Save. Related Topics • Managing Fax Messages 10.4.6 How to Sort Fax Messages Step by Step: 1. Click on the Fax Messages tab. 2. Click on the desired folder, e.g., Read. 3. Click on one of the column titles: Date, Time, Phone Number, Last Name, First Name, Company, Fax Group or Pages to sort the Fax messages by this criterion in ascending alphanumeric order.
Voice Messages and Fax Sending Fax Messages 4. If you want to reverse the sort order, click again on column header. Related Topics • • Managing Fax Messages How to Display Fax Messages in the Send Queue 10.4.9 How to Delete a Fax Message Step by Step: 1. Click on the Fax Messages tab. 2. Click on one of the folders: Inbox, Read, Sent Items or Sending Items. 3. Select one of the following options: • Click on the desired Fax message. • Mark the desired Fax messages. 4.
Voice Messages and Fax Notification Service for Messages 10.6 Notification Service for Messages The communication system can optionally notify you about a new message by email, by phone or with an SMS. The Notification Service works as follows: Message Notification Action Voicemail, E-mail You receive an e-mail with the message as a WAV file, the date and time it was received, the duration of the message and, if available, the phone number and name of the sender.
Voice Messages and Fax Notification Service for Messages • If you want to activate the notification for a Presence status, enable the corresponding check box. • If you want to deactivate the notification for a Presence status, clear the corresponding check box. 4. Click Save. Related Topics • • Notification Service for Messages How to Specify an E-Mail Address 10.6.2 How to Enable or Disable the Notification by Phone Step by Step: 1. Click Setup. 2. Click on the Notifications tab. 3.
Voice Messages and Fax Phone Menu of the Voicemail Box 10.6.3 How to Enable or Disable SMS Notification Prerequisites: Step by Step: • Your administrator of the communication system has defined an appropriate SMS template for you. 1. Click Setup. 2. Click on the Notifications tab. 3.
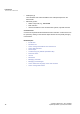
Voice Messages and Fax Phone Menu of the Voicemail Box OpenScape Office User Menu Structure Enter mailbox Enter PIN 1 2 Enter mailbox 3 Set status Inbox Played Saved Deleted 1 2 3 4 4 Record greetings 1 Name 2 Greeting 3 Profiles 1 Replay 1 Office 1 Office 2 Callback 2 Meeting 2 Meeting 3 Next 3 Sick 3 Sick 4 Save 4 Break 4 Break 5 Save as new 5 Gone Out 5 Gone Out 6 Delete 6 Vacation 6 Vacation 7 Copy 7 Lunch 7 Lunch 0 Date & Time 8 Home
Configuration 11 Configuration You can configure myPortal to suit your requirements by editing your personal data or the program settings, for example. INFO: When you make multiple changes under Setup on different tabs, it is sufficient to Save all the changes once at the end. Defining Additional Phone Numbers Additional phone numbers are typically used for: • Status-based call forwarding • CallMe service Your additional phone numbers are visible in the internal directory.
Configuration How to Edit your own Name 11.1 How to Edit your own Name Step by Step: 1. Click Setup. 2. Click on the Personal Details tab. 3. Enter your name in the My Personal Details area in the First Name and Last Name fields. 4. Click Save. Related Topics • Configuration 11.2 How to Specify an E-Mail Address Prerequisites: Step by Step: • Your administrator of the communication system has configured e-mail forwarding. 1. Click Setup. 2. Click on the Personal Details tab. 3.
Configuration How to Provide your own Picture 4. Click Save. Related Topics • • • • • • Configuration Call Number Formats How to Enable the CallMe Service Status-based Call Forwarding How to Configure Status-based Call Forwarding Voicemail 11.4 How to Provide your own Picture Prerequisites: Step by Step: • You have an image file with your picture in one of the following file formats: BMP, GIF, JPG. 1. Click Setup. 2. Click on the Personal Details tab. 3. Click in the My Picture area on Select. 4.
Configuration Programming the Function Keys of the Telephone This applies to both the predefined function keys and the other function keys, but not the local application keys (Local App.). INFO: In the case of phones with a display, you can also program some function keys directly at the phone. Programming Function Keys on Different Levels You can program the function keys on two levels: the first level can be assigned all the offered functions, and the second level can be assigned external phone numbers.
Configuration How to Change the Password 9. If you have programmed a function key as the Shift Key, select the check box 2. Level. Enter the external phone numbers as described under steps 6 to8. 10. If you want to program further function keys, repeat steps 4 to 9. 11. Close the Browser window for key programming. 12. Click in the myPortal Setup window on Save. Related Topics • • Programming the Function Keys of the Telephone Problem Resolution: Empty Browser Window for Key Programming 11.
Configuration How to Enable or Disable an Automatic Logon 11.8 How to Enable or Disable an Automatic Logon NOTICE: Use the automatic login only if you are sure that no one else has access to your Windows user account. Otherwise, unauthorized users could, for example, potentially access your voicemails and fax messages or redirect your station number to external toll-based destinations. Step by Step: 1. Click Setup. 2. Click on the Program Settings tab. 3.
Configuration How to Change the Server Address 4. Click Save. Next steps: Close myPortal and restart the application. Related Topics • • Configuration User Interface Elements 11.11 How to Change the Server Address INFO: Do not change the server address unless you are instructed to do so by your administrator. You cannot use myPortal with an invalid server address. Step by Step: 1. Click Setup. 2. Click on the Program Settings tab. 3.
Configuration Troubleshooting 11.12.1 How to Perform Automatic Updates Prerequisites: Step by Step: Next steps: • You have received a message such as: A new version of myPortal is available and will be downloaded shortly. myPortal will be automatically closed and restarted. 1. Click OK. myPortal is automatically closed and updated. You can then restart myPortal. Related Topics • • Automatic Updates Problem Resolution: No Automatic Update 11.
Configuration Troubleshooting 11.13.2 Problem Resolution: The Nokia Application Suite Starts Instead of myPortal If the Nokia Application Suite is installed on your PC, Java applications with the .jar extension such as myPortal, for example, are automatically associated with that application. Note that the Nokia Application Suite will automatically become the default application for .jar files when it is reinstalled.
Index A Absence 43 automatic creation of Outlook appointments 43 Ad-hoc Conference 61 Ad-hoc conference 64 alternative workplace 50 announcement 80 announcement mode 80 authentication conference participant 61 AutoAttendant central 80 personal 57, 80 automatic logon 103 automatic updates 103 availability 42 B Break 43 C call accept 21 exit 39 forward to voicemail box 42 hold 39 Journal, accepted 32 Journal, external 32 Journal, inbound 32 Journal, internal 32 Journal, missed 32 Journal, open 32 Journal, o
Index send 98 Fax number 93 First Steps 14 folder Fax messages 94 Journal 32 voicemail 88 function keys program 103 functions during a call 39 myPortal 7 G general personal greeting 80 group voicemail 88 name announcement 57, 80 Notification Fax message 99 voicemail 99 notification by phone 99 Notification service 99 O Office 43 OpenScape Office, hardware and software prerequisites 12 Operating instructions 8 Out of the Office 43 Outlook contact import 23 P make call 20 Meeting 43 myPortal functions 7
Index rule-based call forwarding 52 S Scheduled Conference 69 scheduled conference 61 screen pop, pop-up window 35 searching in a directory 23 sent Fax messages 94 server address 103 Setup 103 Sick 43 skin color 103 SMS notification 99 sorting directory 23 Fax messages 94 Journal 32 voicemail 88 starting myPortal 11 status-based call forwarding 52 voicemail box 57 Phone menu 101 W WAV file notification 99 voicemail 88 Z zoom function 23 T teleworking 50 TIFF file Fax message 94 notification 99 topics,