
User Manual
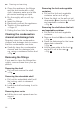
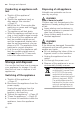

Table Of Contents
- Refrigerator
- de
- en
- Table of contents
- Safety
- Preventing material damage
- Environmental protection and saving energy
- Installation and connection
- Familiarising yourself with your appliance
- Features
- Basic operation
- Additional functions
- Alarm
- Refrigerator compartment
- Defrosting
- Cleaning and servicing
- Troubleshooting
- Storage and disposal
- Customer Service
- Technical data
- fr
- Table des matières
- Sécurité
- Prévenir les dégâts matériels
- Protection de l'environnement et économies d'énergie
- Installation et branchement
- Description de l'appareil
- Équipement
- Utilisation de base
- Fonctions additionnelles
- Alarme
- Compartiment réfrigération
- Dégivrage
- Nettoyage et entretien
- Dépannage
- Entreposage et élimination
- Service après-vente
- Caractéristiques techniques
- it
- Sommario
- Sicurezza
- Prevenzione di danni materiali
- Tutela dell'ambiente e risparmio
- Installazione e allacciamento
- Conoscere l'apparecchio
- Dotazione
- Comandi di base
- Funzioni supplementari
- Allarme
- Frigorifero
- Scongelamento
- Pulizia e cura
- Sistemazione guasti
- Stoccaggio e smaltimento
- Servizio di assistenza clienti
- Dati tecnici
- nl

en Cleaning and servicing
44
2. Clean the appliance, the fittings
and the door seals with a dish
cloth, lukewarm water and a little
pH-neutral washing-up liquid.
3. Dry thoroughly with a soft, dry
cloth.
4. Insert the fittings.
5. Electrically connect the appliance.
6. "Switch on the appliance."
→Page41
7. Putting the food into the appliance.
Cleaning the condensation
channel and drainage hole
Regularly clean the condensation
channel and drainage hole to ensure
that the condensation can drain.
▶
Carefully clean the condensation
channel and the drainage hole,
e.g. using a moistened cotton bud.
→Fig.
6
Removing the fittings
If you want to clean the fittings thor-
oughly, remove these from your ap-
pliance.
Removing the shelf
▶
Pull out and remove the shelf.
→Fig.
7
Removing the extendable shelf
1. Pull out the extendable shelf until
the locking catch is released.
→Fig.
8
2. Lower the shelf and swing it out to
the side.
Removing door racks
▶
Lift the door rack upwards and re-
move it.
→Fig.
9
Removing the fruit and vegetable
container
1. Pull out the fruit and vegetable
container as far as it will go.
2. Press the latch on the pull-out rail
downwards and remove the fruit
and vegetable container .
→Fig.
10
Removing the shelf above the fruit
and vegetable container
1. Pull out the fruit and vegetable
container.
2. Remove the shelf and rotate .
→Fig.
11
3. Press the fastenings for the lower
glass plate outwards.
→Fig.
12
4. Lift the glass plate at the front
and pull it out at the rear .
→Fig.
13