
Commissioning Instructions


Before You Begin
Fume Hood Specific Sash Setup and Calibration
6 | 9
Siemens Industry, Inc.
A6V10801613
Restricted
07.06.2016
6.
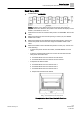
Measure the fixed area of the fume hood in square feet (square meters).
Any fume hood leakage must be accounted for in this measurement. Set
FIXED AREA to this value.
NOTE:The fixed area of the fume hood is an area that remains open
regardless of sash position or movement. For example, most fume hoods
have an intake gap under the lower airfoil and above the cabinet of the fume
hood (typically a 1 inch gap). Also include 1% of the maximum open face
area in this calculation for other open areas, such as the space between the
sash and the track, and leakage.
7.
If the fume hood has a fixed panel in the sash opening of Segment A, locate
the position of the panel by measuring from the bottom of the sash opening
to the bottom of the fixed panel and enter the value into FPANEL POS A.
Measure the height of the fixed panel and enter the value into FPANEL HGT
A. Repeat step 7 for Segment B.
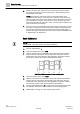
Sash Calibration
NOTE:
The full travel of the sash must be used during calibration.
1.
Set CAL SASH NUM to 1.
2.
Verify CAL SASH LOC is set to MIN..
3.
Slide the sash panel to be calibrated to the far left. Measure the distance
from the left end of the track to the left edge of the sash panel. Set CAL
SASH POS to this value. When the sash aggregator accepts the reading,
the minimum position value will be entered into POS SASH 1.
Sash Panel Measurement (15-inch sash panels).
4.
Verify CAL SASH LOC is set to MAX..
5.
Slide the sash panel to be calibrated to the far right. Measure the distance
from the left end of the track to the left edge of the sash panel. Set CAL
SASH POS to this value. When the sash aggregator accepts the reading,
the maximum position value will be entered into POS SASH 1.
6.
Set CAL SASH NUM back to 0 or to the number of horizontal sash panel to
be calibrated. This locks to sash calibration into the sash aggregator.
7.
Repeat Steps 1 through 6 for the remaining sash panels.