
Installation Instructions


Installation Instructions
Document No. 546-14404
May 20, 2006
Venturi Air Valve Application
CE Compliant Fume Hood Controller Board
FUM0410R1
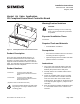
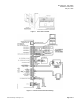
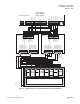
Figure 1. CE Compliant Fume Hood Controller Board.
Product Description
The Fume Hood Controller Board (Figure 1) is
the main termination board for the Fume Hood
Controller. The board comes with a ferrite fi lte r to
suppress electrical emissions from the 8-conductor
cable. The ferrite filter must be installed to meet FCC
requirements and CE compliance.
Product Numbers
546–00702 Venturi Air Valve Application
CE Compliant Fume Hood Controller
Board
546–00
702E
Ventur
i Air Valve Application
CE Comp
liant Fum e Hood Controller
Board w
ith enclosure.
(Application 900 and 933 with ferrite filter)
Keep the controller board in its static proof
bag until you are ready to install it on the
mounting posts.
Warning/Caution Notations
CAUTION:
Equipment damage or loss of data may
occur if you do not follow the procedures
as specified.
Expected Installation Times
23 minutes.
Required Tools and Materials
•Smallflat-blade screwdriver
Prerequisites
• Fume Hood Controller Enclosure is mounted
and wiring has been roughed-in.
• Operator Display Panel is installed and cable
pulled to locatio n of controller.
Instructions
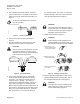
1. If the Fume Hood Controller will be used with
a field panel, then disconnect the Floor Level
Network (FLN) trunk from the field panel.
2. Carefully remove the contro lle r board from the
anti-static bag.
3. Center the contro ller board over the mount ing
posts in the bottom of the controller enclosure.
Insert the corner holes of the board onto the
mounting posts. Press firmly on the board to snap
it securely into place (Figure 1). Repeat for all
controllers.
4. Place the provided Controller Identification Label
in a convenient location on the outside of the
enclosure.
I
tem Number: 546-14404, Rev. BA
P
age 1 of 6