
Installation Instructions


Document No. 546-00100
Installation Instructions
Rev. 3, February, 2000
Siemens Building Technologies, Inc. Page 6 of 8
Section 4: Attaching Linkages to Sash
Panels
NOTE:
For best performance, attach the linkage
mounting blocks to the sash glass.
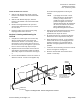
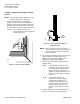
1. To determine the linkage mounting block
location, hold the free end of the linkage flat
against the sash panel. Generally, the linkage
should be mounted approximately 1 inch from
the inside edge of the sash panel. See Figure 9.
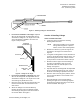
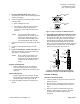
NOTE: For combination sashes, the
mounting blocks must be attached as
shown in Figure 10.
FUM0214R1
1"
Figure 9. Location of Mounting Block.
FUM0217R1
SASH
HANDLE
MINI
MOUNTING
BLOCK
Figure 10. Location of Mounting Block on
Combination Sash.
NOTE:
Make sure that the block is mounted so
that the sash can travel without running the
actuator block off the track or interfering
with any obstacles.
2. Use the alcohol towelette to clean the surface on
which the linkage-mounting block is to be
applied. Dry the surface thoroughly before
applying the linkage-mounting block.
3. Peel the protective backing from the linkage-
mounting block.
NOTE: If applied without pressure to the
mounting surface, you may remove
and reapply the linkage-mounting
block if necessary. If pressure is
applied, the adhesive backing on the
block may be damaged if the block is
removed.
NOTE: For best performance and
appearance, mount the linkage-
mounting block squarely and
uniformly on the sash panel. Also,
use the palms of your hands and
press the mounting blocks and
decorator plates firmly on the sash
glass.
4. Insert the linkage into the mounting block and
press it onto the block’s mounting surface.