
Installation Instructions

Installation Instructions
Document No. 546-00330
December 8, 2011
Laboratory Room Controller and Enclosure
Item Number 546-00330, Rev. BA Page 1 of 6
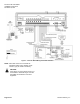
Product Description
The Laboratory Room Controller (LRC) is a multi-
application equipment controller designed to provide
Direct Digital Control (DDC) for a laboratory room
with a single fume hood controller, or up to four fume
hood controllers through a Fume Hood Flow Module
(FFM). The LRC, which controls room temperature
and pressurization, can operate stand-alone, with a
field panel, or as part of a network.
Product Numbers
546-00360 Laboratory Room Controller –
Pneumatic Actuation
(Appl. 2600, 2601, 2602, and 2603)
546-00362 Laboratory Room Controller –
Electronic Actuation
(Appl. 2600, 2611, 2612, and 2613)
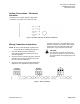
Warning/Caution Notations
WARNING
Personal injury/loss of life may
occur if you do not follow
procedure as specified.
CAUTION
Equipment damage or loss of
data may occur if you do not
follow procedure as specified.
Required Tools
• Medium slotted screwdriver
• 1/8-inch flat-blade screwdriver
• Medium Phillips head screwdriver
• 1/4-inch nut driver
• Hammer
• Electric drill
• 1/2-inch drill bit
• Four 4-inch spring wing toggle bolts with
mushroom heads
• Four washers (1/4-inch ID, 3/4-inch OD)
• Four anchors (sleeve or stud)
• Level
• Marker
• Tape measure
• Pencil
Expected Installation Time
45 minutes
Prerequisites
• The enclosure should be at least 5 feet away
from large motors and radio equipment.
• Field level network (FLN) with 24-volt wiring
roughed in.
• All damper and valve actuators are installed.
Mounting Instructions
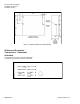
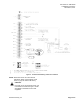
1. Remove the enclosure cover.
2. Remove the appropriate conduit knockouts. See
Figure 1.
3. On the wall or the surface on which you will
mount the enclosure, measure and mark a level
line.
4. Align the top edge of the enclosure on the level
line made in Step 3. Mark the position of the four
mounting holes on the rear panel of the
enclosure.
5. Drill the two mounting holes. Insert the wall
anchors.
CAUTION:
When hanging the controller, it is
recommended that you use the enclosure
mounting holes as a template for marking
the holes on the wall. The metal shavings
from drilling new holes in the controller can
cause severe damage to the controller.
6. Place the washers on the mounting bolts. Mount
the enclosure on the wall.