
Installation Instructions


Document No. 546-00321
Installations Instructions
Rev. 3, February, 2000
Siemens Building Technologies, Inc. Page 3 of 7
With Smoke
1. Determine the position of the mobile sample
tube in the hood. In order to do this the optional
Smoke Kit may be used. The smoke will be used
around the area located 3 inches above the
highest sash opening and 6 to 8 inches back
from the sash track on the right side of the fume
hood.
2. If the FHM will be mounted on the left side, then
place the sample tube on the left side. Puff the
smoke while moving the sash up and down to
determine the ideal location for the mobile
sample tube.
NOTE:
The goal is to find a location that has a
repeatable smoke pattern for any given
sash position. This is an ideal and may not
be obtainable due to the fact that smoke
patterns have many variables, try to get as
close as possible.
3. Change the sash position and examine the
smoke pattern. The smoke may swirl around a
good location with the sash at different heights.
For a short time the smoke may visually float in
a single position with surrounding smoke swirls,
or the smoke pattern may look the same at
different heights (i.e. same direction and
velocity).
4. Continue to
Section 4. Evaluation of Single
Vertical Sash Configuration
or
Section 5 or
Section6ifyouhaveaHorizontalor
Combination Hood.
Without Smoke
NOTE:
If the smoke tube or any other form of
smoke is not available, then place the
sample tube 3 inches above the highest
sash opening, 6 to 8 inches back from the
sash track on the right side of the fume
hood and follow the instructions below.
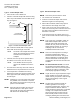
1. Place the sample tube to the sidewall on top of
the location determined in above. Rotate the 90°
elbow in order for the opening to point toward
the opposite side of the hood.
2. Secure the tube to the wall with the duct tape.
3. Continue to
Section 4. Evaluation of Single
Vertical Sash Configuration
or
Section 5 or
Section6ifyouhaveaHorizontalor
Combination Hood
.
NOTE:
The flexible tubing should run under the
sash and outside the hood. The FHM
should be placed in the approximate
position it will be mounted and out of the
direct path of airflow.
Section 4. Evaluation of Single Vertical
Sash Configuration.
1. Open the sash to the highest position (largest
sash area and slowest face velocity).
2. Watch the display and move the sash
downward. The raw count should increase
steadily as the sash is lowered.
NOTE:
If the hood is equipped with a bypass, then
the raw counts should remain steady or
rise slightly as the sash is lowered enough
to expose the bypass.
3. If the raw counts do not react as stated in the
notes, then reposition the opening in the sample
tube around the location that was determined in
Section 3. Starting Location for the Mobile
Sample Tube,
and then repeat Step 2 of this
section.
4. If acceptable results are obtained from Steps 1
and 2, then mark the location and refer to the
FHM Installation Instructions to install the FHM.
5. If unsatisfactory results are obtained, then
determine if one of the following symptoms
typifies the FHM readings:
A. The raw signal has no range or does
not change.
NOTE: This condition may be influenced by
the following factors:
• The hood may not have airflow. Measure
the face velocity with an airflow measuring
device to ensure that there is proper airflow
into the fume hood.
• The tube is kinked. Straighten the hose out
to open the tube.
• There are poor room conditions that may
be influencing the FHM. Use the smoke
tubes or some other safe means to
visualize how the air currents move around
the room. If there are strong air currents
moving across the sensor opening, then the
unit may be flooded into one reading and
not influenced by the flow within the fume
hood. Move the FHM or change the flow
patterns in the room by diverting diffusers.