
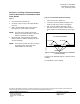
Installation Instructions


Document No. 546-00321
Installations Instructions
Rev. 3, February, 2000
Siemens Building Technologies, Inc. Page 5 of 7
Section 6. Evaluation of Combination
Sash Hood Configuration.
NOTE:
The instructions start with the vertical
sashes of the hood and add the horizontal
sashes.
1. Open the vertical sash to the highest position
(largest sash area and slowest face velocity).
Leave the horizontal sashes closed off.
2. Watch the display and move the sash
downward. The raw count should increase
steadily as the sash is lowered.
NOTE: If the hood is equipped with a
bypass, then the raw counts should
remain steady or rise slightly as the
sash is lowered enough to expose
the bypass.
3. If the raw counts do not react as stated in Steps
2 and 3 and the Notes above, then reposition
the opening in the sample tube around the
location that was determined earlier and repeat
Step 1.
4. If acceptable results are obtained, then mark the
location and refer to the FHM Installation
Instructions to install the FHM. If unsatisfactory
results are obtained, then refer to
Section 4.
Evaluation of Single Vertical Sash Configuration
,
Steps 5 through 12.
5. Once you have obtained acceptable raw count
readings from the vertical sashes, check the
horizontal raw count readings as follows:
a. Move all the sashes to the left and then to
the right. As the sashes move watch the
display to determine if the tube location
reacts similarly to open area on both the left
and right sides.
b.
If the FHM responds in an acceptable
manner, then mark the location of the tube
where the sidewall adapter will be installed.
If unsatisfactory results are obtained, then
continue with step 7.
1. Move the sample tube to a completely different
location in the hood. Look for the location using
smoke tubes or some other safe means where
the air currents do not appear to be as turbulent.
See Step 1 at the beginning of this section and
retest the FHM.
2. Retest the FHM until the conditions improve. If
satisfactory results are still unobtainable, then
continue with Step 9.
3. A Sample Tube may be required if, when the
horizontal sashes are moved, the signal is
stronger on the side of the FHM and weaker on
the opposite side of the FHM. See
Section 8.
Creating a Sample Tube for Horizontal or
Combination Sash Fume Hoods,
to solve this
condition.
Section 7. Creating a Sample Tube for
Vertical Sash Fume Hoods.
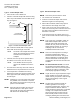
NOTE:
There are several options in creating a
permanent sampling tube inside a vertical
sash fume hood. The type of tube that will
work on a particular hood must be
determined on site, taking into
consideration the fume hood construction
and conditions within the lab room.
NOTE:
Larger PVC may be required for larger
hoods. Smaller sizePVC will restrict the
airflow and may not provide a wide enough
range of raw readings to offer a good
calibration curve.
NOTE:
The directions mentioned below are
guidelines for creating a permanent
sampling tube. However, they may be
modified to work on different hoods,
provided the FHM gives acceptable
readings. The sample tube should be
placed at least 1/2-inch away from the
sidewall. This will provide a more accurate
reading by allowing flow around the tube.