
Installation Instructions

Installation Instructions
Document No. 546-00580
May 22, 2012
Venturi Air Valve for Critical
Environments
Item No. 546-00580. Rev. DA Page 1 of 7
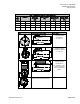
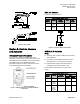
Figure 1: Venturi Air Valve.
Figure 2:
Venturi Air Valve with Enclosure.
Product Description
The Siemens Venturi Air Valve is a pre-packaged,
easy to install airflow measurement and control
solution. It provides stable and precise airflow
control of room supply, room general exhaust or
fume hood exhaust.
Options
Sizes 6 in, 8 in, 10 in, 12 in, 2 x 10 in, 2 x 12 in,
3 x 12 in
Aluminum or Heresite coated construction
Laboratory Room Controller (LRC) in an
enclosure with or without Fume hoods
Constant Air Volume Controller (CAV)
Variable Air Volume Controller (VAV)
Hot water reheat coils (one or two row)
Electronic Actuation
Control packages including fast-acting or basic
electronic actuation (optional) and a differential
pressure transmitter (optional). These parts are
included in an enclosure that is factory-mounted to
the outside of the valve.
Expected Installation Time
30 minutes
Required Tools and Materials
Small flat blade screwdriver
3/8-inch open end wrench
Needle nose pliers
Sealant
1/4-inch poly tubing
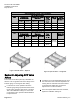
Prerequisites
Valve ductwork free of debris
Construction filters in place
Supply/Exhaust ductwork installed
Water lines installed (if reheat coils are used)
NOTE:
Valves should be located so that they
do not come in contact with rigid
conduit, sprinkler piping, Greenfield
metal covering, or rigid pneumatic
tubing. Do not install valves tight against
concrete slabs or columns because
vibrations are amplified through these
structures. Also, allow clearance for
service access to controls.