
Installation Instructions

Document No. 546-00580
Installation Instructions
May 22, 2012
Page 2 of 7 Siemens Industry, Inc.
Instructions
Installation instructions for the Venturi Air Valves are
presented for various actuator types. These
instructions consist of the following:
Section 1 — mounting the valve.
Section 2 — adjusting AVC airflow.
Section 3 — actuation and sensors.
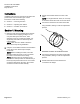
Section 1: Mounting
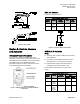
1. Move the valve to the installation area. Remove
the valve from the shipping package. Do not
carry the valve by the flow sensor, valve
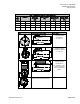
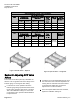
extension rod or any controls. See Table 1 for
single-body and Table 3 for multi-body valve
measurements.
NOTE: Take care not to break or bend the
airflow sensor taps during installation.
2. Verify the correct airflow direction and orientation
of the valve in the ductwork (for example,
Horizontal).
NOTE: Before installing the valve, hold in the
intended position and push on the cone inside
the valve to ensure that it moves freely.
NOTE: Valves that are not mounted in a true
horizontal or vertical position as determined by a
level may have performance issues. If a controls
enclosure is attached to the valve, the controls
enclosure must be mounted vertically.
3. Support the ductwork within 12 inches of the
valve.
NOTE: For single bodied air valves, do not crimp
or otherwise deform the ends of round air valves.
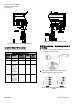
4. Connect the ductwork to the valve’s inlet collar
using drawband, bolting or other accepted trade
practice.
Drawband connection for ductwork and valve.
5. Connect the ductwork to the valve’s outlet collar
using drawband, bolting or other accepted trade
practice.
6. Seal all ductwork and check that the duct
connections are airtight.