
Installation Instructions


Document No. 546-00092
Installation Instructions
August 10, 2011
Page 4 of 6 Siemens Industry, Inc.
NOTE:
Switch SW1 is not used for Floating Control
(Digital) Applications.
3. Perform the steps in the Section 5 – Functional
Verification.
4. Replace the cover on the enclosure and tighten
the butterfly screws.
Installation for a floating control (digital) application
is complete.
Section 4– Analog Control (0 to 10
Vdc, 4 to 20 mA) Applications
This section covers installation for lab supply air
terminal, lab exhaust air terminal, and analog control
signals from any controller or field panel.
1. Using two-conductor 20 AWG cable, connect
the LEA Interface board, J2, to the analog
control output from the controller or field panel.
See Figure 6 and Figure 7.
Figure 6. Analog Controller (4–20 mA) and LEA
Interface Board Wiring.
Figure 7. Analog Controller (0–10 Vdc) and LEA
Interface Board Wiring.
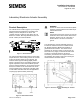
2. Set the switches (Figure 8) using Table 1 and
Table 2.
3. Perform the steps in the Section 5 – Functional
Verification.
4. Replace the cover on the enclosure and tighten
the butterfly screws.
Installation for an analog (0 to 10 Vdc, 4 to 20 mA)
control application is complete.
Section 5 – Functional Verification
1. The basic test procedure for the LEA Interface
board with either Digital (floating) or Analog (0
to 10 Vdc, 4 to 20 mA) control can be
accomplished using the on-board switches.
2. Verify AC power is applied to the LEA Interface
board, and LED 1 is ON. See Table 3.
3. Verify that the damper is linked and secured
correctly.
4. Position SW2-2 to ON (test mode).
5. With SW2-3 off, the actuator should be fully
extended and LED 2 is ON, see Table 2.
6. Cycle the SW2-3 position to fully retract (LED 3)
and extend (LED 2 is ON) to move the actuator
through one full cycle.
7. Return the SW2-2 switch to the OFF position.
8. Return the SW2-3 switch to it’s original position.
9. For fail-safe actuators, remove AC power and
verify that actuator moves to proper fail-safe
position. If not, check SW2-3 position and
repeat check.
10. Reapply AC power and verify that the actuator
returns to control.
Functional verification is complete.
Figure 8. Defualt Switch Settings.