
Commissioning Instructions


Before You Begin
Fume Hood Specific Sash Setup and Calibration
8 | 11
Siemens Industry, Inc.
A6V10801622
Restricted
07.06.2016
7.
Repeat Steps 2 through 6 for the lower vertical sash.
8.
Set CAL SASH NUM back to 0 or to the first horizontal sash, number 3, to
be calibrated. This locks to sash calibration into the sash aggregator.
9.
Set CAL SASH LOC to MIN for minimum opening.
10.
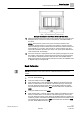
Slide the sash panel to be calibrated to the far left. Measure the distance
from the left end of the track to the left edge of the sash panel. Set CAL
SASH POS to this value. When the sash aggregator accepts the reading,
the minimum position value will be entered into POS SASH 3.
Sash Panel Measurement (15-inch Sash Panels).
11.
Set CAL SASH LOC to MAX for maximum opening.
12.
Slide the sash panel to be calibrated to the far right. Measure the distance
from the left end of the track to the left edge of the sash panel. Set CAL
SASH POS to this value. When the sash aggregator accepts the reading,
the maximum position value will be entered into POS SASH 3.
13.
Set CAL SASH NUM to 0 or to the number of the horizontal sash panel to be
calibrated. This locks to sash calibration into the sash aggregator.
14.
Repeat Steps 9 through 13 for the remaining sash panels.
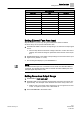
Sash Calibration Verification
1.
Close the vertical sash fully and verify that the value displayed at POS
SASH 1 is at the minimum that was set during calibration. Open the sash
half way and verify that the value displayed at POS SASH 1 is equal to the
measured value. Open the sash fully and verify that the value displayed at
POS SASH 1 is at the maximum that was set during calibration. See Table
Sash/Point Wiring
.
2.
Repeat this verification procedure for the second vertical sash panels using
the appropriate corresponding points. See Table
Sash/Point Wiring
.
3.
Slide the horizontal sash panel 3 to the left and verify the value displayed at
POS SASH 3 is at the minimum that was set during calibration. Slide the
sash to the middle of its range and verify that the value displayed at POS
SASH 3 is equal to the measured value. Slide the sash to the right and
verify that the value displayed at POS SASH 3 is at the maximum that was
set during calibration. See Table
Sash/Point Wiring
.
4.
Repeat this verification procedure for the remaining sash panels using the
appropriate corresponding points. See Table
Sash/Point Wiring
.