S Gebrauchs- und Montageanleitung Operating and installation instructions Mode d’emploi et notice de montage Gebruiksaanwijzing en montagevoorschrift Istruzioni d’uso e per il montaggio Instruccionesdeuso y de montaje Instruções de serviçio e de montagem de en fr nl it es pt
de Seite 03 – 17 it pagina 063 – 077 en page 18– 32 es página 078 – 092 fr pages 33– 47 pt página 093 – 107 nl pagina 48– 62 Abb. 1 GAS GAZ Abb.
Inhaltsverzeichnis Allgemeine Informationen ................................................................................. 4 Hinweise zum Umweltschutz ...................................................................................................................... 4 Vor dem ersten Benutzen .............................................................................................................................. 4 Sicherheitshinweise ..........................................................
Allgemeine Informationen HINWEISE ZUM UMWELTSCHUTZ VOR DEM ERSTEN BENUTZEN Entsorgung der Transportverpackung HINWEIS: Diese Gebrauchsanleitung gilt für mehrere Geräteausführungen. Es ist möglich, dass einzelne Ausstattungsmerkmale beschrieben sind, die nicht auf Ihr Gerät zutreffen. Ihr neues Gerät wurde auf dem Weg zu Ihnen durch die Verpackung geschützt. Alle eingesetzten Materialien sind umweltverträglich und wieder verwertbar. Bitte helfen Sie mit und entsorgen Sie die Verpackung umweltgerecht.
Sicherheitshinweise Bestimmungsgemäße Verwendung Diese Dunstabzugshaube entspricht den vorgeschriebenen Sicherheitsbestimmungen. Ein unsachgemäßer Gebrauch kann zu Schäden an Personen oder Sachen führen. Die Dunstabzugshaube darf ausschließlich im Haushalt benutzt werden. Der Hersteller haftet nicht für Schäden, die durch unsachgemäßen Gebrauch oder falsche Bedienung verursacht werden.
Sicherheitshinweise Ein gefahrloser Betrieb ist möglich, wenn der Unterdruck im Aufstellraum der Feuerstätte 4Pa (0,04mbar) nicht überschreitet. Dies kann erreicht werden, wenn durch nicht verschließbare Öffnungen, z.B. in Türen, Fenstern, in Verbindung mit einem Zuluft-/ Abluftmauerkasten oder durch andere technische Maßnahmen, die zur Verbrennung benötigte Luft nachströmen kann.
Sicherheitshinweise Sachgemäßer Gebrauch Sachgemäße Montage Reinigen Sie die Dunstabzugshaube Beachten sie die Herstellerangaben für das Kochgerät, ob der Betrieb einer Dunstabzugshaube darüber möglich ist. sorgfältig vor der ersten Inbetriebnahme. Vor jeder Reinigung und Pflege ist die Dunstabzugshaube durch Ziehen des Netzsteckers oder Ausschalten der Sicherung stromlos zu machen. Lampen (insbesondere Halogenlampen) werden bei Betrieb sehr heiß.
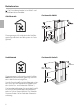
Betriebsarten Die Dunstabzugshaube ist im Abluft- und Umluftbetrieb verwendbar. Abluftbetrieb Gerätemaße Abluft Die angesaugte Luft wird durch die Fettfilter gereinigt und durch ein Rohrsystem ins Freie geleitet. Umluftbetrieb Gerätemaße Umluft min. 126 mm min. 580 mm max 1.030 mm Die angesaugte Luft wird durch die Fettfilter und einen Aktivkohlefilter gereinigt und wieder in die Küche zurückgeführt.
Bedienung Die Beschreibung der Bedienung gilt für mehrere Geräteausführungen. Es ist möglich, dass einzelne Ausstattungsmerkmale beschrieben sind, die nicht auf Ihr Gerät zutreffen. 0 1 Licht 2 HINWEIS: Es ist empfehlenswert, das Gebläse bei Kochbeginn einzuschalten und erst einige Minuten nach Kochende wieder auszuschalten. Der Küchendunst wird so am wirkungsvollsten beseitigt. Einschalten des Lüfters und Einstellen der Lüfterstufen 3 Drücken Sie die Taste 1.
Reinigung und Pflege VERLETZUNGSGEFAHR BRANDGEFAHR Vor jeder Reinigung und Pflege ist die Dunstabzugshaube durch Ziehen des Netzsteckers oder Ausschalten der Sicherung stromlos zu machen. Bei zunehmender Sättigung der Filter mit fetthaltigen Rückständen erhöht sich die Entflammbarkeit. Außerdem kann die Funktion der Dunstabzugshaube beeinträchtigt werden. Geräteoberflächen Durch rechtzeitiges Reinigen der MetallFettfilter wird der Brandgefahr vorgebeugt.
Aus- und Einbau der Fettfilter VERLETZUNGSGEFAHR Vor dem Ein- und Ausbau der Fettfilter ist die Dunstabzugshaube durch Ziehen des Netzsteckers oder Ausschalten der Sicherung stromlos zu machen. Aus- und Einbauen der Metall-Fettfilter 1. Öffnen Sie die Verriegelung und klappen Sie die Fettfilter ab. Fassen Sie dabei mit der anderen Hand unter die Fettfilter. Aktivkohlefilter Aktivkohlefilter binden die Geruchsstoffe bei Umluftbetrieb.
Auswechseln der Lampen Beachten Sie vor dem Auswechseln der Lampen unbedingt die Hinweise und Warnungen im Kapitel “Sicherheitshinweise”! Die Beschreibung des Lampenwechsels gilt für mehrere Geräteausführungen. HINWEIS: Beachten Sie die Garantiebestimmungen im beiliegenden Serviceheft. Wechsel der Halogenlampen VERLETZUNGSGEFAHR Halogenlampen werden bei Betrieb sehr heiß.
Montagehinweise Beachten Sie vor der Montage unbedingt die Hinweise und Warnungen im Kapitel “Sicherheitshinweise”! Der Durchmesser der Abluftrohre sollte nicht kleiner als 150 mm sein. Abluftbetrieb Rundrohre: Die Abluft wird über einen Lüftungsschacht nach oben, oder direkt durch die Außenwand ins Freie geleitet.
Montagehinweise ELEKTRISCHER ANSCHLUSS Bei erforderlichem Festanschluss Beachten Sie vor dem elektrischen Anschluss unbedingt die Hinweise und Warnungen im Kapitel “Sicherheitshinweise”! Installationsseitig ist eine Trennvorrichtung vorzusehen. Als Trennvorrichtung gelten Schalter mit einer Kontaktöffnung von mehr als 3 mm und allpoliger Abschaltung. Dazu gehören LS-Schalter, Sicherungen und Schütze.
Montage Die Dunstabzugshaube ist für die Wandmontage vorgesehen. Achten Sie bei der Montage auch auf even- tuell zu montierende Sonderzubehörteile, z.B. das Starterset für Umluftbetrieb. Beachten Sie die ergänzend beigefügte Montageanweisung. Achten Sie auf den Mindestabstand zwischen Kochstelle und Dunstabzugshaube (siehe “Sicherheitshinweise, Sachgemäße Montage”)! Vermeiden Sie Beschädigungen der empfindlichen Oberflächen! Vorbereiten der Wand VERLETZUNGSGEFAHR, Montagevorbereitung 1.
Montage Aufhängen und Ausrichten 1. Die Schutzfolie der Dunstabzugshaube zuerst hinten und nach der Montage vollständig abziehen. 2. Die Dunstabzugshaube so einhängen, dass sie fest hinten an den Aufhängungen einrastet Ⓐ. 3. Die Dunstabzugshaube durch Drehen der Aufhängungen waagerecht ausrichten. Bei Bedarf kann die Dunstabzugshaube nach rechts oder links verschoben werden Ⓑ.
Montage Montage der Kaminverblendungen VERLETZUNGSGEFAHR Die Innenseiten der Kaminverblendungen können scharfkantig sein. Wir empfehlen bei der Montage Schutzhandschuhe zu tragen. 1. Die Kaminverblendungen trennen. Dazu das Klebeband abziehen. 2. Die Schutzfolie an beiden Kaminverblendungen abziehen. 3. Die Kaminverblendungen ineinanderschieben. 4. Kaminverblendungen auf der Dunstabzugshaube aufsetzen, die innere Kaminverblendung nach oben schieben und links und rechts am Haltewinkel einhängen.
Table of contents General Information ............................................................................................ 19 Information on protection of the environment ............................................................................... 19 Before using the appliance for the first time ...................................................................................... 19 Safety Instructions ........................................................................................
General information INFORMATION ON PROTECTION OF THE ENVIRONMENT BEFORE USING THE APPLIANCE FOR THE FIRST Disposal of transport packaging NOTE: These operating instructions apply to several appliance models It is possible that individual features are described which do not apply to your appliance. Your new appliance was sent to you in protective packaging. All utilised materials are environmentally safe and recyclable. Please help us by disposing of the packaging in an environmentally friendly manner.
Safety instructions Intended use This extractor hood complies with the stipulated safety regulations. Improper use may result in injury or damage. If the appliance is improperly installed, serviced or repaired, the user may be placed in considerable danger for which the manufacturer is not liable. household only. The manufacturer is not liable for damage which is caused by improper use or incorrect operation.
Safety instructions Safe operation is possible provided the low pressure in the installation room of the heating appliance does not exceed 4Pa (0.04mbar). This can be achieved if the combustion air can flow through non-closable openings, e.g. in doors, windows, in conjunction with air intake/exhaust air wall boxes or by other technical measures. Special information for gas cookers When installing the extractor hood above gas hobs, observe the appropriate national statutory regulations (e.g.
Safety instructions Proper use Correct installation Clean the extractor hood thoroughly before Check the manufacturer’s specifications for the cooker to determine whether an extractor hood can be operated over it. using for the first time. Before cleaning and servicing the extractor hood, isolate it from the power supply by pulling out the mains plug or switching off the fuse. Bulbs (especially halogen bulbs) become very hot during operation.
Operating modes The extractor hood can be used in exhaust air and circulating air mode. Exhaust-air mode Appliance dimensions Exhaust air min. 126 min. 580 max 1.030 The air which is drawn in is cleaned by the grease filters and conveyed to the exterior by a pipe system. Circulating-air mode min. min. 450 400 Appliance dimensions Circulating air min. 126 min. 580 max 1.030 The air which is drawn in is cleaned by the grease filters and an activated carbon filter and conveyed back into the kitchen.
Operation The description of the operation applies to several appliance models. It is possible that individual features are described which do not apply to your appliance. 0 1 Light 2 NOTE: It is recommended to switch on the blower when you start cooking and not to switch it off again until several minutes after you have finished cooking. In this way the kitchen fumes are removed most effectively. Switching on the fan and selecting the fan settings 3 Press button 1.
Cleaning and care LOOKING AFTER THE APPLIANCE Metal-mesh grease filters Suitable cleaning agents and care products for your appliance can be purchased via the Hotline or from the Online Shop (see cover page). The metal-mesh grease filters absorb the grease particles from the kitchen fumes. Appliance surfaces NOTE: Observe the warranty regulations in the enclosed service booklet. The appliance surfaces and controls are scratch-sensitive.
Removing and installing the grease filters Before removing and installing the grease filters, always follow the instructions and warnings in the chapter entitled ”Safety instructions”! Activated carbon filters bind the odours in circulating-air mode. Removing and installing the metal-mesh grease filters Installing and removing the activated carbon filters 1. Open the lock and fold down the grease filters. In doing so, hold the underside of the grease filters with your other hand. 1.
Changing the bulbs Before changing the bulbs, always follow the instructions and warnings in the chapter entitled ”Safety instructions”! The description of changing the bulbs applies to several appliance models. NOTE: Observe the warranty regulations in the enclosed service booklet. Changing the halogen bulbs Halogen bulbs become very hot during operation.
Installation instructions Prior to installation, always follow the instructions and warnings in the chapter entitled ”Safety instructions”! The diameter of the exhaust air pipes should not be less than 150 mm. Exhaust-air mode Round pipes: The exhaust air is conveyed upwards via a ventilation shaft or directly through the outer wall to the exterior.
Installation instructions ELECTRICAL CONNECTION If a permanent connection is required Before connecting the appliance to the power supply, always follow the instructions and warnings in the chapter entitled ”Safety instructions”! A disconnector must be provided on the installation side. Switches with a contact opening of more than 3 mm and all-pole disconnection are regarded as disconnectors. This includes LS switches, fuses and contactors.
Installation The extractor hood is designed to be mounted on the wall. During installation, optional accessories may also require fitting. Observe the minimum distance between hob and extractor hood (see ”Safety instructions”)! Avoid damaging the sensitive surfaces! Preparing the wall RISK OF INJURY, DAMAGE TO PROPERTY Before drilling the holes for the designated installation location, check for concealed electrical cables and other lines. Installation preparations 1.
Installation Attachment and alignment 1. Initially remove the protective foil from the back of the extractor hood and, following installation, remove foil completely. 2. Mount the extractor hood, ensuring that the back is attached firmly to the brackets Ⓐ. 3. Align the extractor hood horizontally by turning the brackets.. If required, the extractor hood can be moved to the right or left Ⓑ. A C B RISK OF INJURY Check that all locking screws and locking caps have been attached securely! 4.
Installation Installing the flue ducts RISK OF INJURY 4. Place flue ducts on the extractor hood, push the inner flue duct upwards and attach the left and right sides to the fixing bracket. The insides of the flue ducts may have sharp edges. We recommend wearing protective gloves during installation. 1. Separate the flue ducts. To do this, remove the adhesive tape. 2. Remove the protective film from both flue ducts. 3. Insert one flue duct into the other.
Tabel de matières Informations générales ....................................................................................... 34 Conseils pour le respect de l’environnement .................................................................................... 34 Avant la première utilisation......................................................................................................................... 34 Consignes de sécurité ..................................................................
Informations générales CONSEILS POUR LE RESPECT DE L’ENVIRONNEMENT Mis au rebut de l’emballage de transport Pour vous parvenir, votre nouvel appareil a été protégé par un emballage. Tous les matériaux qui le composent sont compatibles avec l’environnement et recyclables. Aidez-nous à éliminer l’emballage dans le respect de l’environnement. Les différentes parties de l’emballage peuvent s’avérer dangereuses pour les enfants. Pour cette raison, veuillez les conserver hors de leur portée.
Consignes de sécurité Conformité d’utilisation Cette hotte aspirante est conforme aux dispositions de sécurité prescrites. Une utilisation inexperte peut provoquer des dommages corporels ou des dégâts matériels. Cette hotte aspirante sert exclusivement à une application domestique. Le fabricant décline toute responsabilité des dommages provoqués par une utilisation inexperte ou des erreurs de manipulation.
Consignes de sécurité La hotte peut fonctionner parallèlement sans risque à condition que la dépression dans le local où est installé le foyer ne dépasse pas 4 Pa (0,04 mbar). Il est possible d’y parvenir au moyen d’orifices impossibles à obturer, ménagés p. ex. dans les portes, fenêtres, et en association avec une ventouse télescopique d’apport / d’évacuation d’air, ou par d’autres dispositifs techniques permettant à l’air de combustion d’affluer.
Consignes de sécurité Utilisation correcte Montage correct Avant la première mise en service, nettoyez Dans la notice d’instructions publiée par le fabricant de l’appareil de cuisson, vérifiez s’il est possible de faire marcher une hotte aspirante au-dessus. la hotte aspirante soigneusement. Avant chaque nettoyage ou entretien, débranchez la fiche mâle de la prise de courant ou ramenez le disjoncteur en position éteinte pour mettre la hotte aspirante hors tension.
Modes de service La hotte aspirante peut fonctionner en mode Évacuation d’air et en mode Recyclage de l’air. Mode Évacuation de l’air Cotes de l’appareil (évacuation de l’air) min. 126 min. 580 max 1.030 L’air aspiré est débarrassé des particules de graisse par les filtres à cet effet, transite par un conduit puis gagne l’extérieur. Mode Recyclage de l’air min. min. 450 400 Cotes de l’appareil (recyclage de l’air) min. 126 min. 580 max 1.
Utilisation La description de l’utilisation vaut pour plusieurs versions d’appareils. Certains équipements ne figurant pas sur votre appareil peuvent y être décrits. 0 1 Éclairage 2 REMARQUE : Il convient d’allumer le ventilateur en début de cuisson et d’attendre quelques minutes après la fin de la cuisson avant de l’éteindre à nouveau. C’est cette méthode qui aspire les buées de cuisson avec le plus d’efficacité.
Nettoyage et entretien REMARQUE CONCERNANT L’ENTRETIEN DE L’APPAREIL Vous pouvez vous procurer des produits appropriés pour nettoyer et entretenir l’appareil par le biais de la hotline ou de la boutique en ligne (voir la page de couverture). Surfaces de l’appareil REMARQUE : Veuillez tenir compte des conditions de garantie publiées dans le manuel de SAV ci-joint. Les surfaces de l’appareil et ses éléments de commande craignent les rayures.
Dépose et incorporation des filtres à graisse Avant de déposer et incorporer les filtres à graisse, veuillez impérativement respecter les consignes et avertissements figurant au chapitre « Consignes de sécurité » ! Lorsque la hotte fonctionne en mode Recyclage d’air, les filtres au charbon actif lient les substances odoriférantes. Dépose et incorporation des filtres métalliques à graisse Dépose et incorporation des filtres au charbon actif 1.
Remplacement des ampoules Avant de remplacer les ampoules, veuillez impérativement respecter les consignes et avertissements figurant au chapitre « Consignes de sécurité » ! La description du changement de lampe vaut pour plusieurs versions d’appareils. REMARQUE : Veuillez tenir compte des conditions de garantie publiées dans le manuel de SAV ci-joint. Changement des ampoules halogènes Les ampoules halogènes deviennent très chaudes en service.
Consignes de montage Avant de remplacer les ampoules, veuillez impérativement respecter les consignes et avertissements figurant au chapitre « Consignes de sécurité » ! Mode Évacuation d’air L’air sortant de la hotte est évacué vers le haut par un conduit d’aération, il traverse le mur et pénètre dans l’atmosphère extérieure.
Consignes de montage BRANCHEMENT ÉLECTRIQUE Si un raccordement fixe s’impose Avant d’effectuer le branchement électrique, veuillez impérativement respecter les consignes et avertissements figurant au chapitre « Consignes de sécurité » ! Il faut prévoir un dispositif de coupure du côté de l’installation électrique. Valent comme dispositif de coupure les interrupteurs présentant une ouverture de plus de 3 mm entre contacts et sectionnant chaque pôle.
Montage Cette hotte aspirante a été prévue pour un montage mural. Vérifiez, pendant le montage, s’il faut monter des accessoires en option.
Montage Accrocher et aligner 1. Commencez par retirer l'arrière de la pellicule protégeant la hotte aspirante, puis retirez-la complètement une fois le montage achevé. 2. Accrochez la hotte aspirante de telle sorte qu'elle encrante fermement à l'arrière, sur ses moyens d'accrochage Ⓐ. 3. Tournez les moyens d'accrochage pour ajuster l'horizontalité de la hotte. Si nécessaire, il est possible de déplacer la hotte aspirante vers la droite ou la gauche Ⓑ.
Montage Montage des capots de cheminée RISQUE DE BLESSURES Les côtés intérieurs des capots de cheminée peuvent présenter des arêtes vives. Nous recommandons de porter des gants protecteurs au montage. 1. Séparez les capots de cheminée. Pour ce faire, retirez le ruban adhésif. 2. Retirez la pellicule protectrice recouvrant les deux capots de cheminée. 3. Faites coulisser les capots de cheminée l'un dans l'autre. 4.
Inhoudsopgave Algemene Informatie .......................................................................................... 49 Milieubescherming ............................................................................................................................................ 49 Voor het eerste gebruik ................................................................................................................................... 49 Veiligheidsvoorschriften ................................
Algemene Informatie MILIEUBESCHERMING VOOR HET EERSTE GEBRUIK Recycling van de transportverpakking OPMERKING: Deze gebruiksaanwijzing geldt voor verschillende uitvoeringen van het apparaat. Het is mogelijk dat er kenmerken worden beschreven die niet van toepassing zijn op uw apparaat. Uw nieuwe apparaat is op weg naar u beschermd door de verpakking. De gebruikte materialen zijn onschadelijk voor het milieu en geschikt voor recycling. Zorg a.u.b. voor een milieuvriendelijke afvoer van het verpakking.
Veiligheidsvoorschriften Gebruik volgens de voorschriften Deze afzuigkap voldoet aan de voorgeschreven veiligheidsbepalingen. Onjuist gebruik kan persoonlijk letsel of schade veroorzaken. De afzuigkap is uitsluitend bedoeld voor huishoudelijk gebruik. De fabrikant is niet aansprakelijk voor schade die het gevolg is van onjuist gebruik of onjuiste bediening. De fabrikant is niet verantwoordelijk voor schade die het gevolg is van niet-naleving van de veiligheidsvoorschriften.
Veiligheidsvoorschriften Het apparaat kan zonder gevaar worden gebruikt wanneer de onderdruk in de opstellingsruimte van de stookplaats niet hoger is dan 4 Pa (0,04 mbar). Dit kan worden bereikt wanneer de voor de verbranding benodigde lucht kan toestromen door niet-afsluitbare openingen, bijv. in deuren, ramen en luchttoevoer- of luchtafvoermuurkasten; of door middel van andere technische maatregelen.
Veiligheidsvoorschriften Juist gebruik Juiste montage Reinig de afzuigkap zorgvuldig voordat u Controleer aan de hand van de handleiding van het kooktoestel of er een afzuigkap boven mag worden gebruikt. deze voor het eerst gebruikt. Voor elke reiniging en onderhoud moet de afzuigkap stroomloos worden gemaakt door de stekker uit het stopcontact te trekken of de zekering uit te schakelen. Lampen (vooral halogeenlampen) worden tijdens het gebruik zeer heet.
Gebruikswijze De afzuigkap kan worden gebruikt met afvoerlucht en met circulatielucht. Gebruik met afvoerlucht Afmetingen afvoerlucht min. 126 min. 580 max 1.030 De aangezogen lucht wordt door de vetfilters gereinigd en via een buizensysteem naar de buitenlucht afgevoerd. Gebruik met circulatielucht min. min. 450 400 Afmetingen circulatielucht min. 126 min. 580 max 1.030 De aangezogen lucht wordt door de vetfilters en een actieve-koolfilter gereinigd en weer teruggeleid naar de keuken.
Bediening De beschrijving van de bediening geldt voor verschillende uitvoeringen van het apparaat. Het is mogelijk dat er kenmerken worden beschreven die niet van toepassing zijn op uw apparaat. 0 1 licht 2 OPMERKING: Wij raden u aan de ventilator in te schakelen zodra u begint met koken en hem pas enkele minuten na het koken weer uit te schakelen. Zo wordt de keukendamp het effectiefst verwijderd. Ventilator inschakelen en ventilatorstanden instellen 3 Druk op toets 1.
Reiniging en onderhoud ONDERHOUD VAN HET APPARAAT Metalen vetfilter Geschikte reinigings- en onderhoudsmiddelen voor uw apparaat zijn verkrijgbaar via de Hotline of de Online-shop (zie de omslag). De aangebrachte metalen vetfilters nemen de vette bestanddelen van de keukendamp op. Oppervlakken van het apparaat BRANDGEVAAR Bij toenemende verzadiging met vethoudende resten wordt de ontvlambaarheid groter. Bovendien kan dit een nadelige invloed hebben op de werking van de afzuigkap.
Demontage en montage van de vetfilters Lees beslist de aanwijzingen en waarschuwingen in het hoofdstuk "Veiligheidsvoorschriften" voordat u de vetfilters demonteert of monteert. Metalen vetfilters demonteren en monteren 1. Open de vergrendeling en klap de vetfilters omlaag. Houd daarbij uw andere hand onder de vetfilters. Actieve-koolfilters binden de reukstoffen bij gebruik met circulatielucht. Actieve-koolfilters monteren en demonteren 1.
Lampen vervangen Lees beslist de aanwijzingen en waarschuwingen in het hoofdstuk "Veiligheidsvoorschriften" voordat u de lampen vervangt. De beschrijving van de lampvervanging geldt voor verschillende uitvoeringen van het apparaat. OPMERKING: Lees de garantievoorwaarden in het bijgevoegde serviceboekje. Gloeilampen vervangen 1. Til de lampafscherming iets op. 2. Duw de lampafscherming naar het midden van het apparaat. 2 1 Halogeenlampen vervangen Halogeenlampen worden tijdens het gebruik zeer heet.
Montageaanwijzingen Lees voor de montage beslist de aanwijzingen en waarschuwingen in het hoofdstuk "Veiligheidsvoorschriften"! De diameter van de luchtafvoerbuizen mag niet kleiner zijn dan 150 mm. Gebruik met afvoerlucht Ronde buizen: De afvoerlucht wordt via een luchtkoker naar boven geleid, of rechtstreeks door de muur naar buiten.
Montageaanwijzingen ELEKTRISCHE AANSLUITING Lees voor de elektrische aansluiting beslist de aanwijzingen en waarschuwingen in het hoofdstuk "Veiligheidsvoorschriften"! De afzuigkap mag alleen worden aangesloten door een gekwalificeerde elektromonteur die op de hoogte is van de voorschriften van het verantwoordelijke nutsbedrijf.
Montage De afzuigkap is bedoeld voor montage op de muur. Houd bij de montage rekening met eventueel te monteren speciaal toebehoren. Neem de minimumafstand tussen de kookplaat en de afzuigkap in acht (zie ”Veiligheidsvoorschriften”)! Voorkom beschadiging van de gevoelige oppervlakken! Voorbereiden van de muur VERWONDINGSGEVAAR, GEVAAR VAN MATERIËLE SCHADE Voordat u gaat boren, dient u te controleren of er op de montageplaats elektrische of andere installatieleidingen zijn aangelegd in de muur.
Montage Ophangen en uitlijnen 1. Voor het monteren de beschermende folie van de achterkant verwijderen, daarna de rest van de folie verwijderen. 2. De afzuigkap zodanig ophangen dat deze stevig in de ophangingen valt Ⓐ. 3. De afzuigkap horizontaal uitlijnen door de ophangingen te draaien. Desgewenst kan de afzuigkap naar links of rechts worden verschoven Ⓑ. A C B VERWONDINGSGEVAAR Controleer of alle bevestigingsschroeven en doppen goed zijn gemonteerd. 4.
Montage Montage van de schoorsteenafschermstukken VERWONDINGSGEVAAR De binnenzijden van de schoorsteenafschermstukken kunnen scherpe randen hebben. Wij raden u aan bij de montage werkhandschoenen te dragen. 1. De schoorsteenafschermstukken losmaken. Daartoe het plakband verwijderen. 2. De beschermfolie van beide schoorsteenafschermstukken trekken. 3. De schoorsteenafschermstukken in elkaar schuiven. 4. Schoorsteenafschermstukken op de afzuigkap plaatsen.
Indice Informazioni generali .......................................................................................... 64 Avvertenze sulla tutela dell’ambiente .................................................................................................... 64 Al primo uso ........................................................................................................................................................... 64 Avvertenze di sicurezza .............................................
Informazioni generali AVVERTENZE SULLA TUTELA DELL'AMBIENTE Smaltimento dell'imballaggio di trasporto L'imballaggio ha protetto il vostro nuovo apparecchio nel trasporto fino a voi. Tutti i materiali impiegati sono compatibili con l'ambiente e riciclabili. Preghiamo di collaborare smaltendo l'imballaggio in modo ecologico. Le parti dell'imballaggio possono essere pericolose per i bambini. Custodire perciò queste parti fuori della portata dei bambini.
Avvertenze di sicurezza Uso regolare Questa cappa aspirante è conforme alle prescritte norme di sicurezza. Un uso incompetente può causare danni a persone o beni materiali. Impiegare la cappa aspirante esclusivamente per l'uso domestico. Il costruttore non risponde dei danni causati da impiego improprio o da uso errato. Il costruttore non può essere chiamato a rispondere di danni , che siano da attribuire all'inosservanza delle avvertenze di sicurezza.
Avvertenze di sicurezza Un uso privo di pericolo è possibile se la depressione nell'ambiente d'installazione del focolare non supera 4 Pa (0,04 mbar). Questo si può ottenere se l'aria necessaria per la combustione può affluire attraverso aperture non chiudibili, ad es in porte, finestre, in collegamento con una cassetta murale di alimentazione/scarico dell'aria oppure mediante altre soluzioni tecniche.
Avvertenze di sicurezza Uso appropriato Montaggio appropriato Alla prima messa in funzione pulire con Osservare le istruzioni del costruttore dell'apparecchio di cottura, con riferimento alla possibilità di usare una cappa aspirante sovrapposta. cura la cappa aspirante. Prima di ogni pulizia e manutenzione togliere tensione alla cappa aspirante estraendo la spina di alimentazione oppure disinserendo il dispositivo di sicurezza.
Modi di funzionamento La cappa aspirante può essere usata in funzionamento ad espulsione d'aria ed a ricircolo d'aria. Funzionamento ad espulsione d'aria Dimensioni dell'apparecchio ad espulsione d'aria min. 126 min. 580 max 1.030 L'aria aspirata viene depurata dai filtri per grassi e scaricata all'aperto tramite un sistema di tubi. Funzionamento a ricircolo d'aria min. min. 450 400 Dimensioni dell'apparecchio a ricircolo d'aria min. 126 min. 580 max 1.
Uso La descrizione dell'uso è valida per molti modelli dell'apparecchio. È possibile che siano descritti alcuni particolari di dotazione, che non riguardano questo apparecchio. 0 1 Luce 2 NOTA: è consigliabile accendere il ventilatore all'inizio della cottura e spegnerlo solo alcuni minuti dopo la fine della cottura. I vapori di cottura vengono così eliminati nel modo più efficace. Acendere il ventilatore e regolare i gradi di potenza 3 Premere il pulsante 1.
Pulizia e cura AVVERTENZA SULLA CURA DELL'APPARECCHIO Filtri per grassi metallici Idonei prodotti per la pulizia e la cura dell'apparecchio possono essere acquistati tramite la linea verde oppure l'Online-Shop (vedi copertina). I filtri per grassi metallici trattengono i grassi dei vapori di cucina. Superfici dell'apparecchio PERICOLO D'INCENDIO NOTA: osservare le norme di garanzia nell'accluso opuscolo del servizio assistenza.
Smontaggio e montaggio dei filtri per grassi Prima di smontare e montare i filtri per grassi osservare assolutamente le istruzioni ed avvertenze nel capitolo "Avvertenze di sicurezza"! Smontaggio e montaggio dei filtri per grassi 1. Aprire il fermo ed abbassare i filtri per grassi. Ciò facendo, con la mano libera sostenere sotto i filtri per grassi. I filtri a carbone attivo fissano gli odori nel funzionamento a ricircolo d'aria. Montaggio e smontaggio dei filtri a carbone attivo 1.
Sostituzione delle lampade Prima di sostituire le lampade osservare assolutamente le istruzioni ed avvertenze nel capitolo "Avvertenze di sicurezza"! La descrizione della sostituzione lampade è valida per molti modelli dell'apparecchio. NOTA: osservare le norme di garanzia nell'accluso opuscolo del servizio assistenza. Sostituzione delle lampade alogene Le lampade alogene si surriscaldano durante il funzionamento.
Istruzioni per il montaggio Prima del montaggio, osservare assolutamente le istruzioni ed avvertenze nel capitolo "Avvertenze di sicurezza"! Il diametro dei tubi di scarico non dovrebbe essere inferiore a 150 mm. Funzionamento ad espulsione d'aria Tubi tondi: L'aria di espulsione viene inviata verso l'alto all'esterno attraverso un pozzo di ventilazione, oppure direttamente all'aperto attraverso un muro esterno.
Istruzioni per il montaggio ALLACCIAMENTO ELETTRICO Prima dell'allacciamento elettrico, osservare assolutamente le istruzioni ed avvertenze nel capitolo "Avvertenze di sicurezza"! In caso di necessità del collegamento fisso La cappa aspirante deve essere allacciata solo da un elettricista qualificato, che conosca le norme della competente azienda di fornitura dell'energia elettrica. Sul lato impianto deve essere previsto un dispositivo di separazione.
Montaggio La cappa aspirante è prevista per il montaggio a muro. Nell'installazione prestare anche attenzione ad eventuali accessori speciali da montare.
Montaggio Sospensione e livellamento 1. Staccare il film protettivo della cappa aspirante prima dietro e, dopo il montaggio, completamente. 2. Appendere la cappa aspirante in modo che dietro s'innesti saldamente nelle sospensioni. Ⓐ. 3. Portare la cappa aspirante in posizione orizzontale ruotando le sospensioni. Se necessario la cappa aspirante può essere spostata verso destra o sinistra Ⓑ.
Montaggio Montaggio dei rivestimenti del camino PERICOLO DI LESIONI Il lato interno dei rivestimenti del camino possono presentare spigoli vivi. Per il montaggio consigliamo di indossare guanti protettivi. 1. Separare i rivestimenti del camino. A tal fine staccare il nastro adesivo. 2. Staccare il film protettivo sui due rivestimenti del camino. 3. Inserire un rivestimenti del camino nell'altro. 4.
Contenido Observaciones de carácter general .................................................................. 79 Advertencias relativas a la protección del medio ambiente .................................................... 79 Antes de la puesta en marcha inicial del aparato ........................................................................... 79 Advertencias de seguridad ................................................................................ 80 Uso correcto del aparato .............
Observaciones de carácter general ADVERTENCIAS RELATIVAS A LA PROTECCIÓN DEL MEDIO AMBIENTE ANTES DE LA PUESTA EN MARCHA INICIAL DEL APARATO Eliminación de embalajes ADVERTENCIA. Las presentes instrucciones de servicio son válidas para diferentes modelos de aparato; por ello puede ser posible que se describan detalles y características de equipamiento que no concuerden íntegramente con las de su aparato concreto.
Advertencias de seguridad Uso correcto del aparato Esta campana extractora cumple las normas y disposiciones específicas en materia de seguridad. El uso erróneo o incorrecto del aparato puede ocasionar daños en personas y objetos. La presente campana extractora deberá usarse única y exclusivamente para eliminar los humos y vahos procedentes de la preparación de alimentos en el ámbito doméstico.
Advertencias de seguridad Un funcionamiento sin peligro es posible si en el local de emplazamiento del hogar no se sobrepasa la depresión admisible de 4 Pa (0,04 mbares). Esto se puede lograr a través del libre acceso del aire de combustión a través de unas aberturas sin posibilidad de cierre ni bloqueo, por ejemplo puertas, ventanas, cajas murales para alimentación y evacuación de aire u otras medidas técnicas.
Advertencias de seguridad Uso correcto del aparato Limpie el aparato a fondo antes de su puesta en marcha inicial. Antes de iniciar los trabajos de limpieza o cuidado y mantenimiento, desconectar la campana extractora de la red eléctrica, extrayendo para ello el enchufe del aparato de la toma de corriente o desactivando el fusible de la caja de fusibles de la vivienda. Las lámparas, en especial las halógenas, alcanzan durante su funcionamiento unas elevadas temperaturas.
Modalidades de funcionamiento La campana puede funcionar con evacuación del aire al exterior o al interior (recirculación del aire) Evacuación del aire al exterior Cotas del aparato Evacuación del aire al exterior min. 126 min.580 580 mín. max 1.030 1.030 máx. El ventilador que incorpora la campana extractora aspira los vahos de la cocina y los evacúa hacia el exterior, haciéndolos pasar previamente a través del filtro antigrasa y los tubos de conducción.
Manejo Las presentes instrucciones de uso son válidas para diferentes modelos de aparato; por ello puede ser posible que se describan detalles y características de equipamiento que no concuerden íntegramente con las de su aparato concreto. 0 1 Conexión / Desconexión de la iluminación 2 ADVERTENCIA.
Limpieza y cuidados ADVERTENCIAS RELATIVAS AL CUIDADO DEL APARATO Los productos y agentes adecuados para la limpieza y el cuidado de su aparato los puede adquirir a través de la Línea telefónica de atención al cliente del fabricante o la tienda online. Superficies del aparato ADVERTENCIA. ¡Obsérvense las condiciones de garantía que figuran en el cuaderno de servicio adjunto! Las superficies del aparato, así como los elementos de mando, son sensibles a rasguños.
Desmontar y montar los filtros antigrasa metálicos Prestar atención a las advertencias e instrucciones que se facilitan en el capitulo «Advertencias de seguridad» antes de proceder al desmontaje y montaje de los filtros antigrasa metálicos. El filtro de carbón activo retiene los olores durante el funcionamiento de la campana extractora con evacuación del aire al interior (recirculación del aire). Desmontar y montar los filtros antigrasa metálicos Montar y desmontar el filtro de carbón activo 1.
Sustituir las lámparas Ténganse en cuenta las advertencias e instrucciones que se facilitan en el capítulo «Consejos y advertencias de seguridad» antes de proceder a la sustitución de las lámparas. La descripción de las operaciones de sustitución de las lámparas son válidas para diferentes modelos de aparato. ADVERTENCIA. ¡Obsérvense las condiciones de garantía que figuran en el cuaderno de servicio adjunto! Sustituir las bombillas 1. Alzar ligeramente el recubrimiento protector de la bombilla. 2.
Advertencias relativas al montaje ¡Ténganse en cuenta estrictamente las advertencias y consejos que se facilitan en el capítulo «Consejos y advertencias de seguridad» antes de proceder al montaje del aparato! Funcionamiento con evacuación del aire al exterior El aire de evacuación se transporta a través de un túnel de ventilación hacia arriba o directamente hacia el exterior, a través de la correspondiente pared. ADVERTENCIA.
Montaje CONEXIÓN ELÉCTRICA ¡Ténganse en cuenta estrictamente las advertencias y consejos que se facilitan en el capítulo «Consejos y advertencias de seguridad» antes de proceder a la conexión del aparato a la red eléctrica! El aparato sólo deberá ser conectado a la red eléctrica por un electricista cualificado, conocedor de las normas vigentes de la empresa local de abastecimiento de energía eléctrica.
Montaje La presente campana extractora ha sido diseñada para montaje mural. Al realizar el montaje, prestar atención a la posibilidad de que se necesiten accesorios opcionales. Prestar atención a la distancia mínima entre la campana extractora y las zonas de cocción (véase al respecto el capítulo «Consejos y advertencias de seguridad»).
Montaje Enganchar y nivelar la campana 1. Retirar la lámina protectora sólo de la parte posterior de la campana; una vez concluido el montaje de la campana, retirarla completamente de ésta. 2. Enganchar la campana en los soportes de tal modo que quede fijamente enclavada en los mismos por su parte posterior Ⓐ. 3. Nivelar la campana horizontalmente, girándola a tal efecto en los soportes de sujeción. En caso necesario, la campana también se puede desplazar hacia la derecha o izquierda Ⓑ.
Montaje Montaje del revestimiento decorativo PELIGRO DE LESIONES La cara interior de los elementos de revestimiento pueden bordes con rebabas (cortantes), resultantes del proceso de fabricación. Por ello se deberá efectuar el montaje utilizando guantes protectores. 1. Separar los elementos de revestimiento inferior, retirando a tal efecto la cinta adhesiva. 2. Retirar la lámina protectora de los dos módulos. 3. Deslizar los elementos de revestimiento uno dentro del otro. 4.
Ĺndice Informações gerais ............................................................................................... 94 Indicações sobre protecção do meio ambiente .............................................................................. 94 Antes da primeira utilização ......................................................................................................................... 94 Instruções sobre segurança ..........................................................................
Informações gerais INDICAÇÕES SOBRE PROTECÇÃO DO MEIO AMBIENTE Reciclagem da embalagem de transporte Até chegar a sua casa, o seu novo aparelho esteve protegido pela embalagem. Todos os materiais utilizados não prejudicam o meio ambiente e são reutilizáveis. Por favor, participe neste objectivo e proceda à reciclagem da embalagem sem prejudicar o ambiente. Os componentes da embalagem podem ser perigosas para as crianças. Por isso, mantenhaas fora do seu alcance.
Instruções sobre segurança Utilização de acordo com as normas Este exaustor corresponde às determinações sobre segurança prescritas. Uma utilização inadequada pode provocar danos a pessoas ou em objectos. O exaustor só pode ser utilizado, exclusivamente, para fins domésticos. O fabricante não é responsável por danos provocados por uma utilização inadequada ou errada. O fabricante não pode ser responsabilizado por danos provocados pelo desrespeito das indicações sobre segurança.
Instruções sobre segurança É possível o funcionamento sem perigo, se a depressão no local da instalação do aparelho de aquecimento não exceder 4 Pa (0,04 mbar). Isto pode ser conseguido se o ar necessário para a combustão puder ser reposto através de aberturas não fecháveis, p. ex. em portas, janelas, em ligação com uma caixa mural de admissão/exaustão de ar ou através de outras medidas técnicas.
Instruções sobre segurança Utilização correcta Montagem correcta Limpar cuidadosamente o exaustor, antes Respeitar as instruções do fabricante do aparelho de cozinhar e verificar, se é ou não possível o funcionamento do exaustor sobre o mesmo. da primeira colocação em funcionamento. Antes de qualquer limpeza ou manutenção, desligar o exaustor da corrente eléctrica, retirando a ficha da tomada ou desligando o dispositivo de segurança.
Tipos de funcionamento O exaustor pode funcionar com exaustão e com circulação de ar. Funcionamento com exaustão de ar Medidas do aparelho na função de exaustão de ar min. 126 min. 580 max 1.030 O ar aspirado é limpo na sua passagem pelo filtro de gordura e encaminhado para o exterior através dum sistema de tubagem. Funcionamento com circulação de ar min. min. 450 400 Medidas do aparelho na função de circulação de ar min. 126 min. 580 max 1.
Utilização A descrição da utilização aplica-se a vários modelos de aparelhos. É possível que sejam descritos alguns pormenores do equipamento que não se refiram ao seu aparelho. 0 1 Luz 2 INDICAÇÃO: É aconselhável que o ventilador seja ligado logo no início da cozedura e desligado só alguns minutos depois de cozedura ter terminado. Os vapores da cozinha só assim são eliminados eficazmente. Ligação do ventilador e regulação das fases de ventilação 3 Premir a tecla 1.
Limpeza e manutenção INDICAÇÃO SOBRE MANUTENÇÃO DO APARELHO Filtros metálicos de gordura Através da Hotline ou da loja Online podem ser adquiridos os produtos de limpeza e manutenção próprios para o seu aparelho. (ver a página dobrada). Os filtros metálicos de gordura aplicados absorvem as partículas de gordura existentes nos vapores da cozinha. As esteiras do filtro são formadas por metal não combustível.
Desmontagem e montagem dos filtros de gordura É indispensável seguir as informações e avisos no capítulo «Instruções sobre segurança», antes da desmontagem e montagem dos filtros de gordura. Os filtros de carvão activo agarram as substâncias de odores na função de circulação de ar. Desmontagem e montagem dos filtros metálicos de gordura Montar e desmontar os filtros de carvão activo 1. Abrir o bloqueio e retirar o filtro de gordura. Com a outra mão segurar o filtro de gordura por baixo. 1.
Substituição das lâmpadas É importante dar atenção às informações e avisos no capítulo «Instruções sobre segurança», antes da substituição das lâmpadas. A descrição sobre a substituição das lâmpadas aplica-se a vários modelos de aparelhos. INDICAÇÃO: Observar as condições de garantia na brochura sobre Service anexa. Substituição das lâmpadas de halogéneo As lâmpadas de halogéneo aquecem muito durante o funcionamento do aparelho.
Instruções de montagem Antes da montagem, deverá observar as instruções e os avisos no capítulo «Instruções sobre segurança»! Funcionamento por exaustão de ar O ar da exaustão é expelido para cima através dum tubo ou directamente para o exterior através da parede exterior. INDICAÇÃO: O ar da exaustão não pode ser encaminhado nem para uma chaminé de fumos ou de gases de exaustão, nem para um poço que sirva de ventilação de locais de instalação de aparelhos de aquecimento.
Instruções de montagem LIGAÇÃO ELÉCTRICA Se for necessária uma ligação fixa Antes da instalação eléctrica, devem ser sempre observadas as instruções e os avisos no capítulo «Instruções sobre segurança»! Deve ser previsto na instalação um dispositivo de corte. Como dispositivo de corte são válidos interruptores com uma abertura de contactos superior a 3 mm e corte de ligação multipolar. Deles fazem parte os interruptores LS, fusíveis e contactores.
Montagem O exaustor está preparado para montagem na parede. Na montagem, tomar também atenção a eventuais acessórios especiais a instalar.
Montagem Suspender e alinhar 1. Retirar a película de protecção do exaustor primeiro atrás e completamente, depois da montagem. 2. Suspender de exaustor, de modo que este encaixe perfeitamente atrás, nos dispositivos de suspensão Ⓐ. 3. Alinhar horizontalmente o exaustor, rodando os dispositivos de suspensão. Se necessário, o exaustor pode ser deslocado para a direita ou para a esquerda Ⓑ.
Montagem Montagem dos tubos decorativos da chaminé PERIGO DE FERIMENTOS 4. Assentar os tubos decorativos sobre o exaustor, deslocar o tubo decorativo interior para cima e pendurá-lo à esquerda e à direita, no ângulo de fixação. As partes interiores dos tubos decorativos da chaminé podem ter arestas aguçadas. Recomendamos o uso de luvas durante a montagem. 1. Separar os tubos decorativos. Para isso retirar a fita adesiva. 2. Retirar a película de protecção de ambos os tubos. 3.
Sonderzubehör LZ52250 236 669419 LZ52350 321 669659 LZ52450 281 669648 Siemens-Info Line (Mo.-Fr.: 8.00-18.00 Uhr erreichbar) Für Produktinformationen sowie Anwendungs- und Bedienungsfragen: Tel.: 01805 213413 oder unter siemens-infoline@bshg.com 0,14 €/Min. aus dem Festnetz der T-Com, Mobil gegebenenfalls abweichend. Nur für Deutschland gültig! Online-Shop: www.siemens-eshop.com 9000 357877 Printed in Germany 1008 Es.