
Operating instructions


14
Installation
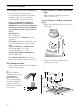
This extractor hood is intended to be
mounted onto the kitchen wall.
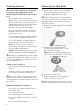
1. Remove the grease filter
(refer to Operating Instructions).
2. Draw a line on the wall from the ceiling
to the lower edge of the hood at the
centre of the location where the hood is
going to be mounted.
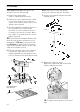
3. Use the template to mark the points on
the wall where the screws will be
mounted. In order to make it easier to
hook the hood onto the screws, draw
the outline of the area where the hood
will be attached.
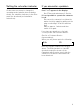
Ensure that the minimum distance bet-
ween the hob and the extractor hood is
maintained – 550 mm for an electric hob
and 650 mm for a gas hob. The bottom
edge of the template equates to the lower
edge of the extractor hood.
4. Drill 4 x l 8 mm holes for the extractor
hood and 2 x l 8 mm holes for the
chimney panelling. Insert plugs into the
holes so that they are flush with the wall.
Note: Take into account any special
accessories that are going to be fitted.
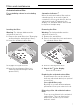
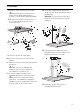
5. Screw on the upper and the two lower
fixing brackets.
23
172
455
68
150
mind.550 Elektro
mind.650 Gas
216
6. Attach the extractor hood.
Adjust the height and align horizontally
with the adjusting screws.
The glass screen must not touch the
wall.