Siemens Electric Range with threeD Surround Convection® Use and Care Manual Models: HE2425(U,C), HE2528U Please read instructions before using. Important: Save these instructions.
Table of Contents About This Manual . . . . . . . . . . . . . . . . . . . . . . . . . . . . . . . . . . . . . . . . . . . 1 How This Manual Is Organized . . . . . . . . . . . . . . . . . . . . . . . . . . . . . . . . . . . . . . . . . . . . . . . . . . . 1 Safety . . . . . . . . . . . . . . . . . . . . . . . . . . . . . . . . . . . . . . . . . . . . . . . . . . . . . 2 Important Safety Instructions . . . . . . . . . . . . . . . . . . . . . . . . . . . . . . . . . . . . . . . . . . . . . . . . . . . . .
About This Manual How This Manual Is Organized This manual contains several sections: • • • • The Overview section describes the features and functionality of the range, including a description of how to set up the range and operate the range’s control panel. The three Operations sections describe how to operate and get the best performance out of each range component: the cooktop, oven, and warming drawer. The Cleaning and Maintenance section describes how to clean and maintain your range.
Safety Safety Important Safety Instructions READ AND SAVE THESE INSTRUCTIONS Important Safety Instructions Fire Safety • Do not use aluminum foil or protective liners to line any part of an appliance, especially surface unit drip bowls or oven bottom. Installation of these liners may result in a risk of electric shock or fire. WARNING: NEVER cover any slots, holes or passages in the oven bottom or cover an entire rack with materials such as aluminum foil. Doing so blocks air flow through the oven.
Safety WARNING TO REDUCE THE RISK OF INJURY TO PERSONS IN THE EVENT OF A RANGE TOP GREASE FIRE, OBSERVE THE FOLLOWING: 1) SMOTHER FLAMES with a close-fitting lid, cookie sheet, or metal tray, then turn off the burner. BE CAREFUL TO PREVENT BURNS. If the flames do not go out immediately, EVACUATE AND CALL THE FIRE DEPARTMENT. 2) NEVER PICK UP A FLAMING PAN – You may be burned.
Safety • Do not touch interior surface of the drawer while it is in use. The interior of the drawer could become hot enough to cause burns. Allow drawer and rack (if equipped) to cool before handling. WARNING: To prevent burns, do not remove drawer while hot. Be sure drawer is empty before removing.
Safety • • different size. Proper relationship of cookware to heating element or burner will also improve efficiency. Cookware not approved for use with glass ceramic cooktops may break with sudden temperature changes. Use only pans that are appropriate for glass ceramic cooktops (only certain types of glass, heatproof glass, ceramic, earthenware, or other glazed utensils are suitable). See Cookware Selection Guide for further details.
Safety Food Safety CAUTION: To maintain food safety, follow these guidelines: 1) DO NOT use a warming drawer to heat cold food (exception: it is safe to use the drawer to crisp crackers, chips or dry cereal and to warm plates. 2) Be sure to maintain proper food temperature. The USDA recommends holding hot food at 140°F or warmer. 3) DO NOT warm food for longer than one hour.
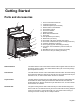
Getting Started Parts and Accessories 1 2 9 3 4 5 6 1. 2. 3. 4. 5. 6. 7. 8. 9. 10. 11. 12. 13. 14. 15. 16.
Getting Started Temperature Limiter Each radiant heating element has its own sensor to protect the glass cooking surface from extreme high temperatures. The limiters will operate automatically by cycling the element off regardless of the cook setting. Although cycling is normal, any one of the following conditions can activate the limiter and cause it to cycle on and off more than usual: • • • • The base of the pan is not making full contact with the heating surface (due to a warped or uneven base).
Getting Started Extension Oven Rack (some models) The Full Extension Rack allows for easier access to cooking foods. The bottom section extends as far as the standard flat rack. However, the top section extends beyond the bottom section bringing the food closer to the user. To order a full extension rack, contact Service or a dealer near you.
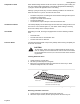
Getting Started Reassembly CAUTION: Always verify that top rack is installed correctly after reassembly. The back edges of the top rack must be under the rack guide on the bottom rack. DO NOT simply rest the top rack on top of the bottom one. 1. 2. 3. 4. To reassemble rack, hold top rack diagonally across bottom rack. Insert one side of top rack to closed position. Rotate the other side toward the back of the rack until it passes the stop (ball). Push top rack the rest of the way in (See Figure 3).
Getting Started Oven Bottom Do not place food directly on oven bottom. Do not use aluminum foil or protective liners to line any part of an appliance, especially surface unit drip bowls or oven bottom. Installation of these liners may result in a risk of electric shock or fire. Oven Vent The oven vent is located below the display above the rear left cooktop element. It is normal to see steam escaping from the vent and condensation may collect on the backguard and cooktop.
Getting Started Control (Panel) Oven Control Panel Clock Oven Temperature Light Control Knob Cooking Mode AM PM Time Temperature Off Start Preheat Temperature Cooking Mode Indicator Lock Indicator Figure 7: Oven Control Panel Table 1: Oven Control Panel Clock– Shows the time of day with a 12 or 24 hour option. Also displays the timer and times associated with delayed cooking and cleaning modes. Turn the control knob to toggle between timer and clock display.
Getting Started The Clock About the Clock • • • • • Setting the Clock Always set the clock after installation or after a power failure. Once power returns to the oven, the clock defaults to 12:00 am. The time of day is displayed in hours and minutes. The clock time will appear during all oven operations except when the timer is running. The oven is preset to a 12 hour clock and indicates AM and PM. To switch to a 24 hour clock, see "Select Function” section.
Getting Started Change the Temperature Scale The oven has been preset to the Fahrenheit temperature scale. The feature allows you to switch between Fahrenheit and Celsius temperature. 1. 2. 3. 4. 5. Turn Clock Display ON or OFF Access SELECT FUNCTIONS Menu. Turn knob clockwise until SELECT TEMP F-C is displayed. Press Start. Turn knob to select Fahrenheit (F) or Celsius (C). Press Start to accept new selection. Clock time display can be turned off. The default display is on. 1. 2. 3. 4. 5.
Getting Started Set the Sabbath Feature About the Sabbath Feature The Sabbath Feature enables those of particular faiths to use their ovens on the Sabbath. • • • • • • The oven will bake for 73 hours before automatically turning off. While baking in Sabbath mode, the display will show SABBATH and the BAKE icon will be displayed. The clock will be off and no temperature will show in the display. During the Sabbath mode, only the OFF key will operate.
Getting Started Setting the Sabbath Feature for the Warming Drawer Only The warming drawer does not operate with the Sabbath feature unless the feature is also activated in the oven. See “Setting the Sabbath Feature for both the Warming Drawer and the Oven.” on page 15. Change the Time Format The clock can be set to a 12 hour or 24 hour format. The default for clock format is 12 hour. 1. 2. 3. 4. 5. 0.0 Turn Automatic Convection Conversion ON or OFF Access SELECT FUNCTIONS Menu.
Operation - Cooktop This section explains how to operate the cooktop. See “Getting the Most Out of Your Cooktop” on page 25 for guidelines to improve cooktop results. About the Cooktop Use the cooktop for surface cooking applications such as boiling, frying, simmering, steaming and sauteing. Operation CAUTION • • • Foods packaged in aluminum foil should not be placed directly on the glass ceramic surface for cooking. Aluminum foil can melt and cause permanent damage.
Operation - Cooktop To turn ON both the inner and outer elements together, push in on the control knob and turn it clockwise to the desired setting. Inner Element Outer Element Element Location Figure 9: Dual Element Burner Knob Triple Element Control Knob To turn on the small inner element only, push in on the control knob and turn it to the symbol (counterclockwise). Turn knob left or right to set the heat level.
Operation - Oven This section explains how to operate the oven. See “Getting the Most Out of Your Oven” on page 27 for guidelines to improve oven results. About the Oven Operation CAUTION Do not use aluminum foil or protective liners to line any part of an appliance, especially surface unit drip bowls or oven bottom. Installation of these liners may result in a risk of electric shock or fire. Setting the Cooking Mode and Temperature Note: To back out of a current mode, press OFF.
Operation - Oven Using the Timer Notes: • • If you do not finish setting the timer, the oven will beep periodically as a reminder to set the time. Press OFF to exit the TIMER mode. (Selecting OFF when not setting the timer will turn the oven off.) Turn the knob to display the time of day or further information about the oven mode when the timers are in use. To set the timer: 1. Press TIME and TIMER 1 will flash in display. 0: 00 TIMER 1 Turn clockwise and TIMER 2 will be displayed.
Operation - Oven Note: Time required for the oven to reach temperature must be included in the set cooking time. 5. Press TIME. TIMED BAKE appears. 1: 20 350° F 6. Press TIME. SET BAKE TIME appears in the HR:MIN display and minutes flash. TIMED BAKE 7. Set minutes. Press TIME. 8. Hours Flash. Set hours. Press START. 9. TIMED BAKE appears in display and the oven begins to preheat. After cooking is complete, display flashes TIME COOK END and reminder beeps will sound. Press OFF to clear.
Operation - Oven Note: The probe temperature can only be set when the probe is installed in the oven. 3. Press COOKING MODE and select BAKE, CONVECTION BAKE or CONVECTION ROAST. 4. Press START. The default oven temperature will appear. 5. Turn knob to change oven temperature if necessary. 6. Touch START. 7. Turn knob to set the probe temperature (desired end temperature of the food). 8. Press START. The chosen oven temperature is displayed in the upper right hand corner of the display.
Operation - Warming Drawer This section explains how to operate the warming drawer. See “Getting the Most Out of Your Warming Drawer” on page 34 for guidelines to improve warming drawer results. About the Warming Drawer The warming drawer will keep hot, cooked foods at serving temperature. Warming drawer settings are Low, Medium, and High. Warming Drawer Specifications Parts Key: 1 2 3 1. Stainless Steel Drawer Interior 2. Gasket 3.
Operation - Warming Drawer • Plastic containers, plastic wrap or aluminum foil can melt if in direct contact with the drawer or a hot cooking container. If it melts onto the drawer, it may not be removable. Preheating For best results, preheat the warming drawer when warming food. Preheat Times: • • • Low: 10 minutes Medium: 15 minutes High: 20 minutes When Only Using the Warming Drawer 1. 2. 3. 4. 5. Press COOKING MODE. Turn knob to select WARMING DRAWER. Press START.
Getting the Most Out of Your Appliance Getting the Most Out of Your Cooktop Cooktop Cooking Guide Boiling Water Time to boil can vary greatly depending on environmental conditions. Try the following tips to decrease boil time: • • • • • • Recommended Settings Use a lid. Use a pan that is appropriately sized for the amount of water and the size of the element. Select a pan with a flat base (See “Cookware Selection Guide” on page 25 for details). Choose a medium-weight pan (rather than a heavy-weight one).
Getting the Most Out of Your Appliance on the surface without wobbling (rocking). Flat, medium-to-heavy-weight pans are best. To Test the Flatness of Your Pans Turn the pan upside down on the countertop and place a ruler flat against the bottom of the pan. The bottom of the pan and the straight edge of the ruler should be flush against each other. Another simple test to determine even heat distribution across the cookware bottom is to place 1” (25.4 mm) of water in the pan.
Getting the Most Out of Your Appliance Getting the Most Out of Your Oven Oven Cooking Guide Rack Position • • • • 6 5 4 3 2 1 • • RACK POSITION 6 (highest position) – melting cheese, broiling thin foods RACK POSITION 5 – broiling most meats, toasting bread RACK POSITION 4 – broiling thicker meats RACK POSITION 3 – most baked goods when baking on one rack, such as on cookie sheet or baking pan, cakes, frozen foods, biscuits, brownies, muffins RACK POSITION 2 – Used for pies, casseroles, breads, bundt or
Getting the Most Out of Your Appliance Note: Preheating the oven is not recommended when using the probe (some models). A hot oven will impair your ability to easily connect the probe to the receptacle and to insert it into the meat. The Probe (some models) • • • • • The oven is well insulated and the retained heat will continue to cook the meat after the oven has shut off. For this reason, remove the meat from the oven as soon as the control beeps.
Getting the Most Out of Your Appliance CAUTION When using Warm mode, follow these guidelines: •Do not use the Warm Mode to heat cold food. •Be sure to maintain proper food temperature. The USDA recommends holding hot food at 140°F or warmer. •DO NOT warm food for longer than one hour. Convection Bake Convection baking is similar to baking. Heat comes from the lower heating element and a third element behind the backwall.
Getting the Most Out of Your Appliance Table 3: Convection Baking Chart Food Temp. (oF) (preheated oven)a Rack Position Item Convection Bake Time (min.)b Breads Yeast bread, loaf, 9x5 Yeast rolls Quick bread, loaf, 8x4 Biscuits Muffins 2 3 2 3 3 375 375-400 350-375 375-400 425 18-22 12-15 45-55 11-15 15-19 Pizza Frozen Fresh 3 3 400-450 425-450 23-26 12-15 a. This temperature must be manually reduced by 25° F if the Automatic Convection Conversion feature has been turned off. b.
Getting the Most Out of Your Appliance Table 4: Broiling Chart Food Rack Position Item / Thickness Broil Setting Internal Temp. (oF) Time Side 1 (min.)a Time Side 2 (min.)a Seafood Fish filets (3/4”-1”) buttered 5 low Cook until opaque and flakes easily 9-11 Do Not Turn Lamb Chops (1”) Medium rare Medium Well 5 5 5 high high high 145 160 170 4-6 5-7 6-8 2-4 4-6 5-7 Garlic bread slices (1”) 5 high N/A 2-4 Do Not Turn Bread a.
Getting the Most Out of Your Appliance Convection Roast Convection Roast uses heat from the top and bottom elements as well as heat circulated by the convection fan. The Convection Roast mode is well suited to preparing tender cuts of meat and poultry. The benefits of Convection Roasting, include: • • As much as 25% faster cooking than standard Roasting/ Baking Rich, golden browning For Best Results: • • • • • • • Use the same temperature as indicated in the recipe.
Getting the Most Out of Your Appliance Dehydrate (some models) The dehydrate mode dries with heat from a third element behind the back wall of the oven. The heat is circulated throughout the oven by the convection fan. Use dehydrate to dry and/or preserve foods such as fruits, vegetables and herbs. This mode holds an optimum low temperature (100° F - 160° F) while circulating the heated air to slowly remove moisture. The oven will stay on for 48 hours before shutting off automatically.
Getting the Most Out of Your Appliance Getting the Most Out of Your Warming Drawer General Tips Refer to the Warming Drawer Chart for recommended settings. • • • • • • • To keep several different foods hot, set the temperature for the food needing the highest setting. Place items needing the highest setting toward the side of the drawer and items needing less heat in the center of the drawer. Food should be at serving temperature (above 140° F) before being placed in the warming drawer.
Cleaning and Maintenance Care and Cleaning Care and Cleaning the Cooktop Precautions for Long Life and Good Appearance of the Surface CAUTION Do not use any cleaner on the glass while the surface is hot; use only the razor blade scraper. The resulting fumes can be hazardous to your health. Heated cleaner can chemically attack and damage surface. • • • • • • • Regular, daily care using the glass ceramic cooktop cleaner will protect the surface and make it easier to remove food soil and water spots.
Cleaning and Maintenance Do Not Use the Following Cleaners • • • • • • • • Glass cleaners which contain ammonia or chlorine bleach. These ingredients may permanently etch or stain the cooktop. Caustic Cleaners Oven cleaners such as Easy Off® may etch the cooktop surface. Abrasive Cleaners Metal scouring pads and scrub sponges such as Scotch Brite® can scratch and/ or leave metal marks. Soap-filled scouring pads such as SOS® can scratch the surface.
Cleaning and Maintenance • • • • • • Preparing the Oven for Self Clean During Self-Clean, the kitchen should be well ventilated to help eliminate odors associated with Self-Clean. Odors will lessen with use. Four hours is the preset length of cleaning. The range can also be set to clean for 3 or 5 hours. The mode automatically stops at the end of the clean hours. When the oven cools after cleaning, the automatic door lock will release and the door can be opened.
Cleaning and Maintenance 5. REMOVE RACKS appears in the display as a reminder to remove oven racks. 6. Press START again to begin the selfclean. SELF CLEAN 4: 00 REMOVE RACKS Note: The door locks at the beginning of the cycle; The door lock symbol will appear in the display at this point. If door does not lock, press OFF and do not self-clean; phone service. Delaying the Start of the Self-Clean Note: The time of day must be correctly set for this option to work properly.
Cleaning and Maintenance Cleaning Guide Table 10: Cleaning Guide Part Recommendations Racks Wash with hot sudsy water. Rinse thoroughly and dry, or gently rub with cleansing powder or soap filled pads as directed. If racks are cleaned in the oven during the self-clean mode, they will lose their shiny finish and may not glide smoothly. If this happens, wipe the rack edges with a small amount of vegetable oil, then wipe off excess. Fiberglass Gasket DO NOT HAND CLEAN GASKET.
Cleaning and Maintenance 3. Flip lever on hinge toward you. Figure 17: Hinge Positions 4. Close the door to approximately halfway open. 5. Holding the door firmly on both sides using both hands, pull the door straight out of the hinge slots. Hold firmly, the door is heavy. 6. Place the door in a convenient and stable location for cleaning. Replacing the Oven Door 1. Holding the door firmly in both hands, place hinges in hinge slots. 2. Open door all the way to expose hinges and slots.
Service Self Help The Cooktop Use these suggestions before calling for service to avoid service charges. Table 11: Cooktop Troubleshooting Chart Cooktop Problem Possible Causes and Suggested Solutions Element cycles more than usual Pan base is warped and not making full contact with heating surface. Base diameter of pan is too small for the size of the element. Pan ingredients have boiled dry.
Service Table 12: Oven Troubleshooting Chart Oven Problem Possible Causes and Suggested Solutions Baking results are not as expected Refer to cooking charts for recommended rack position. Check “Getting the Most Out of Your Oven” on page 27 for tips and suggestions. Adjust oven calibration if necessary (see “Change the Oven Temperature Offset” on page 14). Food takes longer to cook than expected The oven is carefully calibrated to provide accurate results.
Service Warranty What this Warranty Covers & Who it Applies to: The limited warranty provided by BSH Home Appliances (“Siemens”) in this Statement of Limited Product Warranty applies only to the Siemens freestanding and slide-in range, ("Product") sold to you, the first using purchaser, provided that the Product was purchased: (1) for your normal, household (non-commercial) use, and has in fact at all times only been used for normal household purposes; (2) new at retail (not a display, "as is", or previou
Service (6) ordinary wear and tear, spills of food, liquid, grease accumulations, or other substances that accumulate on, in, or around the Product; and (7) any external, elemental and/or environmental forces and factors, including without limitation, rain, wind, sand, floods, fires, mud slides, freezing temperatures, excessive moisture or extended exposure to humidity, lightning, power surges, structural failures surrounding the appliance, and acts of God.
s 5551 McFadden Avenue, Huntington Beach, CA 92649 • 866-447-4363 • www.siemens-home.