
Configuration Instructions


Hardware specific configuration
Dig. audio matrix board Cerberus PACE Compact
7
A6V10429097_en--_e
141 | 219
7.2.2 'Amplifiers'
In the 'Amplifiers' area you can specify the connected amplifiers.
'Speaker Lines Rated Power'
Displays the sum of the power (consumption) of all speaker lines connected to this
amplifier.
'Installed Amplifier'
Configure the type of amplifier, connected to the analog audio output of the device.
For example, 'PV1001 1x200 – Channel A'.
'Installed Amplifier Power'
Depending on the installed amplifier, it will display the nominal power of the
amplifier.
'Current State'
See the fault state of a connected amplifier. 'ok' means the amplifier is operational.
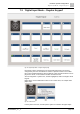
7.2.3 Cerberus PACE Compact: 'Detect Routing'
In contrast to 'Digital audio matrix (4/4/16)' PC2003, the Cerberus PACE Compact
includes a jumper matrix board instead of an output relay matrix. These jumpers
need to be set to adjust the internal routing. Afterwards, the jumpers need to be
read in using the tool PACE-Design.
For this purpose, press the button 'Jumper detection' to start the detection. The
text '<CS16_Jumper_Detection>' in the Caption Bar is displayed during the
detection (about 20 s).
After the detection, press 'Show detected routing' to switch between the
configured (e.g. '1' in the Amp column) and the read in (e.g. '[1]' in the Amp
column). The 'Accept' button is only enabled in case of changes between the
detected and the configured routing information. Press this button to accept the
detected routing configuration or manually re-adjust the jumpers according to your
configuration requirements respectively. Repeat the 'start the detection' step and
press the 'Accept' button if necessary to save the internal routing settings.
Fig. 91: Detect routing