Smart Thermostat RDS120-B User Guide A6V11727414 06/20/2019 Smart infrastructure
Table of Contents 1 About this User guide .................................................................................. 5 1.1 Reference documents ..................................................................................................... 5 1.2 Before starting ................................................................................................................... 5 2 Getting started with the thermostat .......................................................... 7 2.
7.8 Switching between Away and At home .................................................................. 32 7.9 Setting schedules ............................................................................................................ 32 7.10 Switching between Heating and Cooling ............................................................... 33 8 Appendices .................................................................................................. 34 8.1 Frequently asked questions ......
About this User guide Reference documents 1 1 About this User guide 1.1 Reference documents Document title Document Smart Thermostat RDS120-B Mounting Instructions A6V11727380 Smart Thermostat RDS120-B Quick Guide A6V11727429 Smart Thermostat RDS120-B Technical Instructions A6V11727385 Smart Thermostat RDS120-B Commissioning Guide A6V11727391 Smart Thermostat RDS120-B Submittal Sheet A6V11727426 1.
1 About this User guide Before starting ⊳ Specifies the requirements that must be met before performing this procedure. 1. 2. Procedures must be performed in the specified order. [➙ X] Reference to a page number > Relation sign and for identification between steps in a sequence, e.g., Menu bar >Help > Help topics. Symbol identifications WARNING This is the symbol for hazard. It warns of Risks of personal injury. Comply with all measures designated by this symbol to prevent injury or death.
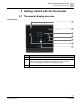
Getting started with the thermostat Thermostat display overview 2 2 Getting started with the thermostat 2.1 Thermostat display overview Normal display Siemens Industry, Inc. Smart Infrastructure Icon Description 1 Tap to display detailed information and additional settings. 2 Displays whether the system is in an energy-optimized mode. If the leaf is red, predefined settings were changed. Tap the red leaf to restore the energy-saving mode. The leaf turns green. 3 Room temperature.
2 Getting started with the thermostat Thermostat display overview Icon Description 4 Tap to toggle between At home and AWAY. 5 Displays whether the thermostat is following a schedule ( ) or following the setpoint changes permanently ( ). Following a schedule can mean the following: ● If there is network connection and the schedule has been set, the thermostat follows the schedule. The temporary change of the temperature setpoint is effective only during the currently scheduled mode.
Getting started with the thermostat Home screen icon overview 2 Icon Description 1 Measured relative humidity 2 Shows room air quality: ● If the icon is green, the air quality is good. ● If the icon is orange, the air quality is average. ● If the icon is red, the air quality is poor. In order to ensure that the room air quality is measured accurately when the room is closed for a long time, it is recommended to force air circulation such as opening a window.
2 Getting started with the thermostat Home screen icon overview Icon Description Temperature setpoint slider. Icon color changes as setpoint is changed: ● Slider changes to orange when setpoint is moved to a point that is higher than the current room temperature and the system enters heating mode to warm up the room. ● Slider changes to blue when setpoint is moved to a point that is lower than the current room temperature and the system enters cooling mode to cool down the room.
Presence detection Presence detection using the built-in PIR sensor 3 3 Presence detection 3.1 Presence detection using the built-in PIR sensor By using a built-in presence detection sensor (also called PIR (Passive infrared detector) sensor), the thermostat detects occupancy and then does the following: ● Activates idle display. When no operations are performed, the thermostat detects presence in room.
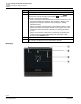
3 Presence detection Approach detection Sensor detection range A The width of each cell. It is 80 cm (31 in). B The thermostat. C The height of each cell. It is 80 cm (31 in). D The area that the PIR sensor can detect. Change from Unoccupied to Comfort when an unoccupied room becomes occupied 1. On the Home screen, tap , tap and then tap . 2. If prompted, enter the administrator password. 3. Tap , tap , and then tap . Scroll down and tap Room presence detector. 4.
Presence detection Approach detection 3 Sensor position 1 Siemens Industry, Inc. Smart Infrastructure The location of the approach sensor.
4 Operating the thermostat from the thermostat main unit Temperature control 4 Operating the thermostat from the thermostat main unit 4.1 Temperature control The thermostat acquires the room temperature using the built-in sensor and/or the external room temperature sensor and maintains the setpoint by delivering control commands to heating and/or cooling equipment.
Operating the thermostat from the thermostat main unit Operating modes 4 4.2 Operating modes 4.2.1 Operating modes overview Operating mode Description At home This mode lets the thermostat know the space is now occupied. Within this mode, you can choose where the thermostat follows a schedule, or toggle to and have the thermostat operate at a specified setpoint indefinitely. See Thermostat display overview [➙ 7] for more detailed information about how the thermostat operates in or .
4 Operating the thermostat from the thermostat main unit Operating modes 3. Tap , tap , and then tap Off/protection configuration. 4. Tap either OFF or Protection. To switch between At home and AWAY modes ● From the Home screen, tap ● Tap to switch from At home to AWAY. to switch from AWAY to At home. To change the default AUTO mode 1. From the Home screen, tap . 2. On the Operation Mode page, tap either HEAT ( ), COOL ( ) or OFF.
Operating the thermostat from the thermostat main unit WLAN connection 4 4.3 WLAN connection Connecting to a WLAN network allows the thermostat to be connected to the cloud server and be controlled from a smartphone. Depending on how thermostat internet connection is set up, go to Advanced Settings or Settings to manage the WLAN connection: ● If Private WLAN (home use) is selected, go to Settings. ● If Administrated WLAN * (commercial use) is selected, go to Advanced Settings. To connect to a network 1.
4 Operating the thermostat from the thermostat main unit Screen lock protection To configure current network settings 1. If the thermostat is selected for commercial application: – On the Advanced Settings page, tap network displays on the screen. and then tap . The current 2. If the thermostat is selected for residential application: – On the Settings page, tap displays on the screen. and then tap . The current network 3. Tap Network Settings.
Operating the thermostat from the thermostat main unit Screen lock protection 4 To create a screen lock code 1. From the Home screen, tap , then tap . 2. Tap , tap and then tap Activate. Enter a code consisting of six numbers, and then tap OK. 3. Tap OK again to confirm. To unlock the home screen ● ● On the Home screen, enter the screen lock code directly and then tap OK. If an administration password has been set, tap the question mark on the screen, and then tap Log in as administrator.
4 Operating the thermostat from the thermostat main unit Fan control If the thermostat is selected for residential application, options related to WLAN connection is accessible from Settings instead of Advanced Settings. To create/activate administrator password under Advanced Settings 1. From the Home screen, tap displays. , and then tap . The Advanced Settings page 2. Tap , tap Password and then Activate. 3. View the password policy on the screen, and then tap . 4.
Operating the thermostat from the thermostat main unit Changing the display language 4 4.7 Changing the display language To change the display language 1. On the Settings page, tap and then tap 2. Tap the desired language. If necessary, tap . to scroll to the desired selection. 4.8 Naming a room A unique name can be assigned to each room that the thermostat is installed. Doing so helps identification of the room when remotely controlling the thermostat. To name a room 1.
4 Operating the thermostat from the thermostat main unit Software updates To check the basic information about the thermostat 1. From the Home screen, tap , tap and then tap . 2. If prompted, enter the administrator password. 3. Tap and then tap . Detailed information about the thermostat displays. 4.11 Software updates The thermostat receives updates to get the latest functionality, enhancements and bug fixes to ensure optimal performance.
Green leaf 5 5 Green leaf The Green leaf indicates that the system has an energy-optimized operation: ● Use Green Leaf default setpoints for heating and cooling. ● Run system automatically based on a schedule. ● Operate fan in AUTO mode if the thermostat controls external fan equipment. ● Switch to follow a schedule with presets defined under Advanced Settings > Optimization. If the thermostat detects one of the following, the leaf icon turns to red.
6 Air quality control 6 Air quality control With its built-in and/or external VOC (Volatile Organic Compounds) sensor, the thermostat measures the room air quality and shows the air quality status symbol on the local idle screen. In the mobile app, the status is indicated by text. If no external VOC sensor is connected or if the input value of the external sensor is invalid, only the built-in sensor is used to provide values for the thermostat.
Operating the thermostat from the mobile app Downloading the app 7 7 Operating the thermostat from the mobile app 7.1 Downloading the app To control the thermostat remotely, download the Siemens Smart Thermostat RDS app from Google Play or App Store. To download the app 1. Open Google Play or App Store, and then search for Siemens Smart Thermostat RDS. 2. In the searched result page, tap the item to view its details, then follow the instructions to complete the installation. 7.
7 Operating the thermostat from the mobile app Changing background color After initial power-up of the thermostat and after initial system configuration, tap to create an account and associate mobile app. See the Smart Thermostat RDS120-B Quick Guide (P/N A6V11727429) for more detailed information. After reconfiguration of the thermostat, log out and return to the app before changes take effect. To manage the account information in the app 1. In the app, tap and then tap Account. 2.
Operating the thermostat from the mobile app Widget overview Managing thermostat details 7 To change a room name 1. Tap and then tap Devices. 2. Select the desired device. 3. Tap the Room field. Enter the new room name. To delete a thermostat 1. Tap and then tap Devices. 2. Select the thermostat to be deleted. 3. Tap Remove Device and then tap Yes. 7.
7 Operating the thermostat from the mobile app Widget overview 7.5.1 28 | 40 Siemens Industry, Inc. Smart Infrastructure Temperature control widget overview 1 Options menu 2 Room name 3 Advanced settings. 4 Room humidity, outside air temperature and air quality display. 5 Indicates if the system is running in an energy-saving mode. If not, the leaf icon turns red. Touch the red leaf to switch back to energy-optimized operation.
Operating the thermostat from the mobile app Widget overview 7 7 Displays the current room temperature. 8 Temperature setpoint slider. Drag the setpoint circle to the right to increase the setpoint and to the left to decrease the setpoint. The value in the circle changes accordingly. 9 Tap to decrease or increase the temperature setpoint. 10 Displays the current scheduled operating mode. Display is active only when the icon is on the same screen.
7 Operating the thermostat from the mobile app Widget overview 7.5.2 7.5.3 30 | 40 Siemens Industry, Inc. Smart Infrastructure Fan widget overview 1 Toggle to switch between the automatic mode or ON mode. For more information about how the fan works, see Fan control [➙ 20]. 2 Display only. Indicates whether the fan is the automatic mode or ON mode.
Operating the thermostat from the mobile app Temperature control 1 Seven-day view by default, showing the heating and/or cooling running hours of each week day counting down from the current day. 2 Tap to switch to the four-week view. 3 Tap to switch to the 12-month view. 4 Indication of heating and/or cooling running hours: Orange bars are for heating while blue bars for cooling. 5 The current day/month 6 The current month/year 7 7.
7 Operating the thermostat from the mobile app Fan control The temperature value can be in ℃ or ℉. You can change the temperature unit under Account. NOTE: For more information about schedules, see Setting schedules [➙ 32]. To adjust the temperature setpoint Do one of the following. Note that the first two options are to adjust the temperature setpoint temporally within the current scheduled mode, while the last option is to adjust the default setpoints.
Operating the thermostat from the mobile app Switching between Heating and Cooling 7 To initiate schedule operation ● From the Home screen of either the thermostat or the mobile app, tap is not displayed on the screen. if To set time periods for different operating modes 1. On the temperature control widget screen, tap schedule. and then tap Thermostat 2. Select which day of the week to set schedules for. By default, the system uses the current day. 3.
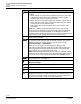
8 Appendices Frequently asked questions 8 Appendices 8.1 Frequently asked questions 8.1.1 What should I do if I forget the screen lock code? Try using the administrator password to unlock the screen. To unlock the screen using the administrator password 1. On the thermostat screen indicating that the screen lock code is incorrect, tap the question mark and then tap Login. 2. Input the administrator password, and then tap OK. 8.1.
Appendices Frequently asked questions 3. Tap , tap , and then tap 8 . Scroll down and tap Room presence detector. 4. Drag the slider to the left. 8.1.5 What is the difference between Administrated WLAN and Private WLAN? Administrated WLAN * is supposed to connect to an infrastructure network managed by facility managers; Private WLAN fits for owner cases and is supposed to connect to a home network.
8 Appendices Frequently asked questions but will be synchronized with the server within 24 hours. Once the synchronization is done, the time will be displayed correctly again. ● If the thermostat doesn't have WLAN connection now, see more information in this section: Can the thermostat display the time correctly if there is no WLAN connection? [➙ 36] NOTE: To display the time correctly, it is important to set the time zone correctly. See Changing a time zone [➙ 21] for more information. 8.1.
Appendices Technical specifications 8.1.17 8 Can I create more than one user account in the mobile app? Yes, you can, but you cannot log into different accounts at the same time. Besides, it is normally unnecessary to do so if you want to manage more than one thermostat using the app, because one user account can associate with a maximum of 12 thermostats. However, one thermostat can only be associated with one user account.
8 Appendices Regulatory information 8.3 Regulatory information 8.3.1 ISED Regulations (Canada) This device complies with Industry Canada license-exempt RSS standard(s). Operation is subject to the following two conditions: (1) this device may not cause interference, and (2) this device must accept any interference, including interference that may cause undesired operation of the device. Le present appareil est conforme aux CNR d'Industrie Canada applicables aux appareils radio exempts de licence.
Appendices EULA 8 Statement This device complies with part 15 of the FCC Rules. Operation is subject to the following two conditions: (1) This device may not cause harmful interference, and (2) this device must accept any interference received, including interference that may cause undesired operation. 8.4 EULA The software included in this product is licensed for use subject to the Siemens end-user license agreement (EULA) posted at www.siemens.
Issued by Siemens Industry, Inc. Smart Infrastructure 1000 Deerfield Pkwy Buffalo Grove IL 60089 +1 847-215-1000 Document ID: A6V11727414 Edition: 06/20/2019 © Siemens Industry, Inc., 2019 Technical specifications and availability subject to change without notice.