
Operating Instructions

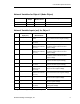
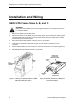
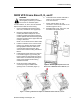
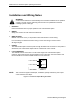
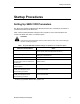
Table Of Contents
- Table of Contents
- Manual Organization
- Manual Notations
- Where To Send Comments
- Reference Documents
- General Description
- LON Interface Option Functionality
- Network Variable Types and Configuration Properties
- SED2 VFD Frame Sizes A, B, and C
- SED2 VFD Frame Sizes D, E, and F
- Installation and Wiring Notes
- Setting Up SED2 VFD Parameters
- Verifying Parameter Operations
- Setting up SED2 VFD LON Interface Option
- Status LED Functionality

SED2 VFD LON Interface Option Operating Instructions
Verifying Parameter Operations
After setting VFD parameters, perform the following steps to verify parameter operations using
the drive keypad:
Step Press Action
1
Displays r0000.
2
and
Enables scrolling to the appropriate parameter number.
3
Displays the value of the selected parameter.
4
and
Enables scrolling to the appropriate parameter value.
5
Confirms parameter value setting and enables scrolling to other
parameter numbers.
6
and then
Returns to the display readout when finished.
Setting up SED2 VFD LON Interface Option
NOTE: To make use of the drive’s functionality in the building automation system, the
Siemens Building Technologies representative is responsible for proper configuration
of the drive for its primary application as well as field programming.
1. Start the SED2 VFD by locally setting the keypad parameters per Table 1 in the Setting Up
SED2 VFD Parameters section.
NOTE: Some parameters may be broken down into Index Functions. These functions are
indicated by the letters “in” within the selected parameter.
For example, for parameter P2041, set in000 to 1 for L
ON control.
2. Install the appropriate file(s) for the network manager tool being used.
NOTES:
1. The device name is Sed2Vfd.
2. Set the start/stop and speed setpoint via nv2 (nviDrvSpeedStpt).
12 Siemens Building Technologies