
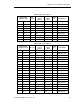
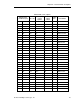
Technical data


SED2 Operation & Maintenance Manual
82 Siemens Building Technologies, Inc.
Slaving the Drive
CAUTION:
This strategy is not normally recommended because you are using the network
communications to close the loop. Delays due to network traffic can cause control to
be degraded or lost, and depending on the setup of the drive, if there is a problem
with the network, the drive may cause physical damage to the HVAC system by
winding up to its maximum or dropping off to its minimum speed.
Other Functionality
Enable any of the following functions during SED2 startup.
Enable the drive to run – RUN ENABLE (Point 35) commands the drive to disable or enable
operation. If commanded OFF, the drive will coast to a stop. If commanded ON, the drive can turn
on. This function is typically used for safety.
NOTE: RUN ENABLE (Point 35) commands the drive to enable or disable operation. READY
TO RUN (Point 28) indicates whether the drive is in the Ready or Off state. ENABLED
(Point 27) indicates whether drive operation is enabled. To run the motor from P1,
enable RUN ENABLE (Point 35), start CMD START (Point 24), and set the drive
CONTROL MODE (Point 26) to either the Local or Serial control mode.
Drive speed setting – FREQ REF (Point 51) can be set from 0 to 100 percent of the drive speed.
FREQ ACTUAL (Point 52) and FREQ MAX (Point 53) are settings that can be monitored.
Start and stop the drive – CMD STP.STRT (Point 24) commands the drive to start or stop
(1=START, 0=STOP). READY TO RUN (Point 28) shows the current status of the drive. STOP
RUN (Point 23) monitors the current running status of the motor (0=STOPPED, 1=RUNNING).
WDOGTIME – Sets the time interval in which P1 communication must take place between
WDOGTIME (Point 80) of the SED2 and the FLN. If no communication occurs during this time, a
WDOGTIME fault registers (F070). Watchdog set to 0 disables the watchdog.
Change drive directions – CMD FWD.REV (Point 22) commands the drive to change direction.
FWD.REV (Point 21) shows the current direction of the drive rotation.
CAUTION:
Changing drive directions while the controlled equipment is moving can damage
HVAC equipment.
Switch between hand and auto modes – SEL HND.AUTO (Point 34) changes drive operation
between hand and auto modes. The actual source in each mode is set in the SED2 programming.
Digital Inputs – Use DIGITAL IN 1 through DIGITAL IN 6 (Points 71 through 76) to monitor the
status of the SED2 digital inputs from the field panel. This is useful when the SED2 is
programmed for control of drive functions (start/stop, fault reset, off, etc.) via the SED2 control
terminal strip. Over the P1 serial link, you can monitor a control sequence that requires receipt of
a contact closure on the SED2 terminal strip.
Digital Outputs – RELAY OUT 1 (Point 40) and RELAY OUT 2 (Point 41) are physical DOs on
the SED2 and can be monitored to confirm drive status. Their purpose depends on how the drive
has been set up. The drive can be programmed so that these points can display various limits,
warnings, and status conditions. Some examples include frequency limit, over current, and motor
over temperature fault.