Water Technologies ChemWeb Server Installation, Operation & Maintenance Manual
Table of Contents WARNING NOTIFICATIONS .......................................................................................................................i Overview of ChemWeb Server ...............................................................................................................1 Description of ChemWeb Server ............................................................................................................2 Power Supply ..........................................................
ChemWeb Server Warranty USFilter Stranco warrants equipment of its manufacture and bearing its trademark to be free of defects in workmanship and materials.
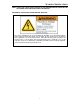
WARNING NOTIFICATIONS NOTE: PLEASE PAY PARTICULAR ATTENTION TO THE WARNING NOTICES FOUND ON THE FOLLOWING PAGES AND THROUGHOUT THIS MANUAL. DISCONNECT AND LOCKOUT POWER BEFORE SERVICING Line voltage (120/240VAC) can be present inside the ChemWeb server and caution should be used to prevent electrical shock, burns or electrocution. Be sure electric power is disconnected before opening the cover of any electrical device.
Overview of ChemWeb Server The ChemWeb Server is used for central recording, monitoring and logging of the process data in potable and swimming pool water treatment plants. It is especially suitable for smaller installations without process display but which are to be installed with a data recording system with simple display. Another application example would be in unmanned plants such as potable water stations, in which recording of the measured data is to be accomplished by remote access.
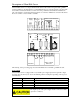
Description of ChemWeb Server The ChemWeb Server is a compact standalone PC which is fitted with an integrated analog, ISDN modem in addition to the main memory, an internal flash drive for programs and data, a clock module and a number of hardware interfaces. Serial connection possibilities such as RS232 and RS485 are part of the interfaces via which application hardware is controlled. An Ethernet connection that allows the device to link to a network is also available. GND 50...80VDC 10...
Overview of ChemWeb Server Ext. Reset If the reset input is connected more than 3 seconds to ground GND or the RESET key is pressed at least 3 seconds, a reset is carried out at the webserver as well as at the modem module. Terminal No.: 5 6 Designation: GND Reset Explanation: Ground Input for external reset of ChemWeb Server Inputs (IN1, IN2) The two digital inputs are fitted internally with pull-up resistors and are activated by connecting them to GND.
Description of ChemWeb Server COM 1 - RS232 null modem This RS232 port is used for modem parameterization and null modem operation without having to disconnect the device from its application environment. Terminal No.
Overview of ChemWeb Server CompactFlash slot (CF) The CompactFlash slot is used as memory for programs and data and can operate commercial CompactFlash cards with corresponding driver software as external drive. For this purpose, the card should be formatted with the FAT file system. It is possible to use CF cards with a capacity of 64, 128 or 256MB.
Connecting more than one ChemWeb Server RS485 bus system The serial RS485 bus is designed as balanced two-wire bus line according to EIA RS485 (DIN 66259, Part 4 or ISO 8482), which is suitable for long transmission routes (up to 4000 ft) at a high transmission rate (19200 baud).
Connecting more than one ChemWeb Server For these resistors, the followings values are recommended: Rt Ru Rd 150 Ohm 390 Ohm 390 Ohm +/- 2 % +/- 2 % +/- 2 % min. 0.25 W min. 0.25 W min. 0.25 W The interface lines are named as line A and line B. Each RS485 bus user is equipped with an interface for the connection of these lines. Due to the different enclosure protection classes, the bus connections of the devices vary.
Setting the IP address of the ChemWeb Server Initialization of the ChemWeb Server after switching on the power supply or after a reset may take up to several minutes depending on the configuration! During this time the ChemWeb Server does not respond! The ChemWeb Server must be installed completely before the initial startup! Before starting the setup of a connection, it must be decided which type of connection is to be used for the connection to the ChemWeb Server.
Setting the IP address of the ChemWeb Server The network connection can be controlled and adapted under “Control Panel” ==> “Network and Internet Connections” ==> “Network Connections”. In this window all network connections can be controlled and adapted. Right click on “ChemWeb Server Connection”; select “Properties”. In this window, only the element “Internet protocol (TCP/IP)” is required. All other elements can be deleted.
Setting the IP address of the ChemWeb Server A fixed IP address and network mask must always be assigned. Other settings should not be changed. Confirm and store by clicking “OK” twice. With some Windows configurations, a restart may now be necessary. Special features of the direct network connection with Windows 95 / 98 / ME With these Windows versions, a network connection is set up automatically if a network board is identified in the laptop computer/PC.
Setting the IP address of the ChemWeb Server In this window all network connections can be controlled and adapted. Select the menu item “Create new connection” from the left window to start the “New Connection Wizard”. Click “Next” Select “Connect to the Internet” and click “Next”.
Setting the IP address of the ChemWeb Server Select “Connect using a dial-up modem” and click “Next”. Select the installed modem and click “Next”. In this window you assign a name for this connection. Type this name in the entry box and click “Next”. Type the telephone number for your ChemWeb Server in the entry box and click “Next”.
Setting the IP address of the ChemWeb Server Select whether this connection is to be available for all users of this computer or only for the user currently logged on, and click “Next”. Type the access code (login / password) in the entry boxes. As the ChemWeb Server cannot manage different access codes, this code must be the same for all users. Furthermore, the box “Turn on Internet Connection Firewall for this ...” must be deactivated.
Setting the IP address of the ChemWeb Server Null modem connection via serial interface Via the integrated RS232 interface “COM1 Null modem” of the ChemWeb Server, a serial connection can be set up to a laptop computer or PC, using a modem cable. It is possible to parameterize and operate the ChemWeb Server via this connection. For this purpose, a modem cable (9/9-contact, jack-plug, 1:1) is required.
Setting the IP address of the ChemWeb Server Click the box “Don’t detect my modem; I will select it from a list”, and click “Next”. Select “Standard Modem Types” under Manufacturer and “Communications cable between two computers” under Models. Click “Next”. Select the serial port at your PC or laptop computer to which the ChemWeb Server is to be connected, and click “Next”. The installation is completed by clicking “Finish”.
Setting the IP address of the ChemWeb Server Select the “Modem” you have just installed and select “Properties“. In the selection menu, the maximum port speed must be set to 57600 bits/s. Confirm by clicking “OK”. Leave the “Phone and Modem Options” by clicking “OK”. Establishing a connection in null modem operation As an example, the setup of a null modem connection using a Windows XP system is shown below.
Setting the IP address of the ChemWeb Server Select “Set up an advanced connection” and click “Next”. Select “Connect directly to another computer” and click “Next”. Select “Guest” and click “Next”. In this window you assign a name for this connection. Type the name in the entry box and click “Next”.
Setting the IP address of the ChemWeb Server Select the interface used for the null modem connection and confirm your choice by clicking “Next”. Select whether this connection is to be available for all users of this computer or only for the user currently logged on, and click “Next”. Now setup of the new connection is completed. Click “Finish”.
Setting the IP address of the ChemWeb Server If this window appears, click “Properties”, as further settings have to be made. In this window, click “Configure” to go to Modem Configuration. Set the maximum transmission speed to 57600 bits/s. Confirm this setting by clicking “OK”. Also confirm in the “Properties” window by clicking “OK”.
Setting the IP address of the ChemWeb Server Now type the correct user name and the matching password in the entry boxes. Test the created connection by clicking “Connect”. If the connection is successful, a corresponding message will appear on the screen. If the connection to the ChemWeb Server is established via this null modem connection, PPP-IP address 192.168.206.4 must always be used as IP address.
Setting the IP address of the ChemWeb Server Start menu item “Find” in the “CHIP” menu. The program then locates all ChemWeb Servers connected to this network segment independent of the set IP address and network mask, and lists all set data. Note the number in the first column “Snr” of the ChemWeb at which a setting is to be made. This number corresponds to the last 5 digits of the MAC address of the ChemWeb Server (see label at ChemWeb Server). Now change to menu item “IP config” in the “CHIP” menu.
Setting the IP address of the ChemWeb Server Setting the IP address of the ChemWeb Server with DHCP The network administrator must reserve a fixed IP address at the DHCP server. For this purpose he needs the MAC address (see label at the ChemWeb Server). The entry box “Use DHCP” must be clicked and the settings must be confirmed by clicking “Yes”. Now the ChemWeb Server must be restarted.
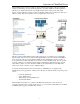
Startup Before startup, a connection to the ChemWeb Server must always be established! This can be any connection (see chapter 3). When starting the Internet Explorer for the first time, the Internet connection wizard might be started. It should be aborted! Basic settings via a Browser If the connection to the ChemWeb Server was configured properly, access is possible via a Javacapable Internet Browser.
Server Setup Bus scan Under this menu item all bus users connected are located automatically, and the corresponding results are displayed. Click “Start Scan” to initiate the “Bus scan”. After the message “Scanning done” appears, the ChemWeb Server reinitializes all aspects of the traced devices. This may take up to 1 minute. This window also states the software version and the software date of the ChemWeb Server below the scan results.
Server Setup Mail configuration Under this menu item, the ChemWeb Server is supplied with data from your provider for sending emails. Type the data you received from your provider and the receiver e-mail addresses in the corresponding boxes, and confirm the entry by clicking “Send”. Mail Server: These entry boxes contain the data required to log on to the e-mail server of your provider and to send e-mails.
Server Setup Event configuration Under this menu item you can define results, which initiate an immediate information e-mail, for each bus user. The symbol after the respective bus user signifies: Events have been defined for this bus user. No events have been defined for this bus user. By clicking a bus user, you open its event settings. This page lists the events which may initiate the information e-mail. These events are different for each bus user.
Server Setup The entry box “Release value” specifies the value at which the event initiates the information e-mail. By clicking the selection box under “Activate”, the event is enabled. The entries are stored by clicking “send data”. By clicking “close window”, the window is closed without storing the entries. If a connection to the Internet cannot be established after an event has occurred, the ChemWeb Server will try it again every 5 minutes.
Server Setup Relay 2 ON / Relay 2 OFF: By clicking this command, relay 2 can be switched on or off. The status of the relay is not stored in the case of a power failure or a reset! Change passwords Under this menu item, the individual user names and passwords are defined. Factory setting: User Name: wt Password: 9040 CGI Password: This login is required to reach all pages on which settings can be changed. FTP Password: This login is required if the ChemWeb Server is to be accessed via FTP (File Transfer).
Server Setup After changing the FTP or PPP password the ChemWeb Server must be restarted to activate the new login. Name configuration Webserver: Define the name and language of the ChemWeb Server in these boxes, and store the entries by clicking “Set”. It is possible to choose between the languages German, English and French. This setting does not influence the language setting at the individual devices.
Server Setup This menu item shows a separate page listing all network configuration data of the ChemWeb Server. Disconnect the power supply of the ChemWeb Server. Then short-circuit digital inputs IN1 and IN2 by means two wire jumpers. Restart the ChemWeb Server by connecting the power supply again. The jack end of the serial cable is connected to the free serial interface of the laptop computer/PC. The plug end is connected to the “COM1 null modem” socket at the ChemWeb Server.
Operation and Data Access Operation via Web Browser To handle and display the data, a Java-capable Internet Browser (e.g. Internet explorer) must be installed on the service computer. A (serial, Intranet, Internet or switched) connection must be available to access the ChemWeb Server. The Internet Browser has to be started and the IP address (or PPP-IP address in the case of a switched or null modem connection) has to be entered into the address line.
Operation and Data Access Online values The submenus of “Online values” display all relevant measured values, status messages, faults and other information concerning the individual device. Configure The submenus of “Configure” display all settable parameters of the respective device. The submenu is password-protected and can only be accessed after typing the correct CGI user name and CGI password in the entry box displayed.
Operation and Data Access Trend The submenus of “Trend” show all measured values of the respective device as daily chart. One group always contains three measured values of the device. These measured values are stored every 5 minutes in a log file on the CompactFlash board. In these submenus, it is also possible to display log files from the past by selecting the respective day, month and year. The selected day will be shown on the chart.
Operation and Data Access Backing up log files The old data is located in the compact flash card. If you have a standard card reader for the PC, you can copy the *.txt files to your PC. The path is WEB \ ARCH. You can copy the Files with the name *.txt to your PC and then you can delete them from the compact flash card. After this you have memory space free. Do not plug in and out the flash card while Webserver is running - switch off before.
Operation and Data Access Data access to CompactFlash card with card scanner The CF card must also include the firmware of the ChemWeb Server.
Technical data Dimensions Weight Installation Ambient Temperature Air humidity Protection class Power supply Max. current consumption Power consumption Relay outputs 3.9” x 4.3” x 2.9” (H x W x D), without CF card / plug approx. 1 LB top hat rail DIN EN 500 22 32 ... 131° F 0 - 95%, not condensing enclosure IP40 / screw terminals IP20 10..60 V DC, 5% ripple 50..80 V DC, 5% ripple without modem: at 12V: approx. 420mA at 24V: approx. 210mA with analog modem: at 12V: approx. 600mA at 24V: approx.
Appendix Accessories and part numbers ChemWeb Server serial ChemWeb Server with analog modem 56k ChemWeb Server with ISDN modem 5885557 6485560 6485563 CompactFlash card 64MB (blank) CompactFlash card 64MB (with firmware for Webserver) CompactFlash card 128MB (blank) CompactFlash card 128MB (with firmware for Webserver) CompactFlash card 256MB (blank) CompactFlash card 256MB (with firmware for Webserver) 6485932 6485935 6485938 6485941 6485944 6485947 Modem cable 9/9-contact, jack-plug, 1:1, 1.
Appendix Tested Web Browser The ChemWeb Server was tested successfully with the following Web browsers: - Microsoft Internet Explorer 6.0 SP1 with Sun Java 1.4.1 - Netscape 7.01 with Sun Java 1.4.1 - Mozilla 1.3 with Sun Java 1.4.1 - K-Meleon Version 0.7.1 with Sun Java 1.4.1 The listed Web browsers display all screens of the ChemWeb Server correctly and allow all required operations. Other Java-capable Web Browsers may cause faulty displays or operation of the ChemWeb Server.
Appendix Ethernet address The Ethernet address is the invariable, physical address of an Ethernet network component. Firewall Firewall describes network components which link an internal network (Intranet) to a public network (e.g. Internet), similarly to a router. Here the access to the, in each case, other network can be restricted or blocked completely depending on the access direction, the service used as well as the authentication and identification of network users.
Appendix IP address The IP address is a 32-bit number, which identifies each network user in the Internet or Intranet unambiguously. It consists of a network part (Net ID) and a user part (Host ID). LAN – Local Area Network Local network within a limited area using a fast transmission medium as e.g. Ethernet. Router Routers connect two different networks.
For further information please contact: Siemens Water Technologies P.O. Box 389 Bradley, IL. 60915 U.S.A 866.766.5987 phone 815.932.1760 fax www.usfilter.com email: stranco.water@siemens.com STRANTROL and HIGH RESOLUTION REDOX are registered trademarks of SIEMENS its subsidiaries or affiliates. Other designations used in this publication may be trademarks whose use by third parties for their own purposes could violate the rights of the owner.