
User Manual

Siveillance Video 2019 R3
65
SI SSP SH LPS COS Video
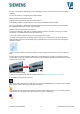
4. Click Add level .
5. To edit the level name:
6. Click the dots and select Rename.
7. Enter a new name.
8. To delete a level, click the dots and select Delete. Cameras on
this level stay in their geographical position, but are no longer associated with the level.
9. Click Setup to exit setup mode.
10. Change order of levels in buildings (smart map)
Requirements:
Smart map editing has been enabled on your Client profile in Management Client.
Steps:
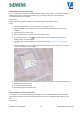
1. Navigate to the building on your smart map. If necessary, zoom in.
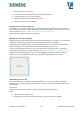
2. Select the building. A pane appears on the right-hand side showing you the levels of the
building.
3. Click Setup to enter setup mode.
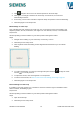
4. Click and drag the dotted area to the correct position. Any
associated cameras and custom overlays stay with the level.
5. Click Setup again to exit setup mode.
Set default level for buildings (smart map)
If a particular level in a building is more relevant than others, for example the ground floor, you can set
that level as the default level. When you open your smart map and go to the building, automatically the
default level is selected.
If you navigate away from the building and back, Siveillance Video Client brings you to the level where
you left off.
Requirements
Smart map editing has been enabled on your Client profile in Management Client.
Steps:
• Navigate to the building on your smart map. If necessary, zoom in.
• Select the building. A pane appears on the right-hand side showing you the levels of the
building. The default level is highlighted.
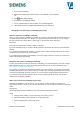
• Click Setup to enter setup mode. Notice the asterisk . It indicates
where the current default level is.
• On the level you want to set as the default level, click the dots .
• Select Set as default.
• Click Setup again to exit setup mode.