%H LQVSLUHG 8VHU 0DQXDO and safety precautions
*HQHUDO ,QIRUPDWLRQ *HQHUDO ,QIRUPDWLRQ 6DIHW\ 3UHFDXWLRQV Please use only Siemens· brand accessories. Any damage caused to the device which is the result of using third-party accessories invalidates any warranty claims. Do not open the device. If the LCD screen of the device is damaged (the glass is broken for example), avoid contact between any liquid which might escape and your skin, mucous membrane (eye, mouth) or foodstuffs and do not breathe in any gas which might escape.
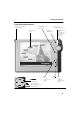
*HQHUDO ,QIRUPDWLRQ )URQW 9LHZ ZLWK &RQWUROV At the rear of the device: Stylus (pull out) Touch-sensitive screen XS &RQWURO NH\ ULJKW OHIW GRZQ Control key (see detailed diagram) Show/hide button for input panel XS OHIW = scroll upwards = cancel operation ULJKW = enter/confirm function SIMpad On/Off button LED (orange) to indicate battery charging Loudspeaker Software control button (corresponds to the Windows right mouse button) LED (green) to indicate operating status (on/off) GRZQ = scro
*HQHUDO ,QIRUPDWLRQ &RQQHWFLRQV DW WKH 5HDU RI WKH 'HYLFH ➐ ➊ ➋ ➌ ➍ ➎ ➏ ➑ 5HDU YLHZ RI WKH GHYLFH ZLWK LQSXW RXWSXW VRFNHWV DQG VORWV ➊ Serial interface or audio headphones interface (Universal interface for Lumberg plug, as used in Siemens· cell phones, e.g. S25/S35). Suitable for connecting modems or for direct connection to a PC. ➋ ➌ Interface (not supported). ➍ ➎ ➏ ➐ Slot for smartcards. ➑ Stylus storage slot. IrDA infrared interface.
7DEOH RI &RQWHQWV *HQHUDO ,QIRUPDWLRQ Safety Precautions................................................................................................. Front View with Controls....................................................................................... Connetcions at the Rear of the Device..................................................................
7DEOH RI &RQWHQWV 6HQGLQJ DQG 5HFHLYLQJ H 0DLOV Basic Information................................................................................................. Starting the Inbox ................................................................................................ Archive Folder (e-Mail Account)........................................................................... Receiving e-Mails ............................
*HWWLQJ 6WDUWHG *HWWLQJ 6WDUWHG Congratulations on purchasing a 6,0SDG 6/ (simply called 6,0SDG in this manual), a mobile device powered by the Microsoft· Windows· for Handheld PC 2000 operating system. Your SIMpad belongs to a new class of device known as Web pad. The large screen provides users with a significantly better information display than that offered by current mobile devices (palmtops, PocketPCs or cell phones). This makes working easier and turns use into a real experience.
*HWWLQJ 6WDUWHG :KDW LV LQ WKH %R[ The package contains: ● A SIMpad ● Three styli, one of which is in the stylus storage slot ● An AC/DC adapter ● A serial PC connection cable ● A CD-ROM with Microsoft· ActiveSync· and Microsoft· Pocket Outlook 2000 (*) software ● A set of documentation with User Manuals and Software Licenses.
*HWWLQJ 6WDUWHG 6ZLWFKLQJ 6,0SDG RQ IRU WKH )LUVW 7LPH Before operating your SIMpad for the first time, it is vital that you read the 6DIHW\ 3UHFDXWLRQV on page 2! %HIRUH VZLWFKLQJ WKH 6,0SDG RQ IRU WKH ILUVW WLPH its batteries must be charged for at least RQH KRXU by connecting the $& '& DGDSWHU to both SIMpad and power socket. Charging is indicated by the orange LED on the SIMpad. &RQQHFWLRQ WR WKH 3RZHU 6XSSO\ Use the power adapter supplied.
*HWWLQJ 6WDUWHG %DVLF 6HWWLQJV DIWHU 6,0SDG LV VZLWFKHG RQ IRU WKH )LUVW 7LPH A welcome screen is displayed after your SIMpad is first switched on. Follow the instructions on the screen. Subsequently, a number of important basic settings are requested. 6FUHHQ &DOLEUDWLRQ After turning the device on, you are asked to calibrate the screen. Calibration is necessary to allow the touch-sensitive screen to react correctly to the pressure point. Only use the stylus supplied for touching the screen.
*HWWLQJ 6WDUWHG 'LDORJ ER[ World Clock 5HJLVWHU Date/Time Tap with the stylus on the year. Now use the displayed keys and to select the year. To set the current month, tap the month and choose the current month from the displayed list. After you have selected the month, tap the current date. Tap in the field for the current time on the three areas for hours, minutes and seconds. When an area is highlighted in blue you can enter a new value. Do this by tapping the number keys of the input panel. Tap .
*HWWLQJ 6WDUWHG 2ZQHU 3URSHUWLHV After you have entered the date and time, a dialog box in which you can enter your personal data appears. 'LDORJ ER[ Owner Properties Enter name, company, address etc. in the fields provided. If you do not know what to enter in a field, leave this field blank. To enter data, first tap the desired field. Then tap the required character on the input panel. Use (top right on the input panel) to delete any incorrectly entered characters (see page 40).
6HWWLQJ XS WKH ,QWHUQHW &RQQHFWLRQ 6HWWLQJ XS WKH ,QWHUQHW &RQQHFWLRQ Use the stylus to tap the button Internet in the 6WDUW &HQWHU. ,QVHUWLQJ WKH 3& &DUG If you want to access the Internet using SIMpad via a radio PC Card (I-Gate or HomeRF), slide the card into the designated slot until it clicks into place. Ensure that the colored side is facing upwards. To remove the card, press the button next to the PC Card.
6HWWLQJ XS WKH ,QWHUQHW &RQQHFWLRQ The subsequent startup depends on the option selected in the dialog box Select Connection. For further information, see the relevant chapter. 6HOHFWHG &RQQHFWLRQ 6HH I-Gate 802.
6HWWLQJ XS WKH ,QWHUQHW &RQQHFWLRQ You can now configure the Internet provider account in the AccessPoint on the SIMpad. To do this, enter the IP address 10.0.0.254 in the “Address” field in Internet Explorer. The HTTP Manager Internet site in which you have to complete the following connection wizards opens. – Basic Settings – Setup Internet Access – Security Settings &RQQHFWLRQ WR /$1 &RPSDQ\ 1HWZRUN The prerequisite is that the Access Router is installed and Internet access is available.
6HWWLQJ XS WKH ,QWHUQHW &RQQHFWLRQ &RQQHFWLQJ 6,0SDG WR +RPH5) *DWHZD\ For this, the HomeRF Gateway (optional accessory) must be in operation. Instructions for this can be found in the HomeRF Gateway System manual. The HomeRF PC Card has to be plugged into the SIMpad. The following dialog window appears. 'LDORJ ER[ Network Settings Tap OK. The SIMpad then tries to set up a connection to the Internet. Since SIMpad is not yet logged on at the HomeRF Gateway, you will first be requested to log on.
6HWWLQJ XS WKH ,QWHUQHW &RQQHFWLRQ (QWHULQJ ,QWHUQHW $FFHVV 'DWD The following dialog box appears. 'LDORJ ER[ Set HRF Gateway 7DE Internet Access Data Enter the User Name and Password for Internet access. You should have received this information from your provider. Tap OK. The following dialog box appears. Follow the instructions on the screen. 'LDORJ ER[ Restart 'LDORJ ER[ DHCP Server A confirmation message informs you that the HomeRF Gateway has been configured successfully. Tap OK.
6HWWLQJ XS WKH ,QWHUQHW &RQQHFWLRQ You are then asked if you wish to save the data. Confirm the query with OK. The data is permanently saved. A confirmation message informs you that the data has been saved. Tap OK. For more information on settings (e.g. HomeRF Configuration, setting up or clearing a connection or network password), see &KDSWHU 6XEVHTXHQW +RPH5) &RQILJXUDWLRQ RQ SDJH . If you are using SIMpad for the first time, Internet Explorer starts automatically.
6HWWLQJ XS WKH ,QWHUQHW &RQQHFWLRQ Tap OK. The dialog box Connection Settings appears with the installed PC Card. 'LDORJ ER[ Connection Settings Tap in the input fields User Name and Password and enter the data which you received from your Internet service provider. You do not have to fill out the Domain field. For extra security the field Password only displays asterisks when the password is entered. Check if the telephone number of your provider in the Dial-up Connection dialog box is correct.
6HWWLQJ XS WKH ,QWHUQHW &RQQHFWLRQ 'LDORJ ER[ Dial-up Connection Tap Connect. The default homepage opens. This sets up the Internet access or the subsequent configuration. For the first startup, we recommend that you first close Internet Explorer and configure your e-Mail account. To do this tap Setup e-Mail Settings in the 6WDUW &HQWHU and continue as described in Chapter "e-Mail Settings", page 69. This concludes the setting up of the Internet Connection.
6HWWLQJ XS WKH ,QWHUQHW &RQQHFWLRQ &RQQHFWLQJ 6,0SDG YLD ,QIUDUHG RU 6HULDO ,QWHUIDFH 1RWHV RQ ,QIUDUHG The connection via the infrared interface only functions if the cell phone’s infrared interface is switched on. You will find the relevant function in your cell phone settings. The transmission speed of the connection to the Internet depends on the cell phone’s modem and the connection between the cell phone and the Internet service provider.
6HWWLQJ XS WKH ,QWHUQHW &RQQHFWLRQ If you want to use a cell phone with modem over the serial interface, you must use a null-modem adaptor between the PC connection cable supplied and the corresponding cell phone data cable. The adaptor is available as an accessory from your specialized dealer. &RQQHFWLRQ 6HWWLQJV The following dialog window appears. 'LDORJ ER[ Network Settings Tap OK. The dialog box Connection Settings appears.
6HWWLQJ XS WKH ,QWHUQHW &RQQHFWLRQ Tap OK. If you are using SIMpad for the first time, Internet Explorer (see page page 49) starts automatically. If this is a subsequent configuration, you must open Internet Explorer by tapping Internet in the 6WDUW &HQWHU. The dialog box Dial-up Connection appears. 'LDORJ ER[ Dial-up Connection Tap Connect. The default homepage opens. This sets up the Internet access or the subsequent configuration.
6HWWLQJ XS WKH ,QWHUQHW &RQQHFWLRQ 5HVHW )XQFWLRQ Should the system “get stuck“ (evident from the fact that input is no longer possible), you can perform a reset. On the underside of the device you will find a small hole marked RESET. Press the button in this hole using the stylus. SIMpad is restarted. If a simple reset does not clear the fault, please refer to “Troubleshooting“ , see page 92. After a reset you are requested to enter the calibration, date and time again.
6HWWLQJ XS WKH ,QWHUQHW &RQQHFWLRQ 1RWHV RQ 6W\OXV The screen is touch-sensitive. The stylus supplied in the device is designed to be used to touch the screen. Storage slot 5HDU RI 'HYLFH ZLWK 6ORW IRU 6W\OXV Keep the stylus in the storage slot intended for the purpose at the back of the device. Only use the stylus supplied for touching the screen.
&RQQHFWLQJ WR \RXU GHVNWRS 3& &RQQHFWLQJ WR \RXU GHVNWRS 3& Your SIMpad works as a stand-alone device. However, to get the most out of your SIMpad, you may want to connect to your desktop PC or notebook. Microsoft· ActiveSync· is used to exchange data between your PC and the SIMpad. This program is available on the CD-ROM supplied in the box. You can use Microsoft ActiveSync to synchronize your Outlook applications (Inbox, Calendar and Contacts) with the PC.
&RQQHFWLQJ WR \RXU GHVNWRS 3& Fully insert the flat end of the serial cable, arrow side up, into the serial port on your SIMpad. 3DUWQHUVKLS :L]DUG The first time you connect, the New Partnership Wizard on your desktop PC helps you to establish a partnership and set options for synchronizing Pocket Outlook data, e-mail messages, and files between your SIMpad and desktop PC. Start the ActiveSync program on your PC. The following dialog window appears.
&RQQHFWLQJ WR \RXU GHVNWRS 3& Click Next. A window in which you can select a program for synchronizing personal information then appears. The following appears if you selected Microsoft Outlook, for example, and clicked Next. 'LDORJ ER[ New Partnership - 2 You can now select the required Outlook applications here. Then click Next. All e-Mails, appointments and contacts will be transferred to your SIMpad or synchronized. You can also copy files which you created on the PC (e.g.
&RQQHFWLQJ WR \RXU GHVNWRS 3& 7URXEOHVKRRWLQJ SDUWQHUVKLSV SIMpad is designed to automatically detect the connection type and configure itself to communicate with your desktop PC. However, if you are unable to establish a connection between your SIMpad and your desktop PC, please follow the following steps. 1. Verify that the serial PC connection cable is connected to your SIMpad. 2.
7KH 6WDUW &HQWHU 7KH 6WDUW &HQWHU The most important SIMpad functions can be reached easily via the 6WDUW &HQWHU. 7KH 6WDUW &HQWHU 6WDUW &HQWHU is started automatically when SIMpad is first switched on and also when the operating system is restarted. The 6WDUW &HQWHU contains buttons for various functions. Tap the relevant button to start a particular function. For a number of functions the Internet connection is established. In such cases, tap Connect in the dialog box subsequently displayed.
7KH 6WDUW &HQWHU 6WDUW &HQWHU %XWWRQV ,QWHUQHW Establishes the Internet connection, starts the Web browser (see page 49) and opens your default Homepage. 2XWORRN Opens a dialog box through which you can start the Microsoft· Pocket Outlook applications Tasks, Calendar, Contacts and Inbox (see page 62). 2IILFH Opens a dialog box through which you can start the Microsoft· Pocket Office applications Word, Excel, PowerPoint and Access (see page 59).
:RUNLQJ ZLWK :LQGRZV IRU +DQGKHOG 3& :RUNLQJ ZLWK :LQGRZV IRU +DQGKHOG 3& Microsoft· Windows for Handheld PC 2000 is the pre-installed operating system of SIMpad. The operating system is the basis for all programs which run on SIMpad. 'HVNWRS The desktop is the basis for the user interface for Windows for Handheld PC.
:RUNLQJ ZLWK :LQGRZV IRU +DQGKHOG 3& ,FRQV RQ WKH 'HVNWRS By default the desktop shows the following LFRQV which you can GRXEOH WDS with the stylus. 0\ &RPSXWHU Shows an overview with folders. You can open various folders and create new ones. This icon allows you to organize your fileing system. 0\ 'RFXPHQWV Displays the folders intended for storing private data, e. g. letters. 5HF\FOH %LQ Shows a list of deleted documents. You can recover documents deleted by mistake.
:RUNLQJ ZLWK :LQGRZV IRU +DQGKHOG 3& 7DVNV You can use Tasks to manage your activities and responsibilities. (page 63). 0LFURVRIW 3RFNHW :RUG Opens the Microsoft· Pocket Word. This allows you to write letters, for example (see page 59). 0LFURVRIW 3RFNHW ([FHO Opens the spreadsheet program Pocket Excel, (see page 60). 0LFURVRIW 3RFNHW $FFHVV Opens the Pocket Access program. You can use this program to view and update your databases (see page 61).
:RUNLQJ ZLWK :LQGRZV IRU +DQGKHOG 3& %XWWRQV IRU 2SHQHG $SSOLFDWLRQV FHQWHU A button is shown for each open window at the center area of the taskbar. If for example you have started the Internet Explorer and Pocket Word a button is shown for each of these programs. By tapping the relevant button you activate the corresponding window. 7DVN 0DQDJHU To open the task manager, press the button (right mouse key) and at the same time tap the taskbar using the stylus.
:RUNLQJ ZLWK :LQGRZV IRU +DQGKHOG 3& :LQGRZV DQG 'LDORJ %R[HV $ :LQGRZ :LQGRZV ([SORUHU VHH SDJH 'LDORJ ER[ IURP :LQGRZV ([SORUHU Most programs appear on the screen in the form of a window or of a dialog box. A window is a working area, a dialog box is a type of form with input fields, selection lists etc. Individual commands of a program can in their turn open dialog boxes. This is how Pocket Word, for example, allows you to find text.
:RUNLQJ ZLWK :LQGRZV IRU +DQGKHOG 3& 6ZDSSLQJ EHWZHHQ :LQGRZV It can occur that you have opened a number of windows at the same time. In this case you can easily swap from one window to the other: In the middle of the taskbar (see page 34) tap the button of the window to which you wish to swap to. 0RYLQJ 'LDORJ %R[HV ZLWK 7LWOH %DU The title bar allows you to move the dialog box 'LDORJ ER[ ,QSXW 3DQHO ZLWK 7LWOH %DU Dialog boxes which only fill part of the screen have a title bar at the top.
:RUNLQJ ZLWK :LQGRZV IRU +DQGKHOG 3& 7RROEDU 7RROEDU LQ 3RFNHW :RUG Many programs have a toolbar at the top of the window. This consists of icons representing specific functions. In Pocket Word for example there is the icon which allows you to write text in bold letters. On a tool bar tap the desired icon with the stylus. &ORVLQJ :LQGRZV DQG 'LDORJ %R[HV Close all windows and dialog boxes by tapping or at the top right of the window or dialog box.
:RUNLQJ ZLWK :LQGRZV IRU +DQGKHOG 3& 6FUROOLQJ ZLWKLQ /LVWV RU /RQJHU 'RFXPHQWV When the content of a window is larger than the window itself, you can scroll up or down. Tap to scroll up by one line. Tap and then drag downwards or upwards to scroll rapidly. Tap to scroll downwards rapidly. Or, if this area is above, tap to scroll upwards rapidly. Tap to scroll up by one line. 6FUROO %DUV Tap with the stylus on or repeatedly to scroll up or down in stages.
:RUNLQJ ZLWK :LQGRZV IRU +DQGKHOG 3& (QWHULQJ 'DWD To enter data use either the input panel or write the characters directly onto the screen. In both cases you use the stylus. To try out the data input functions, you can start Microsoft Pocket Word, for example: 8VLQJ WKH ,FRQ RQ WKH 'HVNWRS Double WDS the icon. Pocket Word is opened.
:RUNLQJ ZLWK :LQGRZV IRU +DQGKHOG 3& (QWHULQJ 'DWD ZLWK WKH 6W\OXV +DQGZULWLQJ 5HFRJQLWLRQ Instead of the input panel you can also write characters directly on the screen with the stylus. You can write letters, numbers or special characters. A program working in the background attempts to recognize the characters entered. When a character has been detected it is inserted at the current cursor position. To enter characters, tap the icon on the lower right in the taskbar.
:RUNLQJ ZLWK :LQGRZV IRU +DQGKHOG 3& 2YHUYLHZ RI 'DWD (QWU\ ZLWK WKH 6W\OXV The starting points for writing a character are clearly shown in the tables below. /HWWHUV D $ Q 1 % % R 2 F & S 3 G ' T 4 H ( U 5 I ) 6 6 J * W 7 K + X 8 L , Y 9 M - Z : N .
:RUNLQJ ZLWK :LQGRZV IRU +DQGKHOG 3& 1XPEHUV 6SHFLDO &KDUDFWHUV DQG &RPPDQGV o m " >%DFNVSDFH@ >%ODQN@ >GHOHWH IURP # OHIW WR ULJKW@ >FXW@ >7DE@ >FRS\@ >QHZ OLQH@ >SDVWH@ To continue working with the Windows interface or via the input panel after entering data with the stylus, tap .
:RUNLQJ ZLWK :LQGRZV IRU +DQGKHOG 3& $GGLWLRQDO $SSOLFDWLRQV IRU (QWHULQJ 'DWD ZLWK WKH 6W\OXV Tap in the taskbar with the stylus on Start Programs Application Jot. In the submenu which is now opened, you will find the following applications for data entry with the stylus: -RW 0DFUR (GLWRU Allows names to be created and managed for text modules and commands. You can assign a longer text to a macro name or commands such as „Copy“ or “Insert date/time“ .
:RUNLQJ ZLWK :LQGRZV IRU +DQGKHOG 3& (GLW )XQFWLRQV There are a number of editing functions available for text entry. These edit functions are the same for all programs used under Windows for Handheld PC 2000. 6HOHFWLQJ 7H[W 6HOHFWHG 7H[W Use the stylus to position the cursor on the start or end point of the text to be selected. Then drag the stylus slowly over the screen. The selected text is shown inversed.
:RUNLQJ ZLWK :LQGRZV IRU +DQGKHOG 3& :LQGRZV ([SORUHU You can use the Windows Explorer to manage folders and documents in your file system. 6WDUWLQJ :LQGRZV ([SORUHU 9LD 0\ &RPSXWHU LFRQ RQ WKH 'HVNWRS Double WDS the icon. The current folder is displayed. 2U 8VLQJ WKH 6WDUW 0HQX Tap with the stylus in the taskbar on Start Programs Windows Explorer. The current folder is displayed. Current folder Icon for folder Icon for document. Double tapping opens the folder and displays its contents.
:RUNLQJ ZLWK :LQGRZV IRU +DQGKHOG 3& 9LHZV /DUJH ,FRQV 6PDOO ,FRQV DQG 'HWDLOV Folders and files can be displayed in a number of different ways. The “Large Icons” setting can be impractical, particularly when a folder contains a large number of files or subfolders. Tap in the Windows Explorer toolbar (see page 38). A popup menu opens. Select a view other than the current view (a marker indicates the current view).
$FFHVVLQJ WKH :RUOG :LGH :HE $FFHVVLQJ WKH :RUOG :LGH :HE The World Wide Web, also called WWW or just the Web, is the modern, intuitive interface of the Internet. Even as an inexperienced user you can quickly find your way around the Web on your own. A program which allows you to surf in the Web is referred to as a Web browser. 0LFURVRIW· ,QWHUQHW ([SORUHU IRU +DQGKHOG 3& is pre-installed as the Web browser in SIMpad.
$FFHVVLQJ WKH :RUOG :LGH :HE 6WDUWLQJ ,QWHUQHW ([SORUHU Use the stylus to tap the button Internet in the 6WDUW &HQWHU. 2U 8VLQJ WKH 6WDUW 0HQX Tap Start Programs Internet in the toolbar. ,QWHUQHW ([SORUHU IRU +DQGKHOG 3& Internet Explorer starts the pre-specified Home page. This sometimes also involves (automatically) establishing the Internet connection.
$FFHVVLQJ WKH :RUOG :LGH :HE (QWHULQJ ,QWHUQHW $GGUHVVHV 'LDORJ ER[ IRU WKH &XUUHQW ,QWHUQHW $GGUHVV At the top of the Internet Explorer window you see a field in which the current Internet address is displayed. In this field you can also type a new Internet address that you wish to call next. Tap in the field for the Internet address. The entire entry is highlighted. You can overwrite the entry. Using the Input Panel, enter the required Internet address (e. g. KWWS ZZZ P\ VLHPHQV FRP VLPSDG).
$FFHVVLQJ WKH :RUOG :LGH :HE 8VLQJ WKH %URZVHU 1DYLJDWLRQ $LGV The Microsoft Internet Explorer for Handheld PC toolbar (see page 38) contains symbols to help you navigate in the Web. %DFN +LVWRU\ )XQFWLRQ The Web browser logs the pages that it has already visited. You can use the Back function to return to previously visited pages. )RUZDUG +LVWRU\ )XQFWLRQ If you have previously tapped on the Forwards function. , you can undo this operation by using 6WRS Stops loading a page.
$FFHVVLQJ WKH :RUOG :LGH :HE &UHDWLQJ DQG 0DQDJLQJ )DYRULWHV You can store frequently visited Web sites as favorites (electronic bookmarks). This saves you the effort of having to retype the Internet addresses of such sites each time you need them. $GG WKH :HE 6LWH &XUUHQWO\ 'LVSOD\HG WR WKH )DYRULWHV In the Internet Explorer menubar, tap Favorites Add to favorites. A dialog box appears: 'LDORJ ER[ Add Favorites The Name field suggests a title for the Web site.
$FFHVVLQJ WKH :RUOG :LGH :HE 6HWWLQJ WKH +RPHSDJH 6HDUFK 3DJH DQG 9DULRXV 2SWLRQV In the Internet Explorer menu, tap View Options. A dialog box with Internet options is displayed. 'LDORJ ER[ Options In the field Default Pages you can set the Home Page and the Search Page. The Home Page is the Internet address which is loaded immediately when you start the Web browser or when you tap . It is recommended that you set the overview page that you use most frequently as your home page. .
6HQGLQJ DQG 5HFHLYLQJ H 0DLOV 6HQGLQJ DQG 5HFHLYLQJ H 0DLOV Just like displaying the Web and its http addresses, e-Mail is another important Internet service. Because Pocket Word, Pocket Excel and Pocket PowerPoint are integrated in your SIMpad, you are able to view e-Mail attachments just by tapping them. 0LFURVRIW ,QER[ is the pre-installed e-Mail application on your SIMpad. Before you can send and receive e-Mails you must have a connection to the Internet.
6HQGLQJ DQG 5HFHLYLQJ H 0DLOV 6WDUWLQJ WKH ,QER[ 8VLQJ WKH ,FRQ RQ WKH 'HVNWRS 'RXEOH WDS the icon. 2U 8VLQJ WKH 6WDUW &HQWHU Tap Outlook Inbox in 6WDUW &HQWHU. After starting the Inbox, the main program window appears. ,QER[ IRU :LQGRZV IRU +DQGKHOG 3& E-mail accounts and their archive folders are shown on the left.
6HQGLQJ DQG 5HFHLYLQJ H 0DLOV $UFKLYH )ROGHU H 0DLO $FFRXQW Each new e-Mail account created consists of four archive folders. You can show or hide the archive folders in the list of e-Mail accounts. Tap E-mail account folders Tap E-mail account folders are hidden. 2SHQLQJ DQG &ORVLQJ $UFKLYH )ROGHUV The e-Mail archives have the following meaning: Deleted (local): For e-Mails that you have read and no longer need. Sent: For e-Mails that you have already sent. Inbox: For new e-Mails.
6HQGLQJ DQG 5HFHLYLQJ H 0DLOV 5HSO\LQJ WR )RUZDUGLQJ H 0DLOV You can type a reply to the displayed e-Mail. Tap in the Inbox toolbar. The window for editing e-Mails is displayed. The e-Mail that you wish to reply to is quoted in the text field. :LQGRZ IRU (GLWLQJ H 0DLOV Tap in the area for editing the e-Mail. For information on entering data, see page 40, for information on edit functions, see page 45.
6HQGLQJ DQG 5HFHLYLQJ H 0DLOV 6HQGLQJ H 0DLOV To prepare a finished mail for sending, in the toolbar, tap . This stores the e-Mail in the Outbox. To send all e-Mails in the Outbox at the same time and receive new e-Mails simultaneously, tap Services Send/Receive Mails. A dialog box is displayed in which you enter the password for the e-Mail account. Tap OK. If there is not any connection to the Internet yet, the dialog window Dial-Up Connection is displayed.
6,0SDG 6RIWZDUH 6,0SDG 6RIWZDUH Your SIMpad already includes the full suite of software that you need to function as a mobile manager. You have access to Microsoft Pocket Outlook, Pocket Office and other pre-installed programs to help you calculate expenses and conduct searches. 0LFURVRIW 2IILFH IRU +DQGKHOG 3& Microsoft· Pocket Office is easy to use thanks to the conventional Office environment which you are used to on your PC.
6,0SDG 6RIWZDUH 3RFNHW ([FHO 8VLQJ WKH ,FRQ RQ WKH 'HVNWRS 'RXEOH WDS the icon. 2U 8VLQJ WKH 6WDUW &HQWHU Tap Office Excel in 6WDUW &HQWHU. Microsoft· Pocket Excel offers many functions which are already available to you in the Microsoft Excel spreadsheet program on your desktop computer. These have been optimized for the mobile user. The newest SW version of Pocket Excel offers even more useful and familiar functions.
6,0SDG 6RIWZDUH 3RFNHW 3RZHU3RLQW 8VLQJ WKH ,FRQ RQ WKH 'HVNWRS 'RXEOH WDS the icon. 2U 8VLQJ WKH 6WDUW &HQWHU Tap Office PowerPoint in 6WDUW &HQWHU. With Microsoft· Pocket PowerPoint, you can use you SIMpad to give presentations wherever you are, giving the word "mobility" a whole new meaning. You can create a user-defined presentation by making changes to the master slide and the slide sequence and then displaying it on the SIMpad, for example.
6,0SDG 6RIWZDUH 0LFURVRIW 3RFNHW 2XWORRN IRU +DQGKHOG 3& Microsoft· Pocket Outlook comprises the applications Calendar, Contacts, Tasks and Inbox. The program supports you in managing your daily information including deadlines, e-Mail and personal data. Pocket Outlook data can be synchronized automatically with your PC using ActiveSync technology. Simply set up a connection to your computer (see page 26).
6,0SDG 6RIWZDUH &RQWDFWV 8VLQJ WKH ,FRQ RQ WKH 'HVNWRS 'RXEOH WDS the icon. 2U 8VLQJ WKH 6WDUW &HQWHU Tap Outlook Contacts in 6WDUW &HQWHU. Business and private information regarding your contacts is saved using Contacts. You no longer need to run two parallel lists. Main functions: ● You can use Contacts to search for, add or edit information concerning your contacts. ● Address an e-Mail to a contact just by tapping the screen once. ● You can create business cards on the spot.
6,0SDG 6RIWZDUH ,QN:ULWHU 8VLQJ WKH ,FRQ RQ WKH 6WDUW &HQWHU 'RXEOH WDS the icon. 2U 8VLQJ WKH 6WDUW 0HQX Tap Start Programs Accessories InkWriter. Microsoft InkWriter· is an electronic notebook which you can use to write and draw as you would on normal paper. You can also format or enlarge the drawings and text as required. You can enter data via the input panel or directly using the stylus. More information about InkWriter can be found in the related Online Help.
6,0SDG 6RIWZDUH 3') 9LHZHU In the taskbar, tap Start Programs Application PDF Viewer. A dialog box is displayed in which you can select and open a PDF file. PDF Viewer is a program for viewing the widely-used PDF files. PDF has an OS (operating system)-independent file format for screen presentation or printing out documents. It makes no difference which program these documents were created with. PDF files can be recognized by the ending ".pdf".
6,0SDG 6RIWZDUH ,QVWDOOLQJ $GGLWLRQDO 6RIWZDUH You can add even more functionality to your SIMpad by installing third-party software. A wide variety of commercial software is available for the Windows for Handheld PC 2000 operating system, ranging from business applications to games and entertainment.
6,0SDG 6RIWZDUH 6,0SDG 6RIWZDUH 8SGDWHV Your SIMpad operating system can be upgraded. This replaces the entire operating system as well as installed programs. All existing data will be deleted! Before executing such an update you should therefore back up all your important data on a PC (see page 26). During an update, SIMpad should be connected to AC power or the battery must be fully charged. Now perform a hardreset.
,PSRUWDQW &RQILJXUDWLRQV ,PSRUWDQW &RQILJXUDWLRQV Use the stylus to tap the button Setup in the 6WDUW &HQWHU. The following dialog box appears. 'LDORJ ER[ Setup Selection You now have access to the most important settings. Here you can configure a new e-Mail account or set up a new connection, for example. Select the necessary option and then see the corresponding chapter.
,PSRUWDQW &RQILJXUDWLRQV 5HOHDVH &RQQHFWLRQ This option closes the dial-up connection. A dial-up connection is usually billed according to the duration. To save costs, you should release the connection when you have finished exchanging information via the Internet or retrieving or sending e-Mails. An Internet connection is established whenever you can see the icon on the system area of the taskbar (see page 34). To disconnect from Internet, GRXEOH WDS the icon.
,PSRUWDQW &RQILJXUDWLRQV 6HWWLQJ 8S &RQQHFWLRQV Connections to remote computers are managed under Remote Network. These can be connections to your Internet service provider, to specific online services or remote connections to other PCs. Before you can establish a connection, you must first create and activate it. Two connections are pre-defined on your SIMpad (I-Gate and HomeRF). You can readily activate these connections (see page 73).
,PSRUWDQW &RQILJXUDWLRQV 6HOHFWLQJ WKH &RQQHFWLRQ 7\SH Double tap the Make New Connection icon in the Remote Network window. The dialog box for creating a new connection is displayed. 'LDORJ ER[ Make New Connection r 3DUW Assign a name of your choice to the connection. A dial-up connection is a switched connection (regardless of whether it is analog, ISDN or via GSM). A direct connection is a dedicated line, e. g. in a local network, which is permanently connected to the Internet via routers.
,PSRUWDQW &RQILJXUDWLRQV 6HOHFWLQJ WKH 'HYLFH WR EH 8VHG 'LDORJ ER[ Make New Connection r 3DUW In the second part of the dialog box you select the device that you want to use. )RU 'LDO 8S &RQQHFWLRQ Select the relevant modem from the list. The table below shows which modem you should use for which connection type.
,PSRUWDQW &RQILJXUDWLRQV 6DYLQJ DQG 7HVWLQJ 1HZ &RQQHFWLRQ To complete, tap Finish. The new connection is created. An icon with the name of the created connection is now visible in the Remote Networking window. If you are accessing the Internet using SIMpad and the new PC Card connection for the first time, please see Chapter "Using a PC Card to Access the Internet", page 18. To establish the connection, double WDS the icon.
,PSRUWDQW &RQILJXUDWLRQV &RQWURO 3DQHO The Control Panel window is displayed. You can also open the window via Start Settings Control Panel. &RQWURO 3DQHO The control panel allows basic settings to be made for Windows for Handheld PC 2000 and the SIMpad. The window shows various icons with explanatory labels. If you double tap DQ LFRQ, a dialog box for corresponding settings opens. To VDYH settings, exit the dialog box . If you wish to FDQFHO without saving, exit with .
,PSRUWDQW &RQILJXUDWLRQV ,FRQV LQ WKH &RQWURO 3DQHO 'LVSOD\ For example, select colors for the desktop and title bars of dialog boxes. 2ZQHU Enter device name and PC connection. &RPPXQLFDWLRQV Set the data transfer to the PC. 'HYLFH 6HWWLQJ Device-specific setting options (see page 78). The device settings can also be opened using the icon in the system area of the taskbar. ,QWHUQHW 2SWLRQV Set the start page, search page and other options (see page 53).
,PSRUWDQW &RQILJXUDWLRQV 3RZHU Check the battery and display the capacity. 6\VWHP Technical data for hardware and operating system. .H\ERDUG Set keyboard properties. 'LDOLQJ Set general dial-up parameters for connections over the telephone network. :RUOG &ORFN Setting up the actual time. 5HFDOLEUDWLQJ WKH 6FUHHQ Recalibration is needed if elements of the touch-sensitive screen no longer or only react by tapping at another position.
,PSRUWDQW &RQILJXUDWLRQV 6RXQGV IRU (YHQWV For Windows for Handheld PC 2000, events can be assigned sounds. The “Click“ sound when you tap the screen is one such sound. To set a sound: 8VLQJ WKH ,FRQ LQ WKH &RQWURO 3DQHO Double WDS the icon. The dialog box for volume and sound properties is displayed. 'LDORJ ER[ Volume & Sounds Properties The Volume tab allows you to set the important events for which you want sound support.
,PSRUWDQW &RQILJXUDWLRQV 5$0 0HPRU\ When you work with SIMpad, the operating system and standard programs are decompressed and copied into RAM. 64 MB RAM are available for this, 2 MB of which are required by the operating system. The remaining 62 MB are shared between the 6WRUDJH 0HPRU\ and 3UR JUDP 0HPRU\. The storage memory stores current data (text, images, parameters etc.) which is created by the programs being used at the time.
,PSRUWDQW &RQILJXUDWLRQV 2WKHU VHWWLQJV 6DYLQJ 6HWWLQJV DQG $GGUHVVHV You can save important settings and data in flash memory, e. g. the address book of the e-Mail program, to ensure lasting storage. This is important when you are not using the device for several days. In the taskbar, tap Start Programs Help Save Settings to save all the important current settings.
,PSRUWDQW &RQILJXUDWLRQV 6HWWLQJ WKH /RXGVSHDNHU 9ROXPH DQG 6FUHHQ %ULJKWQHVV Using a setup dialog which is not default for Windows for Handheld PC 2000, check and change the important SIMpad settings. In Opened Applications in the taskbar, double tap the icon . The dialog box for device settings is displayed. 'LDORJ ER[ Device Settings 7DE Settings Use the left hand slider control to set the screen brightness.
,PSRUWDQW &RQILJXUDWLRQV &UHDWLQJ D 1HZ H 0DLO $FFRXQW To use another e-Mail address you must create an e-Mail account for it in the Inbox. To do this, start the Inbox (see page 55). In the Inbox menu, tap Services and in the drop-down menu which is subsequently displayed, tap Options. The Options dialog box is displayed. 'LDORJ ER[ Options Tap Add.... The Service Name dialog box is displayed. 'LDORJ ER[ Service Name Tap the Service type list and select the type for incoming e-Mails.
,PSRUWDQW &RQILJXUDWLRQV 'LDORJ ER[ Service Definition 1/3 The following data must be supplied: ● for POP3 Host or IMAP4 Host, the Internet address of the servers for incoming e-Mails ● for User ID, the user name for the e-Mail account ● for Password, the secret access password for the e-Mail account (for security reasons this is not displayed as it is entered) ● for SMTP Host, the server Internet address for outgoing e-Mails ● for Return address, your own e-Mail address.
,PSRUWDQW &RQILJXUDWLRQV 'LDORJ ER[ Inbox Preferences 3/3 You can set the options described in the dialog as required. By tapping the small box before the relevant option you switch the option on or off. Tap Finish and OK in the dialog box which is then still displayed. This creates the e-Mail account. This account is displayed in the Inbox window on the left in the list of e-Mail accounts.
&RQQHFWLQJ ZLWK RWKHU GHYLFHV &RQQHFWLQJ ZLWK RWKHU GHYLFHV On the back of the device you will find the various interfaces which give SIMpad its communication capabilities. Infrared interface (diode) Slot for smartcard ,QWHUIDFHV IRU LQIUDUHG DQG 6PDUWFDUG FRQQHFWLRQV &RQQHFWLQJ WR \RXU 3ULQWHU SIMpad has an infrared interface to allow it to communicate with a printer. The printer used must also have this interface.
6XEVHTXHQW +RPH5) &RQILJXUDWLRQ 6XEVHTXHQW +RPH5) &RQILJXUDWLRQ The HomeRF can also be configured at a later date. In the start menu, tap Start Programs Communication HomeRF Configuration. If you have already defined the password for the HRF Gateway, proceed as described in Chapter "Configuring HomeRF Gateway", page 87. 6HWWLQJ WKH 3DVVZRUG IRU WKH +RPH5) *DWHZD\ If you have not yet configured a password for the cordless HomeRF Gateway, the following dialog box appears.
6XEVHTXHQW +RPH5) &RQILJXUDWLRQ &RQQHFWLQJ 6,0SDG WR +RPH5) *DWHZD\ If you have not yet configured a password for the cordless HomeRF Gateway, the following dialog box appears. 'LDORJ ER[ Check Network Connection Enter the password for the cordless network. This is the password you set when you connected the first component to the HomeRF Gateway. Then tap OK. If you do not know the password or have entered it incorrectly, see Chapter "Reading out the Network Password" on page 87.
6XEVHTXHQW +RPH5) &RQILJXUDWLRQ 5HDGLQJ RXW WKH 1HWZRUN 3DVVZRUG If you do not know the network password or you have entered it incorrectly, the following dialog box appears. 'LDORJ ER[ Read out Network Password -> Teach Follow the instructions on the screen and tap OK. This dialog box closes after approx. 60 seconds. SIMpad is now connected to the cordless network. Now proceed with the HomeRF Gateway configuration. How you do this is explained in Chapter "Configuring HomeRF Gateway" on page 87.
6XEVHTXHQW +RPH5) &RQILJXUDWLRQ 6HWWLQJ XS &RQQHFWLRQ DQG 5HOHDVH Tap Set. The following dialog box appears. 'LDORJ ER[ Set HRF Gateway 7DE Internet Connection In this tab, you can set how an Internet connection should be established (connected) or released (disconnected) via the HomeRF. $XWRPDWLF &RQQHFWLRQ If you activate automatic connection setup, an Internet connection is setup automatically as soon as you start Internet Explorer or the Inbox.
6XEVHTXHQW +RPH5) &RQILJXUDWLRQ (QWHULQJ ,QWHUQHW $FFHVV 'DWD The following dialog box appears. 'LDORJ ER[ Set HRF Gateway 7DE Internet Access Data Enter the User Name and Password for Internet access. You will have received this information from your provider. Tap OK. The following dialog box appears. Follow the instructions on the screen. 'LDORJ ER[ Restart.
6XEVHTXHQW +RPH5) &RQILJXUDWLRQ 'LDORJ ER[ HRF Gateway Tap OK. 6HWWLQJ XS DQ ,QWHUQHW &RQQHFWLRQ The HRF Gateway Configuration dialog box appears. 'LDORJ ER[ HRF Gateway Configuration Close the dialog box. To surf the Internet or exchange e-Mails via the cordless HomeRF Gateway you have to start Internet Explorer. The default homepage opens and the Internet connection is set up.
6XEVHTXHQW +RPH5) &RQILJXUDWLRQ &KDQJLQJ WKH +RPH5) *DWHZD\ 1HWZRUN 3DVVZRUG If you want to change the password for the cordless HomeRF Gateway, tap Start Programs Communication HomeRF Configuration. Then tap the option Set and the tab Network Password. 'LDORJ ER[ Set HRF Gateway 7DE Internet Connection Tap Change Network Password. 'LDORJ ER[ Change Network Password Enter the new password in this dialog box. Enter the password again to ensure that you have entered it correctly. Tap Next.
$SSHQGL[ $SSHQGL[ 7URXEOHVKRRWLQJ You can solve the following faults yourself: )DXOW 5HPHG\ SIMpad does not switch on or the screen flickers. Connect SIMpad to AC power (empty battery?) and press the on/off button (see page 9). Check the AC/DC adapter connections (both ends plugged in?). Check other electrical equipment on the same circuit (power failure? blown fuse?). SIMpad no longer reacts (software is “stuck“), random displays on the screen. Restart SIMpad by pressing Reset.
$SSHQGL[ Internet connection Ensure that the cell phone you are using has a via cell phone cannot built-in modem. be established. Ensure that the Infrared function is switched on on the cell phone (can be enabled/disabled in the cell phone’s settings). Ensure that a serial cable connection or an infrared connection exists between SIMpad and the cell phone (see page 21). With infrared connections make sure that SIMpad and the mobile are not more than 0.
$SSHQGL[ Taskbar can no long- The taskbar Auto hide function is activated and the screen is not properly calibrated. In this case, er be called up. switch on the input panel, tap the Ctrl key and then press the left control key. Elements on the The screen must be recalibrated (see page 76). screen do not react or only react when you tap somewhere else on the screen.
$SSHQGL[ 0DLQWHQDQFH DQG &DUH In case the built-in battery capacity is already weakening, the battery has to be changed. Let your dealer do this for you. Do not attempt to open the device yourself! 8VDJH DQG &OHDQLQJ ,QVWUXFWLRQV Wipe the FDVH with a damp cloth or with an antistatic cloth. Never use a dry cloth! There is a danger that this will induce a static charge! Wipe the VFUHHQ with a lint-free soft cloth. To remove finger marks and contamination from the screen dip the cloth in glass cleaner.
$SSHQGL[ :DUUDQW\ :DUUDQW\ IRU 86$ /LPLWHG 2QH
$SSHQGL[ 'LVFODLPHU 5HJDUGLQJ /LQNV When accessing the Internet, you will be directed to Internet web sites . These sites may send cookies to that are beyond the control of Siemens· your web browser, may solicit personal information, may collect data from your SIMpad, and may contain information that is inappropriate or offensive.
$SSHQGL[ :DUUDQW\ IRU RWKHU FRXQWULHV From the date of purchase and within the warranty period Siemens· AG will rectify free-of-charge any deficiencies which are due to material or production faults. Siemens· AG will honor the warranty by either repairing or replacing the defective part or device. From 01.01.2002 is valid an warranty period of 24 Months for the countries listed on page 94 (until 31.12.2001, 12 Months). Excluded from the warranty is damage caused by misuse (e.g. broken screen, liquids etc.
$SSHQGL[ 86$ )HGHUDO &RPPXQLFDWLRQV &RPPLVVLRQ )&& &ODVV % &RPSOLDQFH 6WDWHPHQW IRU 6,0SDG 6/ The following statement applies to the products covered in this manual, unless otherwise specified herein. The statement for other products will appear in the accompanying documentation.
$SSHQGL[ )&& 'HFODUDWLRQ RI &RQIRUPLW\ IRU 6,0SDG 6/ This device complies with Part 15 of the FCC Rules. Operation is subject to the following two conditions: (1) this device may not cause harmful interference, and (2) this device must accept any interference received, including interference that may cause undesired operation. Product name Mobile Personal Computer Trade name SIMpad SL4 Model number S842 Contact person Oliver Zechlin Phone no.
,QGH[ $ Accessories ........................................... 8 ActiveSync ........................................... 26 Additional Connection Settings............ 68 Approval............................................... 95 Archive Folder (Inbox) .......................... 56 Attaching Files to E-Mails .................... 58 Attaching Files to e-Mails .................... 58 Authenticated Data Connection........... 84 % Backup function ................................... 26 Battery ..................
,QGH[ MS Reader........................................... 64 My Computer ...................................... 33 My Documents .................................... 33 1 Navigating in Web Pages..................... 50 Navigation Aids .................................... 51 2 Online Help .......................................... 47 Outbox................................................. 56 Outlook mit PC synchronisieren .......... 26 Owner Properties ..........................
(& 'HFODUDWLRQ RI &RQIRUPLW\ 1R 6 + % 0DQXIDFWXUHU 6LHPHQV 6ZLW]HUODQG /WG $GGUHVV 3 2 %R[ &+ =XULFK 3URGXFW GHVFULSWLRQ 6,0SDG 6/ (QJOLVK 0RGHO GHVLJQDWLRQ 6 + % EDVHG RQ 6 6HULDO 1XPEHU 7KH PRGHO GHVLJQDWLRQ 6 + % PD\ EH IROORZHG E\ DGGLWLRQDO OHWWHUV RU QXPEHUV ZKLFK LQGLFDWH VPDOO GLIIHUHQFHV EHWZHHQ GHYLFHV 7KH SURGXFW GHVFULEHG DERYH LQ WKH IRUP DV GHOLYHUHG LV LQ FRQIRUPLW\ ZLWK WKH SURYLVLRQV RI WKH IROORZLQJ (XURSHDQ 'LUHFWLYH (:* &
Issued by Information and Communication mobile Haidenauplatz 1 D-81667 Munich © Siemens AG 2001 All rights reserved. Subject to availability. Right of modification reserved. Printed in Switzerland (09/2001). Siemens Aktiengesellschaft http://www.my-siemens.