
User's Manual

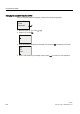


Programming LOGO!
3.8 Configuring additional functions for LOGO! (0BA7 only)
LOGO!
124 Manual, 04/2011, A5E03556174-01
4. Confirm "②": Press OK
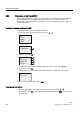
LOGO! requires a password entry if one is assigned. If there is no password assigned on
the LOGO!, LOGO! directly displays the view in Step 5.
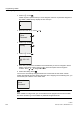
3DVVZRUG
5. Move the cursor to
③": Press or
6ODYH
3DVVZRUG
!1RUPDO
6. Confirm "
③": Press OK
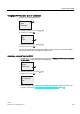
!&RQILJ
7. Confirm "
④": Press OK
0DVWHU,3
8. In this view, you enter the IP address of the LOGO! that you want to configure to be the
master of your slave LOGO!. Press
or to move the square cursor through the
numbers. Press
or to change the number.
9. Confirm the setting: Press OK
You have now successfully changed LOGO! from normal mode to slave mode. LOGO!
restarts automatically and then displays the main menu. Stepping into the following view, you
can see that your LOGO! is now in slave mode:
!1RUPDO
6ODYH
3DVVZRUG
Note
When LOGO! is in slave mode, you can not edit the circuit program from the slave LOGO!.
The menu command
② is not available in parameter assignment mode.