
User's Manual


LOGO! installation and wiring
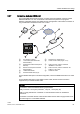
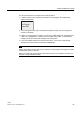
2.4 Putting into operation
LOGO!
64 Manual, 04/2011, A5E03556174-01
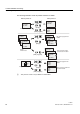
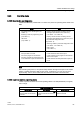
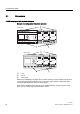
The following illustration shows all possible reactions of LOGO!:
0R
0R
&QW
3DU
%
4
,
,
,
0R
%
4
ZLWKVWRUHGSURJUDPIURP
/2*2
ZLWKDSURJUDPFRSLHG
IURPWKHFDUGLQ/2*2
ZLWKVWRUHGSURJUDPIURP
/2*2
ZLWKDSURJUDPFRSLHGIURP
WKHFDUGLQ/2*2
%HIRUHSRZHURII
$IWHUSRZHURQ
RU
HPSW\
ZLWKSURJUDP
RU
HPSW\
ZLWKSURJUDP
RU
HPSW\
ZLWKSURJUDP
1R3URJUDPLQPHPRU\
/2*2
LQ581PRGH
3URJUDPLQPHPRU\
/2*2LQ581PRGH
3UHVV(6&
1R3URJUDP
3UHVV(6&
1R3URJUDP
6WDUW
6HWXS
&DUG
!3URJUDP
6WDUW
6HWXS
&DUG
!3URJUDP
3UJ1DPH
6HW
6HW3DUDP
!6WRS
3UJ1DPH
6HW
6HW3DUDP
!6WRS
6WDUW
6HWXS
&DUG
!3URJUDP
① This power-on screen is only available on LOGO! 0BA7.