
Service manual


Chapter 5 Replacing Field-Replaceable Units 5-17
5.5.2.2 Installing the Hard Drive in a Dual-Drive Assembly
1. Unpack the replacement hard drive.
2. Install the replacement drive in the drive bracket.
■ To replace the lower drive (drive 0):
a. Install the replacement drive in the lower drive slot in the drive bracket.
b. Push the drive firmly toward the front of the drive bracket until the hard drive
is completely seated.
c. Plug the DRIVE 0 connector on the drive cable into the data/power connector
on the lower drive.
Make sure the connector is correctly oriented before plugging it into the
data/power connector on the drive.
■ To replace the upper drive (drive 1):
a. Install the replacement drive in the upper drive slot in the drive bracket.
b. Push the drive firmly toward the front of the drive bracket until the hard drive
is completely seated.
c. Plug the DRIVE 1 connector on the drive cable into the data/power connector
on the upper drive.
Ensure that the connector is correctly oriented before plugging it into the
data/power connector on the drive.
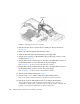
3. Slide the drive assembly into the chassis until it mates with the front of the
chassis (
FIGURE 5-13).