
User guide

29
en
Please keep this instruction manual in a safe place.
When passing the vacuum cleaner on to another
person, please also hand over this instruction manual.
Fold out the picture pages.
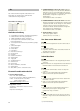
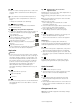
Your vacuum cleaner
1 Adjustable floor tool with locking collar*
2 Hard-floor brush with locking collar*
3 TURBO-UNIVERSAL® brush for floors*
4 Telescopic tube with adjusting sleeve
(and locking collar)*
5 Telescopic tube with sliding switch
(and locking collar)*
6 Handle
7 Flexible hose*
8 Upholstery nozzle*
9 Crevice nozzle*
10 Dust bag change indicator*
11 On/off button
12 Parking aid
13 Power cord
14 Exhaust grille
15 Carrying handle
16 Dust bag compartment lid
17 Accessories compartment
18 Dust bag
19 Motor protection filter, washable
20 Exhaust filter*
21 Storage aid (on underside of appliance)
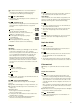
Replacement parts and special
accessories
A Replacement filter pack
Filter TYPE GXXL (VZ41FGXXL)
For best performance GXXLplus (VZ41GXXLP)
Contents: 4 filter bags with seal
1 micro-hygiene filter
http://www.dust-bag-siemens.com
B Hepa filter VZ154HF
Additional, washable filter for cleaner exhaust air.
Recommended for allergy sufferers.
C TURBO-UNIVERSAL® brush for upholstery VZ46001
All-in-one brushing and vacuuming of upholstered
furniture, mattresses, car seats, etc. Especially sui-
table for picking up pet hair. The brush roller is dri-
ven by the suction air flow of the vacuum cleaner.
No separate electrical connection is needed.
D TURBO-UNIVERSAL® brush for floors VZ102TBB
All-in-one brushing and vacuuming of short-pile rugs
and carpets, and for all floor coverings. Especially
suitable for picking up pet hair. The brush roller is
driven by the air flow through the vacuum cleaner.
No separate electrical connection is needed.
E Hard-floor tool VZ123HD
For vacuuming hard floors
(parquet, tiles, terracotta, etc.)
Before using for the first time
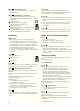
Figure
●Push the handle onto the flexible hose and lock it in
place.
Figure
● Open the accessories compartment.
● Insert the crevice nozzle and upholstery nozzle in the
accessories compartment in the appliance lid.
● Close the accessories compartment.
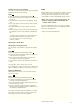
Initial use
Figure
a)Push the flexible hose adapter into the air intake
opening in the vacuum cleaner lid until it locks into
place.
b)To remove the flexible hose, press the two catches
together and pull out the hose.
Figure
● Push the handle into the telescopic tube until it
locks in place.
● To release the connection, press the locking collar
and pull out the telescopic tube.
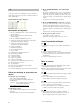
Figure
● Push the telescopic tube into the connecting piece
on the floor tool until it locks in place.
● To release the connection, press the locking collar
and pull out the telescopic tube.
Figure
● Move the sliding sleeve in the direction of the arrow
to release the telescopic tube and adjust it to the
length required.
Figure
● Holding the power cord by the plug, pull out to the
required length and insert the plug into the mains
socket.
!
After continuous use of more than 30 minutes,
completely disconnect the power cord from the
power supply.
=> Risk of overheating and subsequent damage.
1*
2
3
4*
5*
6*
7
*
depending on model