
Installation Guide


9
Nail Penetration and Spacing
Recommended penetration into
studs or blocking, or into a combi-
nation of wood sheathing and these
members, is 1¹⁄₂". Penetration is
1¹⁄₄" with ring shank nails.
Vertical siding, when applied over
wood-based sheathing, should be
nailed to horizontal blocking or other
wood framing members not exceed-
ing 36" on center when face-nailed,
or 32" on center when blind-nailed.
Vertical siding, when installed
without sheathing, should be nailed
to wood framing or blocking mem-
bers at 24" on center. Some building
codes require 24" on center with or
without sheathing; check your local
code to verify requirements. Cut
bevel (scarf) joints for vertical
installations.
Horizontal and diagonal siding
should be nailed to studs at 24" on
center maximum when applied over
wood-based, solid sheathing and
16" on center maximum when
applied without sheathing.
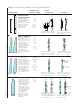
The siding pattern will determine
the exact nail size, placement and
number of nails required. (Refer to
Figure C.) Nails are placed to allow
the wood to move, that is to shrink
and swell, as well as to adequately
hold the siding in place.
As a general rule, each piece of
siding is nailed independently of its
neighboring pieces. Do not nail
through two overlapping pieces of
siding with the same nail as this
practice will restrict the natural
movement of the siding and may
cause unnecessary problems. Nail
joints into the studs or blocking
members.
Drive nails carefully. Hand nailing
is preferred over pneumatic nailing
because there is less control of
placement and driving force with
pneumatic nailers. Nails should be
snug, but not overdriven. Nails that
are overdriven can distort the wood
and may cause excessive splitting.
Overdriven nails also provide an
avenue for moisture to collect and
move through the piece. Predrilling
near the ends will help reduce any
splitting that can occur with thinner
patterns.
For additional information
regarding pneumatic nailing,
contact the International Staple,
Nail and Tool Association at
www.isanta.org
Finishing
Natural wood siding can be
finished with a variety of products
to achieve just about any look
desired. Finishes not only enhance
the appearance of the wood, but
also protect the siding against the
detrimental effects of water, mildew
and ultraviolet light.
Among the wide range of exterior
finishing products available, most
finishes fall into four general
categories: clear water repellents,
bleaching oils, stains and paints.
When choosing a particular finish,
consider the desired appearance,
preparation and maintenance
requirements of the finish, location
of the structure and current condi-
tion of the siding.
Some people prefer to leave
natural wood siding unfinished, in
hopes for a weathered appearance.
This is not recommended. Siding
without a finish can weather
unevenly and is prone to surface
mold, ultraviolet degradation and
moisture-related problems such as
cupping and splitting. With the cor-
rect type of finish, a natural weath-
ered look can be achieved while
providing protection for the siding
to promote optimum performance
over the years.
Clear Water Repellents
Clear water repellents are one
way to achieve a natural look.
These products do not add color to
the siding and the natural colors
and grain patterns can be seen
through the finish. These repellents
are often used on cedar siding
when a weathered, silvery-grey
color is desired.
Clear water repellents will not
maintain the brand new look of sid-
ing because they do not prevent
the sun’s ultraviolet rays from fading
the wood. Instead, water repellents
allow the wood to fade naturally
according to the amount of expo-
sure the wood receives. However,
some water repellents do contain
ultraviolet inhibitors or UV blockers
that help minimize the effects of the
sun.
Always choose a water repellent
that is formulated for wood and
contains a mildewcide to help pre-
vent discoloration caused by
mildew.
Water repellents are sometimes
formulated with a preservative,
such as zinc naphthanate, that
offers additional protection against
decay. These are particularly useful
in areas where the siding is con-
stantly subjected to high moisture.
Some copper-based preserva-
tives, such as copper naphthanate,
may not be desirable because they
have a green tint.
When paint is to be the final
finish, paintable clear water-
repellent preservatives can also be
applied prior to the prime coat to
increase the service life of the top
coats. Clear water repellents should
not be used under a bleaching oil
finish.
Clear water repellents can be
expected to last from six months to
two years, depending on the sur-
face texture of the siding and the
location and exposure of the
structure.
Bleaching Oils and
Bleaching Stains
Bleaching oils and bleaching
stains, sometimes called
weathering stains, are another way
to achieve a grey weathered look,
but the effect happens faster and
the protection offered is longer-lived
than with a clear water repellent.
Bleaching products are similar to
semi-transparent stains but contain
an added ingredient which causes
the wood to bleach to a silver color
within approximately six to 12
Table 3: NAIL LENGTHS
12d 3 ¹⁄₄"
10d 3"
9d 2 ³⁄₄"
8d 2 ¹⁄₂"
7d 2 ¹⁄₄"
6d 2"
5d 1 ³⁄₄"
4d 1 ¹⁄₂"
3d 1 ¹⁄₄"
2d 1"