
Specifications


Sierra Pacific Innovations Corp 1.3.2
M1-D User’s Guide 12
Mounting Steps
1. Find a suitable flat location that is free from obstruction
on all sides. You will want this area to be parallel with the
ground so as not to skew the image as you pan. Make
sure that the area is firm and not flexible since flexing of
the mounting surface will cause jitter in the video image
during use.
2. If using the magnetic mounts carefully tilt the M1-D into
position. DO NOT PINCH YOUR FINGERS. The
magnets will grab with some force.
3. If using the mounting holes first mount the M1-D to your
mounting fixture then mount the fixture to your surface.
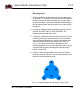
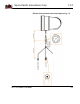
We recommend fabricating a “spider” type bracket that
extends out beyond the edge of the M1-D (see Fig.
1.4.1). If you have access to the underside of your
mounting platform you can mark and drill holes to mount
your bolts through the mounting plate and up into the
bottom of the M1-D.
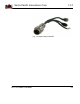
4. Route the main system cable into the vehicle or other
protected area. Be careful to not put undue strain on the
cable or bend the cable severely.
Fig. 1.4.1 Sample spider mount design. Not to scale.