
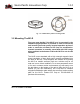
Specifications
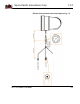


Sierra Pacific Innovations Corp 1.3.2
M1-D User’s Guide 18
visual video and the thermal imaging video being output on the
M1-D video output line. To switch between thermal imaging and
visual video use the FOCUS NEAR command (typically labelled
[NEAR] on keyboard controllers). Each time you push the button
it sill switch between visual and thermal video.
Trigger The Laser Pointer
The M1-D has a visible light red dot laser pointer integrated into
the system. WARNING LASER RADIATION EMITTED FROM
THE FRONT OF THE SYSTEM. DO NOT FIRE LASER WHEN
ANY PERSON IS STANDING IN FRONT OF THE SYSTEM.
DO NOT LOOK INTO LASER APERATURE. DO NOT FIRE
LASER AT ANY PERSONS FACE. The laser is triggered using
the FOCUS FAR command (typically labelled [FAR] on a
keyboard controller). The laser will fire only as long as you send
the command (by computer or by holding the [FAR] button).
While the laser is firing the word LASER will appear on screen
in the top right corner. The cross hair symbology onscreen can
be bore sighted to the laser for your individual application.
Please see Advanced Symbology Menu Settings for more
information.
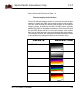
Thermal Imaging Sensor Zoom
The M1-D has an electronic zoom on the thermal imaging video
channel. You can cycle through the various zoom levels via the
IRIS OPEN command (typically labelled [OPEN] on keyboard
controllers). Each time you push the [OPEN] button the system
cycles to the next zoom level. When you reach maximum
electronic zoom the next push of the [OPEN] button returns to
normal 1x no zoom imaging. The amount of electronic zoom is
dictated by the thermal sensor inside the M1-D. The following
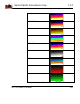
outlines part number and corresponding sensor / zoom levels.
PART #
SENSOR
ZOOM
M1-D-XX-16
160X120
2X
M1-D-XX-32
320X240
2X, 4X
M1-D-XX-64
640X480
2X, 4X, 8X